Spring Boot简介
- Spring boot是Spring家族中的一个全新的框架,它用来简化Spring应用程序的创建和开发过程,也可以说Spring boot能简化我们之前采用SpringMVC+Spring+Mybatis框架进行开发的过程。
- 在以往我们采用SpringMVC+Spring+Mybatis框架进行开发的时候,搭建和整合三大框架,我们需要做很好工作,比如配置web.xml,配置Spring,配置Mybatis,并将它们整合在一起等,而Spring boot框架对此开发过程进行了革命性的颠覆,抛弃了繁琐的xml配置过程,采用大量的默认配置简化我们的开发过程。
- 所以采用Spring boot可以非常容易和快速的创建基于Spring框架的应用程序,它让编码变简单了,配置变简单了,部署变简单了,监控也变简单了。
- 正因为Spring boot它化繁为简,让开发变得极其简单和快捷,所以在业界备受关注。Spring boot在国内的关注趋势也日渐超过Spring。
- 能够快速创建基于Spring的应用程序。(简化配置)
- 能够直接使用java的main方法启动内嵌的Tomcat,Jetty服务器运行Spring boot程序,不需要部署war包文件。
- 提供约定的starter POM来简化来简化Maven配置,让Maven配置变得简单。
- 根据项目的maven依赖配置,Spring boot自动配置Spring,SpringMVC等其它开源框架。
.提供程序的健康检查等功能。(检查内部的运行状态等)
基本可以完全不使用xml配置文件,采用注解配置。(或者默认约定的配置,代码中已经实现)
微服务
微服务:架构风格
一个应用应该是一组小型服务;可以通过HTTP的方式进行互通;
每一个功能元素最终都是一个可独立替换和独立升级的软件单元;
环境准备
环境约束
-jdk1.8
-maven 3.x
-springboot1.5.9RELEASE
MAVEN设置
1 | <profile> |
Spring Boot HelloWorld
浏览器发送hello请求,服务器接受请求并处理,响应HelloWorld字符串;
创建一个maven工程(jar)
导入springBoot 依赖
<parent>
<groupId>org.springframework.boot</groupId>
<artifactId>spring-boot-starter-parent</artifactId>
<version>1.5.9.RELEASE</version>
<relativePath/> <!-- lookup parent from repository -->
</parent>
<dependencies>
<dependency>
    <groupId>org.springframework.boot</groupId>
    <artifactId>spring-boot-starter-web</artifactId>
</dependency>
<dependency>
    <groupId>org.springframework.boot</groupId>
    <artifactId>spring-boot-starter-test</artifactId>
    <scope>test</scope>
    <exclusions>
    <exclusion>
    <groupId>org.junit.vintage</groupId>
    <artifactId>junit-vintage-engine</artifactId>
    </exclusion>
    </exclusions>
</dependency>
<dependency>
    <groupId>org.springframework.boot</groupId>
    <artifactId>spring-boot-starter-logging</artifactId>
</dependency>
</dependencies>
编写主程序,启动Spring Boot应用
/**
 * @Date2020/5/23 12:53
 * SpringBootApplication来标注一个主程序
 **/
@SpringBootApplication
public class HelloWorldMainApplication {
    public static void main(String[] args) {
        //spring应用启动起来
        SpringApplication.run(HelloWorldMainApplication.class,args);
    }
}
编写相关的Controller、Service
运行主程序测试
简化部署
<!--可以将应用打包成一个可执行的jar宝-->
<build>
    <plugins>
        <plugin>
        <groupId>org.springframework.boot</groupId>
        <artifactId>spring-boot-maven-plugin</artifactId>
        </plugin>
    </plugins>
</build>
将这个应用打成jar包,直接用java -jar的命令进行执行;
终止运行
netstat -aon|findstr "8080"
taskkill /f /pid 8976  终止jar命令运行的程序
Hello World探究
pom文件
父文件
<parent>
    <groupId>org.springframework.boot</groupId>
    <artifactId>spring-boot-starter-parent</artifactId>
    <version>1.5.9.RELEASE</version>
    <relativePath/> <!-- lookup parent from repository -->
</parent>
Spring Boot的版本仲裁中心
以后我们导入依赖默认是不需要写版本号的(没有在dependencies里面管理的依赖自然需要声明版本号)
导入的依赖
<dependency>
    <groupId>org.springframework.boot</groupId>
    <artifactId>spring-boot-starter-web</artifactId>
</dependency>
spring-boot-starter-web:
spring-boot-starter:spring-boot场景启动器;帮我们导入了web模块正常运行所依赖的组件
Spring Boot将所有功能场景都抽取出来,做成一个个starters(启动器),只需要在项目里引入这些starter相关场景的所有依赖都会导入进来。要用什么功能就导入什么场景的启动器
主程序类
/**
 * @Date2020/5/23 12:53
 * SpringBootApplication来标注一个主程序,说明这是一个Spring Boot应用
 **/
@SpringBootApplication
public class HelloWorldMainApplication {

    private static Logger log= LoggerFactory.getLogger(HelloWorldMainApplication.class);

    public static void main(String[] args) {
        log.info("HelloWorldMainApplication is success!");
        //spring应用启动起来
        SpringApplication.run(HelloWorldMainApplication.class,args);
    }
}
@SpringBootApplication Spring Boot应用标注在某个类上说明这个类是SpringBoot的主配置类,SpringBoot就应该运行这个类的main方法来启动SpringBoot应用。
@Target({ElementType.TYPE})
@Retention(RetentionPolicy.RUNTIME)
@Documented
@Inherited
@SpringBootConfiguration
@EnableAutoConfiguration
@ComponentScan(
    excludeFilters = {@Filter(
    type = FilterType.CUSTOM,
    classes = {TypeExcludeFilter.class}
    ), @Filter(
        type = FilterType.CUSTOM,
        classes = {AutoConfigurationExcludeFilter.class}
    )}
)
@SpringBootConfiguration:SpringBoot的配置类;
标注在某个类上,标识这是一个SpringBoot的配置类;
@Configuration:配置类上来标注这个注解:
配置类—配置文件;配置类也是容器中的一个组件;@Componet
@EnableAutoConfiguration:开启自动配置功能
以前需要配置的东西,SpringBoot帮我们自动配置;@EnableAutoConfiguration告诉SpringBoot开启自动配置功能;这样自动配置才能生效。
@AutoConfigurationPackage
@Import({EnableAutoConfigurationImportSelector.class})
@AutoConfigurationPackage:自动配置包
@Import({Registrar.class})
Spring的底层注解@Import,给容器中导入一个组件;导入的组件由Registrar.class
将主配置类(@SpringBootApplication标注的类)的所在包及下面所有子包里面的所有组件扫描到
Spring容器;
@Import({EnableAutoConfigurationImportSelector.class})
给容器中导入组件
EnableAutoConfigurationImportSelector:导入那些组件的选择器;
将所有需要导入的组件以全类名的方式返回;
会给容器中导入非常多的自动配置类(xxxAutoConfiguration);就是给容器中导入这个场景需要的所
有组件,并配置好这些组件;免去了我们手动编写配置注入功能组件的工作。
SpringFactoriesLoader.loadFactoryNames(
  getSpringFactoriesLoaderFactoryClass(), getBeanClassLoader());
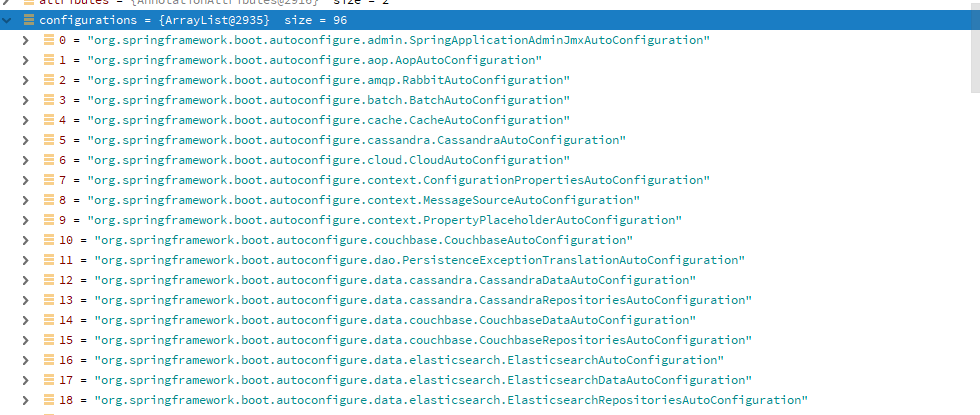
Spring Boot在启动的时候从类路径下的”META-INF/spring.factories”中获取EnableAutoConfiguration指定的值,将这些值作为自动配置类导入到容器中,自动配置类就生效,帮我们进行自动配置工作。
J2EE的整体整合解决方案和自动配置都在m2\repository\org\springframework\boot\spring-boot-autoconfigure\1.5.9.RELEASE\spring-boot-autoconfigure-1.5.9.RELEASE.jar
使用Spring Initializer快速创建Spring Boot项目
IDE都支持使用Spring的项目创建向导快速创建一个Spring Boot项目;
选择我们需要的模块,向导会联网进行项目的创建;
默认生成的Spring Boot项目
主程序已经生成好了,只需要实现我们自己的逻辑
resources文件夹的目录结构
static:保存所有的js css images
templates:保存所有的页面模板;(Spring Boot默认jar包使用嵌入式的Tomcat,默认不支持JSP页面);可以使用模板引擎(freemarker、thymeleaf);
application.properties:Spring Boot 的配置文件,可以修改一些默认设置;
配置文件
SpringBoot使用一个全局的配置文件,配置文件名是固定的;
application.properties
application.yml
配置文件的作用:修改SpringBoot自动配置的默认值
SpringBoot在底层都给我们自动配置好;
YAML是一个标记语言:以前的配置大都使用xxx.xml文件,而yaml以数据为中心,比json,xml更适合作配置文件
YAML语法
k: v :标识一对键值对(空格必须有)
以空格的缩进来控制层级关系,只要左对齐的一列数据,都是一个层级的,属性和值也是大小写敏感;
值的写法
字面量:普通的值(数字、字符串、布尔)
字面量直接来写,字符串默认不用加上单引号或者双引号
“”:双引号,不会转义字符串里面的特殊字符,特殊字符会作为本身想表示的意思
name: “zhangsan \n lisi” 输出zhangsan 换行 lisi
‘’:单引号,会转义特殊字符,输出zhangsan \n lisi
对象、map(属性和值)(键值对)
k:v :对象还是k:v的形式
friends:
lastName: zhangsan
    age: 18
行内写法
friends{lastName:zhangsan,age:18}
数组(list、set)
pets:
  - cat
  - dog
 - pig
行内写法
pets:{cat,dog,pig}
配置文件的注入和校验
properities配置文件在idea中默认utf-8可能会乱码
person:
  name: zhangsan
  age: 18
  boss: false
  birth: 2020/12/12
  map: {k1: v1,k2: 12}
  objectList:
    - lisi
    - wangwu
  dog:
    name: mumu
    age: 2
javaBean
/**
 * @ClassNamePerson
 * @Description 将配置文件中的每一个属性的值映射到这个组件中
 * @Author
 * @Date2020/5/23 16:08
 * @ConfigurationProperties告诉SpringBoot将本类中的所有属性和配置文件中相关的配置进行绑定
 * prefix = "person":配置文件中哪个下面的所有属性进行一一映射
 * 只有这个组件是容器中的组件,才能用容器提供的@ConfigurationProperties功能,需要加上@Component
 * @ConfigurationProperties(prefix = "person")默认从全局配置文件中获取值
 **/
@Component
@ConfigurationProperties(prefix = "person")
public class Person {
    private String name;
    private Integer age;
    private boolean boss;
    private Date birth;
    private Map<String,Object> map;
    private List<Object> objectList;
    private Dog dog;
我们可以导入配置文件处理器,以后编写配置就有提示了
<!--导入配置文件处理器,配置文件进行绑定就会有提示-->
 <dependency>
     <groupId>org.springframework.boot</groupId>
     <artifactId>spring-boot-configuration-processor</artifactId>
     <optional>true</optional>
 </dependency>
| @ConfigurationProperties | @Value | |
|---|---|---|
| 功能 | 批量注入文件的属性 | 一个个指定 |
| 松散绑定 | 支持(lastName,last-name) | 不支持 |
| SpEL | 不支持 | 支持 |
| JSR303数据校验 | 支持 | 不支持 |
| 复杂类型封装 | 支持 | 不支持 |
配置文件yml还是properties都可获取到值
如果只需要获取简单属性值可用@Value
@PropertySource&ImportResource
@PropertySource:加载指定的配置文件,需要指定配置文件的路径
/**
 * @Description 将配置文件中的每一个属性的值映射到这个组件中
 * @ConfigurationProperties告诉SpringBoot将本类中的所有属性和配置文件中相关的配置进行绑定
 * prefix = "person":配置文件中哪个下面的所有属性进行一一映射
 * 只有这个组件是容器中的组件,才能用容器提供的@ConfigurationProperties功能,需要加上@Component
 **/
@PropertySource(value = {"classpath:person.properties"})
@Component
@ConfigurationProperties(prefix = "person")
public class Person {
    private String name;
    private Integer age;
    private boolean boss;
    private Date birth;
    private Map<String,Object> map;
    private List<Object> objectList;
    private Dog dog;
@ImportResource:导入Spring的配置文件,让配置文件里面的内容生效;
Spring Boot里面没有Spring的配置文件,我们自己编写的配置文件,也不能自动识别,想让Spring的配置文件生效,加载进来;@ImportResource需要标注在一个配置类上
@ImportResource(locations = {"classpath:beans.xml"})
导入Spring的配置文件,让其生效
<?xml version="1.0" encoding="UTF-8"?>
<beans xmlns="http://www.springframework.org/schema/beans"
       xmlns:xsi="http://www.w3.org/2001/XMLSchema-instance"
       xsi:schemaLocation="http://www.springframework.org/schema/beans http://www.springframework.org/schema/beans/spring-beans.xsd">
<bean id="helloService" class="com.think.hello.service.HelloService"></bean>
</beans>
SpringBoot推荐给容器中添加组件的方式,推荐使用全注解的方式;
1、配置类===Spring配置文件
2、@Bean给容器中添加组件
@Configuration
public class myAppConfig {
    //将方法的返回值添加到容器,容器中这个组件默认的id就是方法名
    @Bean
    public HelloService helloService(){
        return new HelloService();
    }
}
配置文件占位符
占位符后期之前配置的值,如果没有可用:指定默认值
person:
  name: zhangsan${random.uuid}
  boss: false
  age: ${random.int}
  birth: 2020/12/12
  map: {k1: v1,k2: 12}
  objectList:
    - lisi
    - wangwu
    - zhangsan
  dog:
    name: ${person.hello:hello}mumu
    age: 2
Profile
多profile文件
我们在主配置文件编写的时候,文件名可用applicaton-{profile}.properties/yml
默认使用application.properties的配置
yml支持多文档块的方式
server:
  port: 8080
spring:
  profiles:
    active: prod
---
server:
  port: 8081
spring:
  profiles: dev
---
server:
  port: 8082
spring:
  profiles: prod
激活指定profile
在配置文件中指定spring.profiles.active=dev
命令行的方式
在启动配置里 –spring.profiles.active=dev或java -jar xxx.jar –spring.profiles.active=dev
虚拟机参数
-Dspring.profiles.active=dev
配置文件的加载默认的优先级由高到低
高优先级的配置会覆盖低优先级的配置生效;
SpringBoot会从这四个位置全部加载主配置文件;互补配置;
-file:./conifg/
-file:./
-classpath:/config/
-classpath:/
我们还可用通过spring.config.location来改变默认的配置文件位置
项目打包后可用命令行参数的形式,启动项目的时候来指定配置文件的新位置,指定配置文件会和默认加载的这些配置文件共同起作用形成配置
-jar xxx.jar –server.port=8080
自动配置原理
配置文件能配置的属性参照
@SpringBootApplication
@SpringBootApplication是一个复合注解或派生注解,在@SpringBootApplication中有一个注解@EnableAutoConfiguration,该注解是开启自动配置
@Target(ElementType.TYPE)
@Retention(RetentionPolicy.RUNTIME)
@Documented
@Inherited
@SpringBootConfiguration
@EnableAutoConfiguration
@ComponentScan(excludeFilters = { @Filter(type = FilterType.CUSTOM, classes = TypeExcludeFilter.class),
        @Filter(type = FilterType.CUSTOM, classes = AutoConfigurationExcludeFilter.class) })
public @interface SpringBootApplication {
@EnableAutoConfiguration也是一个派生注解,其中的关键功能是由@Import提供,其导入的AutoConfigurationImportSelector的selectImports()方法通过SpringFactoriesLoader.loadFactoryNames()扫描所有具有META-INF/spring.factories的jar包。 spring-boot-autoconfigure-x.x.x.x.jar里就有一个spring.factories文件。spring.factories文件由一组一组的key=value的形式,其中一个key是EnableAutoConfiguration类的全类名,而它的value是一个xxxxAutoConfiguration的类名的列表, 这些类名以逗号分隔。
spring-boot-autoconfigure-x.x.x.x.jar -> META-INF/spring.factories -> org.springframework.boot.autoconfigure.xxx.xxxAutoConfiguration 类列表将会被实例化到Spring容器。
SpringBoot项目启动时,@SpringBootApplication用在启动类SpringApplication.run()的内部就会置顶selectImports()方法,找到所有JavaConfig自动配置类的全限定名对应的class,然后将所有自动配置类加载到Spring容器中。
以redis自动配置,解析Spring自动配置原理
将redis starter依赖加入
<!--redis jar-->
<dependency>
    <groupId>org.springframework.boot</groupId>
    <artifactId>spring-boot-starter-data-redis</artifactId>
</dependency>
org.springframework.boot.autoconfigure.data.redis.RedisAutoConfiguration会被实例化到容器。该类为什么会被实例化? 因为它在META-INF/spring.factories的Auto Configure列表。
org.springframework.boot.autoconfigure.data.redis.RedisAutoConfiguration被实例化,然而redis也会被实例化即创建RedisTemplate在Spring容器。
然而实例化redis对象是有条件的即@ConditionalOnClass({RedisOperations.class}),意思:当给定的类名在类路径上存在,则实例化当前Bean。
也就是想Spring创建redis实例对象,必须需要将redis starter包:spring-boot-starter-data-redis依赖引入。有了redis starter依赖springboot自动配置就会检测到classpath路径下有相关的类,然后就可以实例化对应的类了,这就是自动配置的原理。
知识点:类上有该注解@Configuration,类被实例化 时@bean会自动执行,生成对应的bean实例,放入Spring容器。
org.springframework.boot.autoconfigure.data.redis.RedisAutoConfiguration会导入JedisConnectionConfiguration.class
@Import({LettuceConnectionConfiguration.class, JedisConnectionConfiguration.class})

JedisConnectionConfiguration.class有注解:@ConditionalOnClass({GenericObjectPool.class, JedisConnection.class, Jedis.class})
spring是怎样读取redis配置参数?
关键是org.springframework.boot.autoconfigure.data.redis.RedisAutoConfiguration的注解:@EnableConfigurationProperties({RedisProperties.class})
知识点:@EnableConfigurationProperties会将配置文件的key-value映射成Java对象。
redis配置类,如果没redis配置,使用本地的redis这需要本地安装redis服务,如果有redis配置就设置redis host、port等属性
appliccation.yml redis配置。必须以spring.redis开头
spring-boot-starter
SpringBoot 可以省略众多的繁琐配置,它的众多starter可以说功不可没。 例如集成redis,只需要pom.xml中引入spring-boot-starter-data-redis,配置文件application.yml中加入spring.redis.database等几个关键配置项即可,常用的starter还有spring-boot-starter-web、spring-boot-starter-test等,相比传统的xml配置大大减少了集成的工作量。
原理
利用starter实现自动化配置只需要两个条件–maven依赖、配置文件。引入maven实质就是导入jar包,spring-boot启动的时候会找到starter jar包中的resources/META-INF/spring.factories文件,根据spring.factories文件中的配置,找到需要自动配置的类。
| 注解 | 说明 |
|---|---|
| @Configuration | 表明是一个配置文件,被注解的类将成为一个bean配置类 |
| @ConditionalOnClass | 当classpath下发现该类的情况下进行自动配置 |
| @ConditionalOnBean | 当classpath下发现该类的情况下进行自动配置 |
| @EnableConfigurationProperties | 使@ConfigurationProperties注解生效 |
| @AutoConfigureAfter | 完成自动配置后实例化这个bean |
实现
pom.xml
<?xml version="1.0" encoding="UTF-8"?>
<project xmlns="http://maven.apache.org/POM/4.0.0" xmlns:xsi="http://www.w3.org/2001/XMLSchema-instance"
         xsi:schemaLocation="http://maven.apache.org/POM/4.0.0 http://maven.apache.org/xsd/maven-4.0.0.xsd">
    <modelVersion>4.0.0</modelVersion>
    <parent>
        <groupId>org.springframework.boot</groupId>
        <artifactId>spring-boot-starter-parent</artifactId>
        <version>2.1.4.RELEASE</version>
        <relativePath/> <!-- lookup parent from repository -->
    </parent>
    <groupId>com.air</groupId>
    <artifactId>starter-demo</artifactId>
    <version>0.0.1-SNAPSHOT</version>
    <name>starter-demo</name>
    <description>spring-boot-starter demo</description>

    <properties>
        <java.version>1.8</java.version>
    </properties>

    <dependencies>
        <dependency>
            <groupId>org.springframework.boot</groupId>
            <artifactId>spring-boot-starter</artifactId>
        </dependency>

        <dependency>
            <groupId>org.springframework.boot</groupId>
            <artifactId>spring-boot-configuration-processor</artifactId>
            <optional>true</optional>
        </dependency>
        <dependency>
            <groupId>org.projectlombok</groupId>
            <artifactId>lombok</artifactId>
            <optional>true</optional>
        </dependency>
        <dependency>
            <groupId>org.springframework.boot</groupId>
            <artifactId>spring-boot-starter-test</artifactId>
            <scope>test</scope>
        </dependency>
    </dependencies>

    <build>
        <plugins>
            <!-- Source -->
            <plugin>
                <groupId>org.apache.maven.plugins</groupId>
                <artifactId>maven-source-plugin</artifactId>
                <executions>
                    <execution>
                        <phase>package</phase>
                        <goals>
                            <goal>jar-no-fork</goal>
                        </goals>
                    </execution>
                </executions>
            </plugin>
        </plugins>
    </build>

</project>
spring-boot-configuration-processor 的作用是编译时生成 spring-configuration-metadata.json ,在IDE中编辑配置文件时,会出现提示。 打包选择jar-no-fork,因为这里不需要main函数。
EnableDemoConfiguration
@Target({ElementType.TYPE})
@Retention(RetentionPolicy.RUNTIME)
@Documented
@Inherited
public @interface EnableDemoConfiguration {
}
DemoProperties
@Data
@ConfigurationProperties(prefix = "demo")
public class DemoProperties {
    private String name;
    private Integer age;
}
name和age对应application.properties里面的demo.name和demo.age
DemoAutoConfiguration
@Configuration
@ConditionalOnBean(annotation = EnableDemoConfiguration.class)
@EnableConfigurationProperties(DemoProperties.class)
public class DemoAutoConfiguration {

    @Bean
    @ConditionalOnMissingBean
    DemoService demoService (){
        return new DemoService();
    }

}
这里设置自动配置的相关条件,和相关操作,由于这里只想写一个最简单的demo,所以这里只需要简单注入一个bean,没有复杂逻辑,实际开发中,这个类是最关键的。
DemoService
public class DemoService {

    @Autowired
    private DemoProperties demoProperties;

    public void print() {
        System.out.println(demoProperties.getName());
        System.out.println(demoProperties.getAge());
    }
}
这里不需要@Service,因为已经通过DemoAutoConfiguration注入spring容器了。
spring.factories
在resources/META-INF/下创建spring.factories文件:
org.springframework.boot.autoconfigure.EnableAutoConfiguration=\
com.air.starterdemo.config.DemoAutoConfiguration
告诉spring-boot,启动时需要扫描的类。
测试
pom.xml 本地mvn install之后,在新的spring-boot项目里面引入
配置文件
demo.name = ooo
demo.age = 11
如果使用的是IDEA,在编辑时会出现提示。
测试
@SpringBootApplication
@EnableDemoConfiguration
public class Demo1Application {

    @Autowired
    private DemoService demoService;

    public static void main(String[] args) {
        SpringApplication.run(Demo1Application.class, args);
    }

    @PostConstruct
    public void test() {
        demoService.print();
    }
}
启动main函数,控制台会打印出配置文件中的name和age,一个简单的spring-boot-starter就写好了
spring.factories
# Initializers
org.springframework.context.ApplicationContextInitializer=\
org.springframework.boot.autoconfigure.SharedMetadataReaderFactoryContextInitializer,\
org.springframework.boot.autoconfigure.logging.ConditionEvaluationReportLoggingListener

# Application Listeners
org.springframework.context.ApplicationListener=\
org.springframework.boot.autoconfigure.BackgroundPreinitializer

# Auto Configuration Import Listeners
org.springframework.boot.autoconfigure.AutoConfigurationImportListener=\
org.springframework.boot.autoconfigure.condition.ConditionEvaluationReportAutoConfigurationImportListener

# Auto Configuration Import Filters
org.springframework.boot.autoconfigure.AutoConfigurationImportFilter=\
org.springframework.boot.autoconfigure.condition.OnBeanCondition,\
org.springframework.boot.autoconfigure.condition.OnClassCondition,\
org.springframework.boot.autoconfigure.condition.OnWebApplicationCondition

# Auto Configure
org.springframework.boot.autoconfigure.EnableAutoConfiguration=\
org.springframework.boot.autoconfigure.admin.SpringApplicationAdminJmxAutoConfiguration,\
org.springframework.boot.autoconfigure.aop.AopAutoConfiguration,\
org.springframework.boot.autoconfigure.amqp.RabbitAutoConfiguration,\
org.springframework.boot.autoconfigure.batch.BatchAutoConfiguration,\
org.springframework.boot.autoconfigure.cache.CacheAutoConfiguration,\
org.springframework.boot.autoconfigure.cassandra.CassandraAutoConfiguration,\
org.springframework.boot.autoconfigure.context.ConfigurationPropertiesAutoConfiguration,\
org.springframework.boot.autoconfigure.context.LifecycleAutoConfiguration,\
org.springframework.boot.autoconfigure.context.MessageSourceAutoConfiguration,\
org.springframework.boot.autoconfigure.context.PropertyPlaceholderAutoConfiguration,\
org.springframework.boot.autoconfigure.couchbase.CouchbaseAutoConfiguration,\
org.springframework.boot.autoconfigure.dao.PersistenceExceptionTranslationAutoConfiguration,\
org.springframework.boot.autoconfigure.data.cassandra.CassandraDataAutoConfiguration,\
org.springframework.boot.autoconfigure.data.cassandra.CassandraReactiveDataAutoConfiguration,\
org.springframework.boot.autoconfigure.data.cassandra.CassandraReactiveRepositoriesAutoConfiguration,\
org.springframework.boot.autoconfigure.data.cassandra.CassandraRepositoriesAutoConfiguration,\
org.springframework.boot.autoconfigure.data.couchbase.CouchbaseDataAutoConfiguration,\
org.springframework.boot.autoconfigure.data.couchbase.CouchbaseReactiveDataAutoConfiguration,\
org.springframework.boot.autoconfigure.data.couchbase.CouchbaseReactiveRepositoriesAutoConfiguration,\
org.springframework.boot.autoconfigure.data.couchbase.CouchbaseRepositoriesAutoConfiguration,\
org.springframework.boot.autoconfigure.data.elasticsearch.ElasticsearchDataAutoConfiguration,\
org.springframework.boot.autoconfigure.data.elasticsearch.ElasticsearchRepositoriesAutoConfiguration,\
org.springframework.boot.autoconfigure.data.elasticsearch.ReactiveElasticsearchRepositoriesAutoConfiguration,\
org.springframework.boot.autoconfigure.data.elasticsearch.ReactiveElasticsearchRestClientAutoConfiguration,\
org.springframework.boot.autoconfigure.data.jdbc.JdbcRepositoriesAutoConfiguration,\
org.springframework.boot.autoconfigure.data.jpa.JpaRepositoriesAutoConfiguration,\
org.springframework.boot.autoconfigure.data.ldap.LdapRepositoriesAutoConfiguration,\
org.springframework.boot.autoconfigure.data.mongo.MongoDataAutoConfiguration,\
org.springframework.boot.autoconfigure.data.mongo.MongoReactiveDataAutoConfiguration,\
org.springframework.boot.autoconfigure.data.mongo.MongoReactiveRepositoriesAutoConfiguration,\
org.springframework.boot.autoconfigure.data.mongo.MongoRepositoriesAutoConfiguration,\
org.springframework.boot.autoconfigure.data.neo4j.Neo4jDataAutoConfiguration,\
org.springframework.boot.autoconfigure.data.neo4j.Neo4jRepositoriesAutoConfiguration,\
org.springframework.boot.autoconfigure.data.solr.SolrRepositoriesAutoConfiguration,\
org.springframework.boot.autoconfigure.data.r2dbc.R2dbcDataAutoConfiguration,\
org.springframework.boot.autoconfigure.data.r2dbc.R2dbcRepositoriesAutoConfiguration,\
org.springframework.boot.autoconfigure.data.r2dbc.R2dbcTransactionManagerAutoConfiguration,\
org.springframework.boot.autoconfigure.data.redis.RedisAutoConfiguration,\
org.springframework.boot.autoconfigure.data.redis.RedisReactiveAutoConfiguration,\
org.springframework.boot.autoconfigure.data.redis.RedisRepositoriesAutoConfiguration,\
org.springframework.boot.autoconfigure.data.rest.RepositoryRestMvcAutoConfiguration,\
org.springframework.boot.autoconfigure.data.web.SpringDataWebAutoConfiguration,\
org.springframework.boot.autoconfigure.elasticsearch.ElasticsearchRestClientAutoConfiguration,\
org.springframework.boot.autoconfigure.flyway.FlywayAutoConfiguration,\
org.springframework.boot.autoconfigure.freemarker.FreeMarkerAutoConfiguration,\
org.springframework.boot.autoconfigure.groovy.template.GroovyTemplateAutoConfiguration,\
org.springframework.boot.autoconfigure.gson.GsonAutoConfiguration,\
org.springframework.boot.autoconfigure.h2.H2ConsoleAutoConfiguration,\
org.springframework.boot.autoconfigure.hateoas.HypermediaAutoConfiguration,\
org.springframework.boot.autoconfigure.hazelcast.HazelcastAutoConfiguration,\
org.springframework.boot.autoconfigure.hazelcast.HazelcastJpaDependencyAutoConfiguration,\
org.springframework.boot.autoconfigure.http.HttpMessageConvertersAutoConfiguration,\
org.springframework.boot.autoconfigure.http.codec.CodecsAutoConfiguration,\
org.springframework.boot.autoconfigure.influx.InfluxDbAutoConfiguration,\
org.springframework.boot.autoconfigure.info.ProjectInfoAutoConfiguration,\
org.springframework.boot.autoconfigure.integration.IntegrationAutoConfiguration,\
org.springframework.boot.autoconfigure.jackson.JacksonAutoConfiguration,\
org.springframework.boot.autoconfigure.jdbc.DataSourceAutoConfiguration,\
org.springframework.boot.autoconfigure.jdbc.JdbcTemplateAutoConfiguration,\
org.springframework.boot.autoconfigure.jdbc.JndiDataSourceAutoConfiguration,\
org.springframework.boot.autoconfigure.jdbc.XADataSourceAutoConfiguration,\
org.springframework.boot.autoconfigure.jdbc.DataSourceTransactionManagerAutoConfiguration,\
org.springframework.boot.autoconfigure.jms.JmsAutoConfiguration,\
org.springframework.boot.autoconfigure.jmx.JmxAutoConfiguration,\
org.springframework.boot.autoconfigure.jms.JndiConnectionFactoryAutoConfiguration,\
org.springframework.boot.autoconfigure.jms.activemq.ActiveMQAutoConfiguration,\
org.springframework.boot.autoconfigure.jms.artemis.ArtemisAutoConfiguration,\
org.springframework.boot.autoconfigure.jersey.JerseyAutoConfiguration,\
org.springframework.boot.autoconfigure.jooq.JooqAutoConfiguration,\
org.springframework.boot.autoconfigure.jsonb.JsonbAutoConfiguration,\
org.springframework.boot.autoconfigure.kafka.KafkaAutoConfiguration,\
org.springframework.boot.autoconfigure.availability.ApplicationAvailabilityAutoConfiguration,\
org.springframework.boot.autoconfigure.ldap.embedded.EmbeddedLdapAutoConfiguration,\
org.springframework.boot.autoconfigure.ldap.LdapAutoConfiguration,\
org.springframework.boot.autoconfigure.liquibase.LiquibaseAutoConfiguration,\
org.springframework.boot.autoconfigure.mail.MailSenderAutoConfiguration,\
org.springframework.boot.autoconfigure.mail.MailSenderValidatorAutoConfiguration,\
org.springframework.boot.autoconfigure.mongo.embedded.EmbeddedMongoAutoConfiguration,\
org.springframework.boot.autoconfigure.mongo.MongoAutoConfiguration,\
org.springframework.boot.autoconfigure.mongo.MongoReactiveAutoConfiguration,\
org.springframework.boot.autoconfigure.mustache.MustacheAutoConfiguration,\
org.springframework.boot.autoconfigure.orm.jpa.HibernateJpaAutoConfiguration,\
org.springframework.boot.autoconfigure.quartz.QuartzAutoConfiguration,\
org.springframework.boot.autoconfigure.r2dbc.R2dbcAutoConfiguration,\
org.springframework.boot.autoconfigure.rsocket.RSocketMessagingAutoConfiguration,\
org.springframework.boot.autoconfigure.rsocket.RSocketRequesterAutoConfiguration,\
org.springframework.boot.autoconfigure.rsocket.RSocketServerAutoConfiguration,\
org.springframework.boot.autoconfigure.rsocket.RSocketStrategiesAutoConfiguration,\
org.springframework.boot.autoconfigure.security.servlet.SecurityAutoConfiguration,\
org.springframework.boot.autoconfigure.security.servlet.UserDetailsServiceAutoConfiguration,\
org.springframework.boot.autoconfigure.security.servlet.SecurityFilterAutoConfiguration,\
org.springframework.boot.autoconfigure.security.reactive.ReactiveSecurityAutoConfiguration,\
org.springframework.boot.autoconfigure.security.reactive.ReactiveUserDetailsServiceAutoConfiguration,\
org.springframework.boot.autoconfigure.security.rsocket.RSocketSecurityAutoConfiguration,\
org.springframework.boot.autoconfigure.security.saml2.Saml2RelyingPartyAutoConfiguration,\
org.springframework.boot.autoconfigure.sendgrid.SendGridAutoConfiguration,\
org.springframework.boot.autoconfigure.session.SessionAutoConfiguration,\
org.springframework.boot.autoconfigure.security.oauth2.client.servlet.OAuth2ClientAutoConfiguration,\
org.springframework.boot.autoconfigure.security.oauth2.client.reactive.ReactiveOAuth2ClientAutoConfiguration,\
org.springframework.boot.autoconfigure.security.oauth2.resource.servlet.OAuth2ResourceServerAutoConfiguration,\
org.springframework.boot.autoconfigure.security.oauth2.resource.reactive.ReactiveOAuth2ResourceServerAutoConfiguration,\
org.springframework.boot.autoconfigure.solr.SolrAutoConfiguration,\
org.springframework.boot.autoconfigure.task.TaskExecutionAutoConfiguration,\
org.springframework.boot.autoconfigure.task.TaskSchedulingAutoConfiguration,\
org.springframework.boot.autoconfigure.thymeleaf.ThymeleafAutoConfiguration,\
org.springframework.boot.autoconfigure.transaction.TransactionAutoConfiguration,\
org.springframework.boot.autoconfigure.transaction.jta.JtaAutoConfiguration,\
org.springframework.boot.autoconfigure.validation.ValidationAutoConfiguration,\
org.springframework.boot.autoconfigure.web.client.RestTemplateAutoConfiguration,\
org.springframework.boot.autoconfigure.web.embedded.EmbeddedWebServerFactoryCustomizerAutoConfiguration,\
org.springframework.boot.autoconfigure.web.reactive.HttpHandlerAutoConfiguration,\
org.springframework.boot.autoconfigure.web.reactive.ReactiveWebServerFactoryAutoConfiguration,\
org.springframework.boot.autoconfigure.web.reactive.WebFluxAutoConfiguration,\
org.springframework.boot.autoconfigure.web.reactive.error.ErrorWebFluxAutoConfiguration,\
org.springframework.boot.autoconfigure.web.reactive.function.client.ClientHttpConnectorAutoConfiguration,\
org.springframework.boot.autoconfigure.web.reactive.function.client.WebClientAutoConfiguration,\
org.springframework.boot.autoconfigure.web.servlet.DispatcherServletAutoConfiguration,\
org.springframework.boot.autoconfigure.web.servlet.ServletWebServerFactoryAutoConfiguration,\
org.springframework.boot.autoconfigure.web.servlet.error.ErrorMvcAutoConfiguration,\
org.springframework.boot.autoconfigure.web.servlet.HttpEncodingAutoConfiguration,\
org.springframework.boot.autoconfigure.web.servlet.MultipartAutoConfiguration,\
org.springframework.boot.autoconfigure.web.servlet.WebMvcAutoConfiguration,\
org.springframework.boot.autoconfigure.websocket.reactive.WebSocketReactiveAutoConfiguration,\
org.springframework.boot.autoconfigure.websocket.servlet.WebSocketServletAutoConfiguration,\
org.springframework.boot.autoconfigure.websocket.servlet.WebSocketMessagingAutoConfiguration,\
org.springframework.boot.autoconfigure.webservices.WebServicesAutoConfiguration,\
org.springframework.boot.autoconfigure.webservices.client.WebServiceTemplateAutoConfiguration

# Failure analyzers
org.springframework.boot.diagnostics.FailureAnalyzer=\
org.springframework.boot.autoconfigure.diagnostics.analyzer.NoSuchBeanDefinitionFailureAnalyzer,\
org.springframework.boot.autoconfigure.flyway.FlywayMigrationScriptMissingFailureAnalyzer,\
org.springframework.boot.autoconfigure.jdbc.DataSourceBeanCreationFailureAnalyzer,\
org.springframework.boot.autoconfigure.jdbc.HikariDriverConfigurationFailureAnalyzer,\
org.springframework.boot.autoconfigure.r2dbc.ConnectionFactoryBeanCreationFailureAnalyzer,\
org.springframework.boot.autoconfigure.session.NonUniqueSessionRepositoryFailureAnalyzer

# Template availability providers
org.springframework.boot.autoconfigure.template.TemplateAvailabilityProvider=\
org.springframework.boot.autoconfigure.freemarker.FreeMarkerTemplateAvailabilityProvider,\
org.springframework.boot.autoconfigure.mustache.MustacheTemplateAvailabilityProvider,\
org.springframework.boot.autoconfigure.groovy.template.GroovyTemplateAvailabilityProvider,\
org.springframework.boot.autoconfigure.thymeleaf.ThymeleafTemplateAvailabilityProvider,\
org.springframework.boot.autoconfigure.web.servlet.JspTemplateAvailabilityProvider
每一个autoconfigure类都是容器中的一个组件,都加入到容器中,用他们来做自动配置
每一个自动配置类进行自动配置功能;
以HttpEncodingAutoConfiguration为例解释自动配置原理
@Configuration(//表示这是一个自动配置类
proxyBeanMethods = false
)
@EnableConfigurationProperties({ServerProperties.class})//启用configurationProperties功能,将配置文件中对应的值和xxxProperties绑定起来
@ConditionalOnWebApplication(//Spring底层@Conditional注解,根据不同条件,如果满足指定条件,整个配置里里面的配置就会生效,判断当前应用是否是web应用,是就生效不是就不生效
    type = Type.SERVLET
)
@ConditionalOnClass({CharacterEncodingFilter.class})//判断当前项目有没有这个类
CharacterEncodingFilter:SpringMVC中进行乱码解决的过滤器
@ConditionalOnProperty(//判断配置文件中是否存在某个配置server.servlet.encoding.enabled如果不存在判断也是成立的,即使我们的配置文件中不配置server.servlet.encoding.enabled=true,也是默认生效的
    prefix = "server.servlet.encoding",//从配置文件中获取指定的值和bean的属性进行绑定
    value = {"enabled"},
    matchIfMissing = true
)
public class HttpEncodingAutoConfiguration {
根据当前不同的条件判断,决定这个配置类是否生效
如果生效,这个配置类就会给容器中添加各种组件,这些组件的属性是从对应的properties类中获取的,这些类里面的每一个又是和配置文件绑定的
@Bean//给容器中添加一个组件,这个组件的某些值需要从properties中获取
@ConditionalOnMissingBean
public CharacterEncodingFilter characterEncodingFilter() {
    CharacterEncodingFilter filter = new OrderedCharacterEncodingFilter();
    filter.setEncoding(this.properties.getCharset().name());
    filter.setForceRequestEncoding(this.properties.shouldForce(org.springframework.boot.web.servlet.server.Encoding.Type.REQUEST));
    filter.setForceResponseEncoding(this.properties.shouldForce(org.springframework.boot.web.servlet.server.Encoding.Type.RESPONSE));
    return filter;
}
所有在配置文件中能配置的属性都是xxxProperties类中封装着,配置文件能配置什么就可以参照某个功能对应的这个属性类
总结 1、SpringBoot启动会加载大量的自动配置类;
2、我们看需要的功能有没有SpringBoot默认写好的自动配置类
3、我们再来看这个自动配置类中配置了哪些组件,只要我们要用的组件有,就不需要再来配置了,
4、给容器中自动配置类添加组件的时候,会从properties类中获取某些属性,我们就可以再配置文件总指定这些属性的值。
xxxAutoConfiguration:自动配置类
给容器中添加组件
xxxProperties:封装配置文件中相关属性
自动配置类哪个生效了
我们可以通过debug=true来让控制台打印自动配置报告,这样就可以很方便知道哪些自动配置生效了
============================
CONDITIONS EVALUATION REPORT
============================


Positive matches:(自动配置类启用的)
-----------------

AopAutoConfiguration matched:
- @ConditionalOnProperty (spring.aop.auto=true) matched (OnPropertyCondition)

AopAutoConfiguration.ClassProxyingConfiguration matched:
- @ConditionalOnMissingClass did not find unwanted class 'org.aspectj.weaver.Advice' (OnClassCondition)
- @ConditionalOnProperty (spring.aop.proxy-target-class=true) matched (OnPropertyCondition)

DispatcherServletAutoConfiguration matched:
- @ConditionalOnClass found required class 'org.springframework.web.servlet.DispatcherServlet' (OnClassCondition)
- found 'session' scope (OnWebApplicationCondition)

DispatcherServletAutoConfiguration.DispatcherServletConfiguration matched:
- @ConditionalOnClass found required class 'javax.servlet.ServletRegistration' (OnClassCondition)
- Default DispatcherServlet did not find dispatcher servlet beans (DispatcherServletAutoConfiguration.DefaultDispatcherServletCondition)


Negative matches:(没有启用的,没匹配成功的)
-----------------

ActiveMQAutoConfiguration:
Did not match:
- @ConditionalOnClass did not find required class 'javax.jms.ConnectionFactory' (OnClassCondition)

AopAutoConfiguration.AspectJAutoProxyingConfiguration:
Did not match:
- @ConditionalOnClass did not find required class 'org.aspectj.weaver.Advice' (OnClassCondition)

ArtemisAutoConfiguration:
Did not match:
- @ConditionalOnClass did not find required class 'javax.jms.ConnectionFactory' (OnClassCondition)
SpringBoot与日志
日志门面SLF4J日志实现Logback;
SpringBoot:底层是Spring框架,Spring框架默认用JCL;
SpringBoot选用SLF4J(日志的抽象层)和logback;
以后开发的时候,日志记录方法的调用,不应该来直接调用日志的实现类,而是调用日志抽象曾里面的方法。
应该给系统导入slf4j的jar和logback的实现jar
import org.slf4j.Logger;
import org.slf4j.LoggerFactory;

public class HelloWorld {
  public static void main(String[] args) {
    Logger logger = LoggerFactory.getLogger(HelloWorld.class);
    logger.info("Hello World");
  }
}
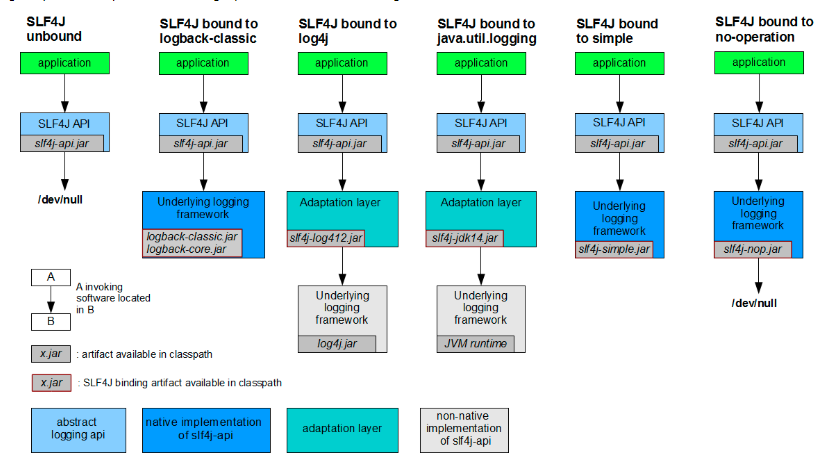
每一个日志的实现框架都有自己的配置文件。使用slf4j后,配置文件还是做成日志实现框架自己本身的配置文件;
遗留问题
不同系统有不同的日志框架,需要做到统一日志记录,即使别的框架和我一起使用slf4j进行输出
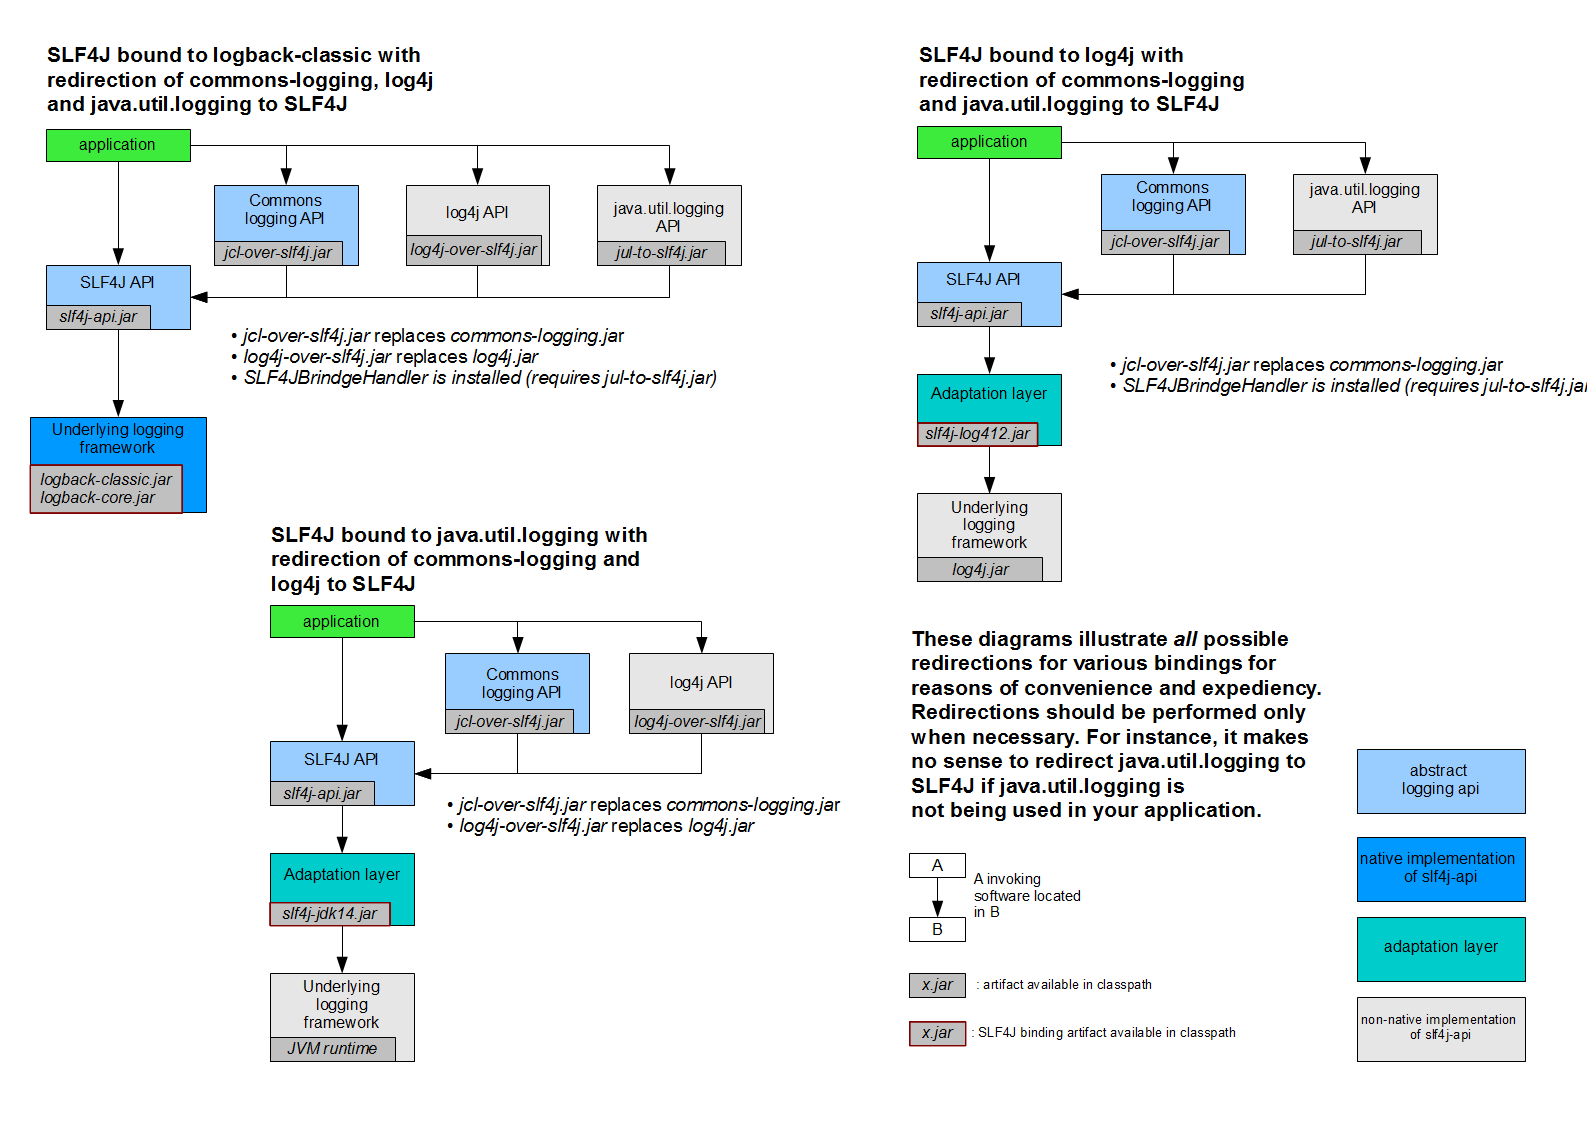
如何让系统中所有日志都统一到slf4j
将系统中其他日志框架排除,用中间包替换原有的日志框架,再导入slf4d其他的实现
<dependency>
    <groupId>org.springframework.boot</groupId>
    <artifactId>spring-boot-starter</artifactId>
    <version>2.3.0.RELEASE</version>
    <scope>compile</scope>
</dependency>
SpringBoot 使用它来做日志
<dependency>
    <groupId>org.springframework.boot</groupId>
    <artifactId>spring-boot-starter-logging</artifactId>
    <version>2.3.0.RELEASE</version>
    <scope>compile</scope>
</dependency>

<dependencies>
    <dependency>
      <groupId>ch.qos.logback</groupId>
      <artifactId>logback-classic</artifactId>
      <scope>compile</scope>
    </dependency>
    <dependency>
      <groupId>org.apache.logging.log4j</groupId>
      <artifactId>log4j-to-slf4j</artifactId>
      <scope>compile</scope>
    </dependency>
    <dependency>
      <groupId>org.slf4j</groupId>
      <artifactId>jul-to-slf4j</artifactId>
      <scope>compile</scope>
    </dependency>
</dependencies>
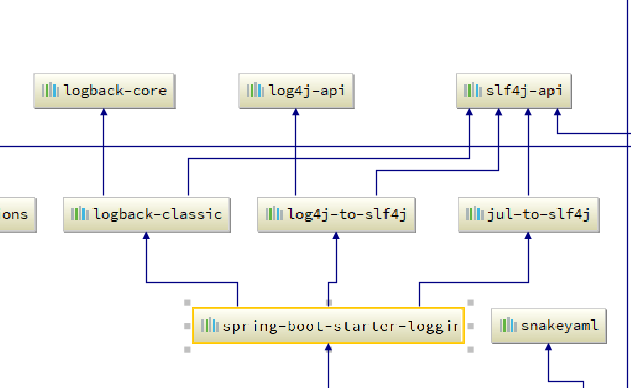
总结:1、SpringBoot底层也是使用slf4j+logback的方式进行日志记录
2、SpringBoot也把其他的日志都替换成了slf4j
3、中间替换包
4、如果要引入其他框架,一定要把这个框架的默认日志移除掉
Spring框架用的commons-logging;
<dependency>
    <groupId>org.apache.activemq</groupId>
    <artifactId>activemq-console</artifactId>
    <version>${activemq.version}</version>
        <exclusions>
            <exclusion>
            <groupId>commons-logging</groupId>
            <artifactId>commons-logging</artifactId>
            </exclusion>
        </exclusions>
</dependency>
SpringBoot能自动适配所有的日志,而且底层使用slf4j+logback的方式记录日志,引入其他框架的时候,只需要把这个框架依赖的日志框架排除掉。
private static Logger logger = LoggerFactory.getLogger(HelloApplication.class);
public static void main(String[] args) {
    SpringApplication.run(HelloApplication.class, args);
    //日志级别由低到高
    //可以调整输出的日志级别
    logger.trace("trace");
    logger.debug("debug");
    logger.info("HelloApplication is Success");
    logger.warn("warn");
    logger.error("error");
}

logging.pattern.console=%d{yyyy-MM-dd} [%thread] %-5level %logger{50} - %msg%n

%d表示日期时间
%thread表示线程名
%-5level:级别从左显示5个字符的宽度
%logger{50}表示logger名字最长50个字符,否则按照句点分割
%msg:日志消息
%n换行符
SpringBoot修改默认日志配置
logging.level.com.think=trace
#当前项目下生成springboot.log日志,可以指定完整的路径D:/springboot.log
#logging.file.name=springboot.log
#在当前磁盘的根路径下创建spring文件夹和里面的log文件夹;使用spring.log做为默认文件
logging.file.path=/spring/log
#在控制台输出的日志的格式
logging.pattern.console=%d{yyyy-MM-dd} [%thread] %-5level %logger{50} - %msg%n
#指定文件中日志的输出格式
logging.pattern.file=%d{yyyy-MM-dd} [%thread] %-5level %logger{50} - %msg%n

<!-- 日志记录器,日期滚动记录 -->
<appender name="FILE_ERROR" class="ch.qos.logback.core.rolling.RollingFileAppender">

<!-- 正在记录的日志文件的路径及文件名 -->
<file>${LOG_PATH}/log_error.log</file>

<!-- 日志记录器的滚动策略,按日期,按大小记录 -->
<rollingPolicy class="ch.qos.logback.core.rolling.TimeBasedRollingPolicy">

<!-- 归档的日志文件的路径,%d{yyyy-MM-dd}指定日期格式,%i指定索引 -->
<fileNamePattern>${LOG_PATH}/error/log-error-%d{yyyy-MM-dd}.%i.log</fileNamePattern>

<!-- 除按日志记录之外,还配置了日志文件不能超过2M,若超过2M,日志文件会以索引0开始,
命名日志文件,例如log-error-2013-12-21.0.log -->
<timeBasedFileNamingAndTriggeringPolicy class="ch.qos.logback.core.rolling.SizeAndTimeBasedFNATP">
<maxFileSize>10MB</maxFileSize>
</timeBasedFileNamingAndTriggeringPolicy>
</rollingPolicy>

<!-- 追加方式记录日志 -->
<append>true</append>

<!-- 日志文件的格式 -->
<encoder class="ch.qos.logback.classic.encoder.PatternLayoutEncoder">
<pattern>${FILE_LOG_PATTERN}</pattern>
<charset>utf-8</charset>
</encoder>

<!-- 此日志文件只记录error级别的 -->
<filter class="ch.qos.logback.classic.filter.LevelFilter">
<level>error</level>
<onMatch>ACCEPT</onMatch>
<onMismatch>DENY</onMismatch>
</filter>
</appender>
可以按照slfj的日志适配图,进行相关的切换
idea依赖分析-pom.xml-右键-Diagrams-Show Dependencies
SpringBoot与Web开发
使用SpringBoot
创建SpringBoot应用,选中我们需要的模块;
SpringBoot已经默认将这些场景配置好了,只需要在配置文件中指定少量配置就可以运行起来;
自己编写业务逻辑代码;
自动配置原理
这个场景SpringBoot帮我们配置了什么,能不能修改,能修改哪些配置,能不能扩展
xxxAutoConfiguration:帮我们给容器中自动配置组件
xxxProperties:配置类来封装配置文件中的内容
SpringBoot对静态资源的映射规则
ResourceProperties可以设置静态资源有关的参数,缓存时间等
@ConfigurationProperties(prefix = "spring.resources", ignoreUnknownFields = false)
public class ResourceProperties {

    private static final String[] CLASSPATH_RESOURCE_LOCATIONS = { "classpath:/META-INF/resources/",
            "classpath:/resources/", "classpath:/static/", "classpath:/public/" };

    /**
     * Locations of static resources. Defaults to classpath:[/META-INF/resources/,
     * /resources/, /static/, /public/].

@Override
public void addResourceHandlers(ResourceHandlerRegistry registry) {
    if (!this.resourceProperties.isAddMappings()) {
        logger.debug("Default resource handling disabled");
        return;
    }
    Duration cachePeriod = this.resourceProperties.getCache().getPeriod();
    CacheControl cacheControl = this.resourceProperties.getCache().getCachecontrol().toHttpCacheControl();
    if (!registry.hasMappingForPattern("/webjars/**")) {
        customizeResourceHandlerRegistration(registry.addResourceHandler("/webjars/**")
        .addResourceLocations("classpath:/META-INF/resources/webjars/")
        .setCachePeriod(getSeconds(cachePeriod)).setCacheControl(cacheControl));
    }
    String staticPathPattern = this.mvcProperties.getStaticPathPattern();
    if (!registry.hasMappingForPattern(staticPathPattern)) {
    customizeResourceHandlerRegistration(registry.addResourceHandler(staticPathPattern)
    .addResourceLocations(getResourceLocations(this.resourceProperties.getStaticLocations()))
    .setCachePeriod(getSeconds(cachePeriod)).setCacheControl(cacheControl));
    }
}
所有/webjars/**都去classpath:/META-INF/resources/webjars/找资源
webjars:以jar包的方式引入静态资源;
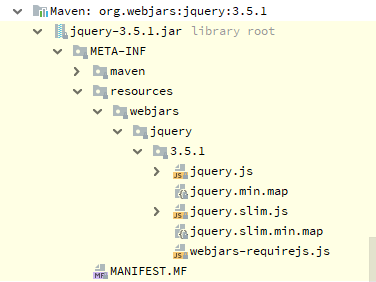
http://localhost:8080/webjars/jquery/3.5.1/jquery.js
<!--引入jquery-webjar-->
<dependency>
    <groupId>org.webjars</groupId>
    <artifactId>jquery</artifactId>
    <version>3.5.1</version>
</dependency>
/**访问当前项目的任何资源(静态资源文件夹)
"/":当前项目的根路径
"classpath:/META-INF/resources/",
"classpath:/resources/",
"classpath:/static/",
"classpath:/public/
以什么样的路径访问静态资源
spring.mvc.static-path-pattern=/static/**
Spring Boot 2.3要在配置文件配置静态资源访问路径
欢迎页,静态资源文件夹下所有的index.html页面;被”/**“映射
所有的**/favicon.ico都是在静态资源文件下找
模板引擎
Thymeleaf
语法更简单,功能更强大
引入Thymeleaf
<!--模板引擎-->
<dependency>
    <groupId>org.springframework.boot</groupId>
    <artifactId>spring-boot-starter-thymeleaf</artifactId>
</dependency>

@ConfigurationProperties(prefix = "spring.thymeleaf")
public class ThymeleafProperties {

    private static final Charset DEFAULT_ENCODING = StandardCharsets.UTF_8;
    //只要我们把html页面放在classpath:/templates/,thymeleaf就能自动渲染
    public static final String DEFAULT_PREFIX = "classpath:/templates/";

    public static final String DEFAULT_SUFFIX = ".html";

    /**
     * Whether to check that the template exists before rendering it.
     */
    private boolean checkTemplate = true;

导入thymeleaf的名称空间
<html xmlns:th="http://www.thymeleaf.org">
语法
参考thymeleaf手册
SpringMVC自动配置
Spring Boot自动配置好了SpringMVC
以下是SpringBoot对SpringMVC的默认
The auto-configuration adds the following features on top of Spring’s defaults:
Inclusion of
ContentNegotiatingViewResolverandBeanNameViewResolverbeans.- 自动配置了ViewResolver(视图解析器:根据方法的返回值得到视图对象(View)视图对象决定如何渲染,是转发还是重定向)
- ContentNegotiatingViewResolver符合所有的视图解析器的
- 如何定制:我们可以给容器中添加一个视图解析器@Bean;自动将其组合进来
- 如何验证是否添加进来了-搜索DispatcherServlet-doDispatch-在这打断点,用debug方式运行
- 随便请求一个页面可以看到DispatcherServlet的viewResolvers里面已经包含了我们自定义的视图解析器
Support for serving static resources, including support for WebJars (covered later in this document)).静态资源文件夹路径,webjars
Automatic registration of
Converter,GenericConverter, andFormatterbeans.- Converter:转换器 类型转换使用
- Formatter:格式化器日期的转换
Support for
HttpMessageConverters(covered later in this document).- HttpMessageConverters:SpringMVC用来转换Http请求和响应的;User–Json
Automatic registration of
MessageCodesResolver(covered later in this document).- 定义错误代码生成规则的
Static
index.htmlsupport.(静态首页访问)Custom
Faviconsupport (covered later in this document).(favicon.ico)Automatic use of a
ConfigurableWebBindingInitializerbean (covered later in this document).我们可以配置一个ConfigurableWebBindingInitializer来替换默认的
初始化WebDataBinder;
请求数据===JavaBean
If you want to keep those Spring Boot MVC customizations and make more MVC customizations (interceptors, formatters, view controllers, and other features), you can add your own @Configuration class of type WebMvcConfigurer but without @EnableWebMvc.
使用WebMvcConfigurerAdapter扩展SpringMVC的功能
编写一个配置类(@Configuration),是WebMvcConfigurerAdapter类型;不能标注@EnableWebMvc。
既保留了所有的自动配置,也能用我们扩展的配置
//作用:请求me的时候会到success页面
@Configuration
public class MyConfig extends WebMvcConfigurerAdapter{

    @Override
    public void addViewControllers(ViewControllerRegistry registry) {
        registry.addViewController("/me").setViewName("success");
    }
}
原理:
WebMvcAutoConfiguration 是SpringMVC的自动配置类
在做其他自动配置时会导入@Import(EnableWebMvcConfiguration.class)
@Configuration(proxyBeanMethods = false)
public static class EnableWebMvcConfiguration extends DelegatingWebMvcConfiguration implements ResourceLoaderAware {

private final WebMvcConfigurerComposite configurers = new WebMvcConfigurerComposite();

//从容器中获取所有WebMvcConfigurer的配置
@Autowired(required = false)
public void setConfigurers(List<WebMvcConfigurer> configurers) {
    if (!CollectionUtils.isEmpty(configurers)) {
    this.configurers.addWebMvcConfigurers(configurers);
        //一个参考实现,将所有的WebMvcConfigurer相关配置都来一起调用
        @Override
        public void addViewControllers(ViewControllerRegistry registry) {
            for (WebMvcConfigurer delegate : this.delegates) {
                delegate.addViewControllers(registry);
            }
        }
    }
}
容器中所有的WebMvcConfigurer都会一起起作用,包括自己写的配置类
全面接管SpringMVC
SpringBoot对SpringMVC的自动配置不需要,所有都是我们自己配,只需要在配置类中添加@EnableWebMvc
原理:

@Retention(RetentionPolicy.RUNTIME)
@Target(ElementType.TYPE)
@Documented
@Import(DelegatingWebMvcConfiguration.class)
public @interface EnableWebMvc {//这个注解上导入了DelegatingWebMvcConfiguration
}

@Configuration(proxyBeanMethods = false)
public class DelegatingWebMvcConfiguration extends WebMvcConfigurationSupport {//DelegatingWebMvcConfiguration.class又继承了WebMvcConfigurationSupport

@Configuration(proxyBeanMethods = false)
@ConditionalOnWebApplication(type = Type.SERVLET)
@ConditionalOnClass({ Servlet.class, DispatcherServlet.class, WebMvcConfigurer.class })
//容器种没有(WebMvcConfigurationSupport)这个组件的时候,这个自动配置类才生效
@ConditionalOnMissingBean(WebMvcConfigurationSupport.class)
@AutoConfigureOrder(Ordered.HIGHEST_PRECEDENCE + 10)
@AutoConfigureAfter({ DispatcherServletAutoConfiguration.class, TaskExecutionAutoConfiguration.class,
        ValidationAutoConfiguration.class })
public class WebMvcAutoConfiguration {

@EnableWebMvc将WebMvcConfigurationSupport组件导入进来;
导入的WebMvcConfigurationSupport只是SpringMVC最基本的功能;
如何修改SpringBoot的默认配置
- SpringBoot在自动配置很多组件的时候,先看容器中有没有用户自己配置的(@Bean,@Component)如果有就用用户配置的,如果没有才自动配置;如果有些组件可以有多个,他是将用户配置的和自己默认的组合起来
- 在SpringBoot种会有非常多的xxxConfigurer帮助我们进行扩展配置
登陆页面
 //所有的WebMvcConfigurerAdapter组件都会一起起作用
@Bean//将组件注册到容器中
public WebMvcConfigurerAdapter webMvcConfigurerAdapter(){
    WebMvcConfigurerAdapter adapter = new WebMvcConfigurerAdapter() {
        @Override
        public void addViewControllers(ViewControllerRegistry registry) {
            registry.addViewController("/").setViewName("login");
            registry.addViewController("/login.html").setViewName("login");
        }
    };
    return adapter;
}
国际化
- 编写国际化文件,抽取页面需要显示的国际化消息

SpringBoot自动配置好了管理国际化资源文件的组件
@Configuration(proxyBeanMethods = false)
@ConditionalOnMissingBean(name = AbstractApplicationContext.MESSAGE_SOURCE_BEAN_NAME, search = SearchStrategy.CURRENT)
@AutoConfigureOrder(Ordered.HIGHEST_PRECEDENCE)
@Conditional(ResourceBundleCondition.class)
@EnableConfigurationProperties
public class MessageSourceAutoConfiguration {private static final Resource[] NO_RESOURCES = {};
@Bean
@ConfigurationProperties(prefix = “spring.messages”)
public MessageSourceProperties messageSourceProperties() {return new MessageSourceProperties();}
@Bean
public MessageSource messageSource(MessageSourceProperties properties) {ResourceBundleMessageSource messageSource = new ResourceBundleMessageSource(); if (StringUtils.hasText(properties.getBasename())) { //设置国际化资源文件的基础名 messageSource.setBasenames(StringUtils .commaDelimitedListToStringArray(StringUtils.trimAllWhitespace(properties.getBasename()))); } if (properties.getEncoding() != null) { messageSource.setDefaultEncoding(properties.getEncoding().name()); } messageSource.setFallbackToSystemLocale(properties.isFallbackToSystemLocale()); Duration cacheDuration = properties.getCacheDuration(); if (cacheDuration != null) { messageSource.setCacheMillis(cacheDuration.toMillis()); } messageSource.setAlwaysUseMessageFormat(properties.isAlwaysUseMessageFormat()); messageSource.setUseCodeAsDefaultMessage(properties.isUseCodeAsDefaultMessage()); return messageSource;}
去页面获取国际化的值
idea file-setting-FileEncodings-fileEncodeing将properties编码改成UTF-8,让他自动转成ascii码(只对当前项目生效)
要改默认的在file-Other Setting-DefaultSetting来修改全局默认设置
