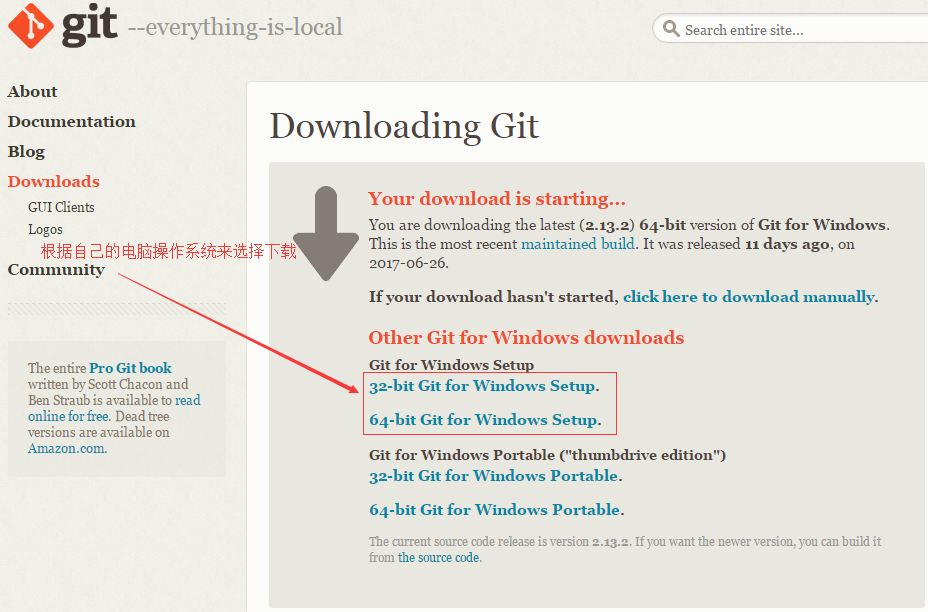
Airthink


  • 首页

  • 分类

  • 归档

  • 标签

  • 关于

  • 搜索

PRINCIPLES

发表于 2020-10-29 | 分类于 财务

介绍

《原则》全书一共分为三个部分 : 第一部分是个人经历的介绍;第二部分是生活原则的描述;第三部分是工作原则的描述。

生活原则

拥抱现实;应对现实

  • 不要混淆愿望与现实
  • 不要担心自己形象;而关心能不能实现你的目标
  • 要重视后续的结果以及后续的后续
  • 不要让痛苦妨碍自己的进步
  • 不要把不好归咎与任何人;从自己身上找原因

做一个超级现实的人

在乎梦想;但是扎根于现实

梦想 + 现实 + 决心 = 成功的生活

理解现实;是任何良好结果的根本依据

因为当真相与愿望不符的时候;大部分人抗拒真相。 这种认知偏差;有很多心理学现象与之相关;如房间里的大象等。在《需求》 和 《思考快与慢中》都有过相关的论述。说到底;就是要扎根现实。理解现实,然后,改变自己;改变现实

头脑需要极度开放

头脑极度开放;极度透明有利于快速学习与改进
这几乎是整个生活原则中最重要的一条原则了
你头脑越是开放,越是不会自欺欺人。其他人给你的反馈就会更加诚实(“你如果是喜欢听与自己意见一样的话;就会得到的反馈就越是虚假”)

如果这些人是可信的人 ;你将会收获很多。

不要担心其他人的看法;那会成为你的障碍
你必须以你认为最好的独特的方式行事;这样做一定会收到反馈;我们必须以开放的头脑思考这些反馈。

尽管你的极度透明会让你感觉到不舒服;但是这样对你是最好的。

极度求真,极度透明会带来更加有意义的工作和更好的人际关系

观察自然;学习现实规律

两种视角:

自上而下 找事务背后规律: 理解市场;供求关系;宏观大势

自下而上去验证具体情况 : 验证具体情况是否相符合

不要固守你认为事物 “应该” 是什么样子
保持客观: 不要让偏见使我们无法认识客观情况。

当看到一个认为自然是错误的想法的时候,先假设自己是错的,然后想办法弄明白为什么自然如此是合理的。
一个例子: 大草原上鬣狗吃了小幼马,我们会心生同情。但是事实上这是自然法则,自然会走向整体最优,而不是个体最优化。

人也是一样。人们会把对自己或者自己相关的人不利的事情叫做坏事,而忽略更大的好。 群体中也有这种倾向,如宗教歧视。

只根据事务对个人的影响就判断绝对的好与坏是不合理的。(这点很难做到)

一个东西要好,必须符合现实规律,并促进整体的进化。这会带来更大的好。

进化是宇宙中最强大的力量

这里推荐一本书:《基因之河》;

关于进化:还有一本书,《自私的基因》, 也非常开脑洞。

进化是生命最大的成就和回报

个人激励机制必须符合群体目标。
比如自然给了性行为个体巨大的快乐激励,来达到群体的不断进化迭代。

现实为了趋向整体最大化,而不是个体。
为了整体做贡献,你就有可能收到回报。自然选择让更好产品得以保留,结果是整体的最优化。

通过快速试错以适应现实是无价的。
实验和适应能带来更快的进步。

要意识到你即是一切,又什么都不是,并决定你想成为什么样子。
“个人即是一切,又什么都不是,这是一个巨大的悖论。”

你的未来取决于你的视角。
你的未来取决于你的如何看待事物,关心什么事物。
必须决定你多大程度将别人的利益放在你的自己利益之上。
拥抱现实,从自然的角度俯视自身很美妙。

理解自然提供的现实教训

收益递减规律。

任何东西在从太少变太多的过程中,边际收益都会递减。

没有痛苦就没有收获。

“人需要困难,这对健康来说是必须的。”

痛苦 + 反思 = 进步

如果以正确的态度面对痛苦,感到痛苦就是你的幸运!!即使反思痛苦。

最好的就是在痛苦的当时就进行反思。

考虑后续与再后续的结果

直接结果很可能是诱惑或者痛苦。

如果因为直接结果的痛苦而不去做,就很难获得大的成功。

如果因为直接结果的诱惑而去做了,就会遭遇更大的失败。

接受结果:内控点

在生活中不论遇到什么情况,如果你能够负起责任,进行良好的决策,而不是抱怨你无法控制的事情,你将更加容易知找到幸福。

不要为喜不喜欢自己的处境担忧,你必须根据自己的愿望找到实现愿望的途径。然后,鼓起勇气坚持下去。

后面的五步流程会给到你一定帮助。

从更高的层次腐蚀机器

想象自己是一个大机器里的一个小机器,拥有改变自己而变得更好的能力。

通过比较你实现的结果和你的目标,你就能确定如何改进你的机器。

却别作为机器设计者的你和作为机器中工作者的你。

最难的事情是在自身所处的环境中,客观的看待我们自己,不高看自己,不承担不应该承担的任务。

擅于请教领域达人,因为你很难客观看待自己,所以你需要依赖他人的意见以及证据。

如果你头脑开放,足够有决心,你几乎可以实现任何愿望。

五部流程,实现你的人生愿望

  1. 明确目标
  2. 找到阻碍目标的问题,并且不容忍问题
  3. 准确诊断问题,找到问题根源
  4. 规划可以解决问题的方案
  5. 做一切必要的事儿来践行这些方案,实现成果

这五个步骤形成一个循环。

需要注意的点是:

专注每个点。设定目标的时候就设定目标,不要想实现和出错(延迟批判)。

当你诊断问题的时候,就不要想如何解决问题,混淆这两个问题会导致你无法发现真正的问题。

坚持这些规则。挫折,会让你难受,不完美永远存在。好消息是你可以从错误中吸收学习和成长。

坚持下去你就会有收获。

有明确的目标

排列目标优先级。你几乎可以得到你想要的任何东西,但你无法得到所有东西。

分清目标和欲望

目标是你真正需要的东西

欲望是你想要但会阻碍你实现目标的东西(比如偷懒)

不要因为某个目标无法实现就否定它

伟大的期望创造伟大的能力

拥有灵活性和自我归咎,那没什么能阻止你

知道如何应对挫折很重要

逆境中,重要的是守住优势,减少损失

你的任务永远是做出尽可能少的选择

成功不难,关键在于少犯错误

找出问题但是不容忍

令人痛苦的问题当做考验你潜在进步的机会

当你遇到一个问题,那就是一个机会。 大多数人不喜欢这么做

不要逃避问题,承认问题是改变的第一步

忍痛前行,痛苦会给你汇报

不要把某个原因当做问题本身

我无法得到很好的睡眠是一个原因,我工作效率低是一个问题,前者可能是后者的原因。

重点解决大问题

找到问题根源

弄清楚问题,这需要时间去诊断,一次良好的诊断一般需要15-60分钟。

区分直接与根本原因

规划方案

前进之前先回顾

设置方案,写下来所有人都能看到,严格执行

规划先于行动,好规划不一定要很多时间

坚定的从头到尾执行方案

保持谦逊

与其他人高质量交流

保持谦逊,你可以从别人那里得到你需要的东西

找到你最大的弱点,并处理掉

理解自己的认知,理解他人与你不同

提升认知能力,保持头脑开放,从他人那里获得帮助,你可以实现很多事情

做到头脑极度开放

这一章几乎是生活原则中最重要的一章。(雷达里奥说;这也是全书最重要的一章)
主要重点有两个: 一个是为什么要保持头脑开放;一个是什么情况下你是头脑封闭的。
认识到第二点其实很重要,这会帮助你的日常反思。

认识到自己的障碍和不足;

寻求可信度高的人的意见,设身处地思考和理解,对比自己的,最终做出更好的决策。

认识你的两大障碍

障碍一:意识障碍;理解你的自我意识障碍

主要是你潜意识里的防备机制; 使你难以接受你的错误和缺点。

我们有一些根植于内心的需求:

  • 被爱
  • 被需要
  • 害怕死亡
  • 害怕失去
  • 害怕自己无意义

不能让“想要自己正确的需求 ” 压倒 “找出真相” 的需求

当有人和你意见不一样;并且要求你解释的时候;你的大脑会把这样的东西当做 攻击;你会变得愤怒。

如果你想要成功;你需要克制这一点。 这样的人你也可以观察一下;身边到处都是。你也可以反思一下;你自己是不是这样的人。(怎么判断自己有这种倾向在后面会说到)

障碍二;思维障碍;理解你的思维盲点障碍

人很难理解自己看不到的东西;《需求》 这本书里也有说到 塞缪尔思反射 。

如果你一心只想告诉对方自己的认为正确的想法;你就是 一个头脑封闭的人

这样的话;当其他人给你展示各种可能性威胁和批评的时候;你可能会看不见。也无法领会。

奉行头脑极度开放;不仅仅是“承认自己可能错了”

如果你知道自己有盲点;你就能找到一种解决办法。

头脑开放不仅仅是“承认自己可能错了”,但是依旧坚持自己的观点。这样作用不大。

a. 诚恳的想想自己也许并不知道最好的解决办法是什么。能不能妥善处理“不知道”很重要
很多糟糕的决定是因为他们相信自己是对的。而头脑极度开放的人知道。找到问题的答案很重要。

b. 决策有两个步骤: 1 分析所有相关信息;2 决策
听听其他人的观点并加以思考,不会削弱你独立思考,自主决策的自由。只会帮你拥有更广的角度

c. 不要担心你的形象,只担心如何实现目标
做出优秀决策的人,很少坚信自己已经掌握了最好的答案,承认自己有缺点 和 盲点 ,并试图了解更多,克服缺陷和盲点。

d 不吸收,产出也不大好。

e 从他人的角度,设身处地,才能评估另一种观点的价值
高度接受自己错了的可能性,鼓励别人告诉自己错在哪里

f 记住:你是在寻找最好的答案,不是自己能得出最好的答案
知道自己不知道,无比重要。 自问一下,我是不是只是从自己的角度看问题

g 搞清楚你是在争论还是在试图理解一个问题,根据可信度,想想哪种更加合理

可信度 有两个特征:

反复的在相关领域成功找到答案(至少三次,拥有硬履历)

再被责问的情况下能对自己的观点做出很好的解释

领会并感激:深思熟虑的意见分歧

沟通方式要让对方觉得,你是试图在理解

你需要提问,而不是做出陈述,心平气和的进行讨论,并鼓励对方也这么做。

(某些时候)人们在产生分歧时变得愤怒是毫无意义的

当讨论陷入僵局,最没效果的就是,你试图在脑子中将所有的事情都弄得清楚。

和可信的,愿意表达分歧的人一起审视你的观点

既单独询问专家,也鼓励专家在我面前展现意见分歧。

为最坏的做准备。使其看起来不那么糟糕。

(重要)识别你头脑封闭的迹象

a 封闭的人:不喜欢看到自己的观点被挑战

不开放:会因为无法说服他人而沮丧,而不是好奇对方为何看法不同。

开放: 更想了解为什么会有分歧,明白自己可能是错的

b 封闭的人:喜欢做陈述而不是提问

开放的人,可信度很高的人,经常会提出很多问题。并真诚的相信自己可能是错的

c 封闭的人: 更关心自己是否被理解,而不是理解他人

封闭的人: 通常担心自己没有被理解

开放的人:觉得有必要从他人的视角看问题。

d 封闭的人:“我可能错了。。。但这是我的观点”

这是一个敷衍的回答,人们借此来固守自己的观点

最好提出一个问题,而不是做出一个断言

e 封闭的人 : 封闭的人,阻挠别人的发言

开放的人更喜欢倾听发言,鼓励表达

f 封闭的人 : 很难同时拥有两种想法

同时持有两种想法,并且能保持独立思考。

g 封闭的人 : 缺乏谦逊

开放的人: 时刻担忧自己可能是错误的。

如何做到头脑开放?

  • 利用自己的痛苦进行高质量的思考
  • 一旦觉得愤怒,冷静下来,以深思熟虑的方式看待眼前问题
  • 一定要客观,愿意倾听
  • 重视证据
  • 冥想

理解人与人大大不相同

要理解:左脑思考偏逻辑,右脑思考偏情感。

要理解:最长发生的斗争就是意识与潜意识,情绪和思考的斗争。

如果你意识不到你的潜意识的存在,你的行为就会像西奥迪尼在《影响力》中做的那个比喻一样:是一个带着按钮的录音机;一按就播放。

比如:听到别人反对时候的被侵犯感。

要知道:我们可以改变,通过习惯。

如何做出正确的决策

好决策最大的敌人是坏情绪

如果你被情绪绑架,你将不可能作出好的决策。作出决策时候必须用逻辑,理性,事实。

正如荣格所说:“如果你不知道潜意识的存在,否则潜意识就会主导你的人生,而你称之为命运”

先了解,后决策

  1. 是什么 :先了解决策的基础知识,既包括“是什么”,也包括宏观的因果关系

“习惯性的问自己,我在了解相关情况吗?我已经掌握了决策的所有知识了么?”

为了了解:

要知道应该问什么人

不要高估自己的可信度

不要不区分别人的可信度(在相同领域有过3次以上成功经验的硬简历)

区分事实和观点,不要听到什么信什么,别人说的和做的很可能不一样。

80/20原则:你从20%的信息获得80%的价值,明白关键性的20%是什么

不要完美主义,完美主义的边际效用是 递减的

  1. 怎么做 :权衡结果,考虑结果,后续的结果,后续的后续的结果

backtrader

发表于 2020-09-05 | 分类于 投资

Backtrader

引言

前基于Python的量化回测框架有很多,开源框架有zipline、vnpy、pyalgotrader和backtrader等,而量化平台有Quantopian(国外)、聚宽、万矿、优矿、米筐、掘金等,这些量化框架或平台各有优劣。就个人而言,比较偏好用backtrader,因为它功能十分完善,有完整的使用文档,安装相对简单(直接pip安装即可)。优点是运行速度快,支持pandas的矢量运算;支持参数自动寻优运算,内置了talib股票分析技术指标库;支持多品种、多策略、多周期的回测和交易;支持pyflio、empyrica分析模块库、alphalens多因子分析模块库等;扩展灵活,可以集成TensorFlow、PyTorch和Keras等机器学习、神经网络分析模块。而不足之处在于,backtrader学习起来相对复杂,编程过程中使用了大量的元编程(类class),如果Python编程基础不扎实(尤其是类的操作),学起来会感到吃力。本文作为backtrader的入门系列之一,对其运行框架进行简要介绍,并以实际案例展示量化回测的过程。

Backtrader介绍

如果将backtrader包分解为核心组件,主要包括以下组成部分:

  1. 数据加载(Data Feed):将交易策略的数据加载到回测框架中。
  2. 交易策略(Strategy):该模块是编程过程中最复杂的部分,需要设计交易决策,得出买入/卖出信号。
  3. 回测框架设置( Cerebro):需要设置(i)初始资金(ii)佣金(iii)数据馈送(iv)交易策略交易头寸大小。
  4. 运行回测:运行Cerebro回测并打印出所有已执行的交易。
  5. 评估性能(Analyzers):以图形和风险收益等指标对交易策略的回测结果进行评价。

“Lines”是backtrader回测的数据,由一系列的点组成,通常包括以下类别的数据:Open(开盘价), High(最高价), Low(最低价), Close(收盘价), Volume(成交量), OpenInterest(无的话设置为0)。Data Feeds(数据加载)、Indicators(技术指标)和Strategies(策略)都会生成 Lines。价格数据中的所有”Open” (开盘价)按时间组成一条 Line。所以,一组含有以上6个类别的价格数据,共有6条 Lines。如果算上“DateTime”(时间,可以看作是一组数据的主键),一共有7条 Lines。当访问一条 Line 的数据时,会默认指向下标为 0 的数据。最后一个数据通过下标 -1 来访问,在-1之后是索引0,用于访问当前时刻。因此,在回测过程中,无需知道已经处理了多少条/分钟/天/月,”0”一直指向当前值,下标 -1 来访问最后一个值。

Backtrader环境搭建

  • 安装python环境 (anaconda)
  • pip install backtrader[plotting]
  • 新建jupyterProject文件夹,在其路径栏输入 jupyter lab,按enter键,等待启用jupyter

回测应用实例

量化回测说白了是使用历史数据去验证交易策略的性能,因此回测的第一步是搭建交易策略,这也是backtrader要设置的最重要和复杂的部分,策略设定好后,其余部分的代码编写是手到擒来。

构建策略(Strategy)

交易策略类代码包含重要的参数和用于执行策略的功能,要定义的参数或函数名如下:

(1)params-全局参数,可选:更改交易策略中变量/参数的值,可用于参数调优。

(2)log:日志,可选:记录策略的执行日志,可以打印出该函数提供的日期时间和txt变量。

(3) init:用于初始化交易策略的类实例的代码。

(4)notify_order,可选:跟踪交易指令(order)的状态。order具有提交,接受,买入/卖出执行和价格,已取消/拒绝等状态。

(5)notify_trade,可选:跟踪交易的状态,任何已平仓的交易都将报告毛利和净利润。

(6)next,必选:制定交易策略的函数,策略模块最核心的部分。

下面以一个简单的单均线策略为例,展示backtrader的使用过程,即当收盘价上涨突破20日均线买入(做多),当收盘价下跌跌穿20日均线卖出(做空)。为简单起见,不报告交易回测的日志,因此log、notify_order和notify_trade函数省略不写。

class my_strategy1(bt.Strategy):
    #全局设定交易策略的参数
    params=(
        ('maperiod',20),
           )

    def __init__(self):
        #指定价格序列
        self.dataclose=self.datas[0].close
        # 初始化交易指令、买卖价格和手续费
        self.order = None
        self.buyprice = None
        self.buycomm = None

        #添加移动均线指标,内置了talib模块
        self.sma = bt.indicators.SimpleMovingAverage(
                      self.datas[0], period=self.params.maperiod)
    def next(self):
        if self.order: # 检查是否有指令等待执行, 
            return
        # 检查是否持仓   
        if not self.position: # 没有持仓
            #执行买入条件判断:收盘价格上涨突破20日均线
            if self.dataclose[0] > self.sma[0]:
                #执行买入
                self.order = self.buy(size=500)         
        else:
            #执行卖出条件判断:收盘价格跌破20日均线
            if self.dataclose[0] < self.sma[0]:
                #执行卖出
                self.order = self.sell(size=500)

数据加载(Data Feeds)

策略设计好后,第二步是数据加载,backtrader提供了很多数据接口,包括quandl(美股)、yahoo、pandas格式数据等,我们主要分析A股数据。

#先引入后面可能用到的包(package)
import pandas as pd  
from datetime import datetime
import backtrader as bt
import matplotlib.pyplot as plt
%matplotlib inline   

#正常显示画图时出现的中文和负号
from pylab import mpl
mpl.rcParams['font.sans-serif']=['SimHei']使用tushare获取浦发银行(代码:600000)数据。
#使用tushare旧版接口获取数据
import tushare as ts 
def get_data(code,start='2010-01-01',end='2020-03-31'):
    df=ts.get_k_data(code,autype='qfq',start=start,end=end)
    df.index=pd.to_datetime(df.date)
    df['openinterest']=0
    df=df[['open','high','low','close','volume','openinterest']]
    return df
dataframe=get_data('600000')

#回测期间
start=datetime(2010, 3, 31)
end=datetime(2020, 3, 31)
# 加载数据
data = bt.feeds.PandasData(dataname=dataframe,fromdate=start,todate=end)

回测设置(Cerebro)

回测设置主要包括几项:回测系统初始化,数据加载到回测系统,添加交易策略, broker设置(如交易资金和交易佣金),头寸规模设置作为策略一部分的交易规模等,最后显示执行交易策略时积累的总资金和净收益。

初始化cerebro回测系统设置

cerebro = bt.Cerebro()

#将数据传入回测系统
cerebro.adddata(data)

将交易策略加载到回测系统中

cerebro.addstrategy(my_strategy1)

设置初始资本为10,000

startcash = 10000
cerebro.broker.setcash(startcash)

设置交易手续费为 0.2%

cerebro.broker.setcommission(commission=0.002)

执行回测

输出回测结果。

print(f'净收益: {round(pnl,2)}')

d1=start.strftime('%Y%m%d')
d2=end.strftime('%Y%m%d')
print(f'初始资金: {startcash}\n回测期间:{d1}:{d2}')
#运行回测系统
cerebro.run()
#获取回测结束后的总资金
portvalue = cerebro.broker.getvalue()
pnl = portvalue - startcash
#打印结果
print(f'总资金: {round(portvalue,2)}')结果如下:
初始资金: 10000
回测期间:20100331:20200331
总资金: 12065.36
净收益: 2065.36

可视化

对上述结果进行可视化,使用内置的matplotlib画图。至此,简单的单均线回测就完成了。下面图形展示了浦发银行在回测期间的价格走势、买卖点和交易总资金的变化等。

# 画图
cerebro.plot()

回测实例

from __future__ import (absolute_import, division, print_function,
                        unicode_literals)

import datetime  # For datetime objects
import os.path  # To manage paths
import sys  # To find out the script name (in argv[0])

# Import the backtrader platform
import backtrader as bt

# Create a Stratey

class TestStrategy(bt.Strategy):

    params = (
        ('exitbars', 5),
        ('maperiod', 24),
        ('printlog', False),
    )

    def log(self, txt, dt=None, doprint=False):
        ''' Logging function for this strategy'''
        if self.params.printlog or doprint:
            dt = dt or self.datas[0].datetime.date(0)
            print('[%s] %s' % (dt.isoformat(), txt))

    def __init__(self):
       # Keep a reference to the "close" line in the data[0] dataseries
        self.dataclose = self.datas[0].close
        # To keep track of pending orders and buy price/commission
        self.order = None
        self.buyprice = None
        self.buycomm = None
        # Add a MovingAverageSimple indicator
        self.sma = bt.indicators.SimpleMovingAverage(
            self.datas[0], period=self.params.maperiod)

        # Indicators for the plotting show
        bt.indicators.ExponentialMovingAverage(self.datas[0], period=25)
        bt.indicators.WeightedMovingAverage(
            self.datas[0], period=25).subplot = True
        bt.indicators.StochasticSlow(self.datas[0])
        bt.indicators.MACDHisto(self.datas[0])
        rsi = bt.indicators.RSI(self.datas[0])
        bt.indicators.SmoothedMovingAverage(rsi, period=10)
        bt.indicators.ATR(self.datas[0]).plot = False

    def notify_order(self, order):
        if order.status in [order.Submitted, order.Accepted]:
            # Buy/Sell order submitted/accepted to/by broker - Nothing to do
            return

        # Check if an order has been completed
        # Attention: broker could reject order if not enough cash
        if order.status in [order.Completed]:
            if order.isbuy():
                self.log(
                    'BUY EXECUTED, Price: %.2f, Cost: %.2f, Comm %.2f' %
                    (order.executed.price,
                     order.executed.value,
                     order.executed.comm))

                self.buyprice = order.executed.price
                self.buycomm = order.executed.comm
            else:  # Sell
                self.log('SELL EXECUTED, Price: %.2f, Cost: %.2f, Comm %.2f' %
                         (order.executed.price,
                          order.executed.value,
                          order.executed.comm))

            self.bar_executed = len(self)

        elif order.status in [order.Canceled, order.Margin, order.Rejected]:
            self.log('Order Canceled/Margin/Rejected')

        self.order = None

    def notify_trade(self, trade):
        if not trade.isclosed:
            return

        self.log('OPERATION PROFIT: GROSS %.2f, NET %.2f' %
                 (trade.pnl, trade.pnlcomm))

    def next(self):
        # Simply log the closing price of the series from the reference
        self.log('Close: %.2f' % self.dataclose[0])

        # Check if an order is pending ... if yes, we cannot send a 2nd one
        if self.order:
            return

       # Check if we are in the market
        if not self.position:
            # Not yet ... we MIGHT BUY if ...
            if self.dataclose[0] > self.sma[0]:
                # current close less than previous close
                if self.dataclose[-1] < self.dataclose[-2]:
                    # previous close less than the previous close

                    # BUY, BUY, BUY!!! (with default parameters)
                    self.log('BUY CREATE: %.2f' % self.dataclose[0])

                    # Keep track of the created order to avoid a 2nd order
                    self.order = self.buy()
        else:
            # Already in the market ... we might sell
            if self.dataclose[0] < self.sma[0]:
                # SELL, SELL, SELL!!! (with all possible default parameters)
                self.log('SELL CREATE: %.2f' % self.dataclose[0])

                # Keep track of the created order to avoid a 2nd order
                self.order = self.sell()

    def stop(self):
        self.log('(MA Period %2d) Ending Value %.2f' %
                 (self.params.maperiod, self.broker.getvalue()), doprint=True)


if __name__ == '__main__':
    cerebro = bt.Cerebro()

    # Add a strategy
    cerebro.addstrategy(TestStrategy)
    # cerebro.optstrategy(TestStrategy, maperiod=range(10, 31))

    # 初始化数据的路径
    modpath = os.path.dirname(os.path.abspath(sys.argv[0]))
    datapath = os.path.join(modpath, '.\\/datas\\/orcl-1995-2014.txt')
    # Create a Data Feed,reverse 代表是否反转数据
    data = bt.feeds.YahooFinanceCSVData(
        dataname=datapath,
        # Do not pass values before this date
        fromdate=datetime.datetime(2000, 1, 1),
        # Do not pass values after this date
        todate=datetime.datetime(2000, 12, 31),
        reverse=False)

    # Add the Data Feed to Cerebro
    cerebro.adddata(data)
    # 改变账户初始金额
    cerebro.broker.set_cash(100000.0)

    # Set the commission - 0.1% ... divide by 100 to remove the % 交易佣金设置
    cerebro.broker.setcommission(commission=0.001)
    # 设置每笔交易交易的股票数量
    cerebro.addsizer(bt.sizers.FixedSize, stake=10)

    print('Starting Portfolio Value: %.2f' % cerebro.broker.getvalue())

    cerebro.run()

    print('Final Portfolio Value: %.2f' % cerebro.broker.getvalue())
    # 画图
    cerebro.plot()

先来回顾一下交易策略模块(Strategy)的构成。交易策略类代码包含参数或函数名如下:

(1)params-全局参数,可选:更改交易策略中变量/参数的值,可用于参数调优。

(2)log:日志,可选:记录策略的执行日志,可以打印出该函数提供的日期时间和txt变量。

(3) init:用于初始化交易策略的类实例的代码。

(4)notify_order,可选:跟踪交易指令(order)的状态。order具有提交,接受,买入/卖出执行和价格,已取消/拒绝等状态。

(5)notify_trade,可选:跟踪交易的状态,任何已平仓的交易都将报告毛利和净利润。

(6)next,必选:制定交易策略的函数,策略模块最核心的部分。

下面仍然以简单均线策略为例,重点介绍参数寻优和交易日志报告。

实现代码如下:

#先引入后面可能用到的包(package)
import pandas as pd  
import numpy as np
import tushare as ts 
import matplotlib.pyplot as plt
%matplotlib inline   
#正常显示画图时出现的中文和负号
from pylab import mpl
mpl.rcParams['font.sans-serif']=['SimHei']
mpl.rcParams['axes.unicode_minus']=False

params是全局参数,maperiod是MA均值的长度,默认15天,printlog为打印交易日志,默认不输出结果,策略模块的核心在next()函数。

from datetime import datetime
import backtrader as bt
class MyStrategy(bt.Strategy):
    params=(('maperiod',15),
            ('printlog',False),)
    def __init__(self):
        #指定价格序列
        self.dataclose=self.datas[0].close
        # 初始化交易指令、买卖价格和手续费
        self.order = None
        self.buyprice = None
        self.buycomm = None
        #添加移动均线指标
        self.sma = bt.indicators.SimpleMovingAverage(
                      self.datas[0], period=self.params.maperiod)
    #策略核心,根据条件执行买卖交易指令(必选)
    def next(self):
        # 记录收盘价
        #self.log(f'收盘价, {dataclose[0]}')
        if self.order: # 检查是否有指令等待执行, 
            return
        # 检查是否持仓   
        if not self.position: # 没有持仓
            #执行买入条件判断:收盘价格上涨突破15日均线
            if self.dataclose[0] > self.sma[0]:
                self.log('BUY CREATE, %.2f' % self.dataclose[0])
                #执行买入
                self.order = self.buy()         
        else:
            #执行卖出条件判断:收盘价格跌破15日均线
            if self.dataclose[0] < self.sma[0]:
                self.log('SELL CREATE, %.2f' % self.dataclose[0])
                #执行卖出
                self.order = self.sell()
    #交易记录日志(可省略,默认不输出结果)
    def log(self, txt, dt=None,doprint=False):
        if self.params.printlog or doprint:
            dt = dt or self.datas[0].datetime.date(0)
            print(f'{dt.isoformat()},{txt}')
    #记录交易执行情况(可省略,默认不输出结果)
    def notify_order(self, order):
        # 如果order为submitted/accepted,返回空
        if order.status in [order.Submitted, order.Accepted]:
            return
        # 如果order为buy/sell executed,报告价格结果
        if order.status in [order.Completed]: 
            if order.isbuy():
                self.log(f'买入:\n价格:{order.executed.price},\
                成本:{order.executed.value},\
                手续费:{order.executed.comm}')
                self.buyprice = order.executed.price
                self.buycomm = order.executed.comm
            else:
                self.log(f'卖出:\n价格:{order.executed.price},\
                成本: {order.executed.value},\
                手续费{order.executed.comm}')
            self.bar_executed = len(self) 
        # 如果指令取消/交易失败, 报告结果
        elif order.status in [order.Canceled, order.Margin, order.Rejected]:
            self.log('交易失败')
        self.order = None
    #记录交易收益情况(可省略,默认不输出结果)
    def notify_trade(self,trade):
        if not trade.isclosed:
            return
        self.log(f'策略收益:\n毛收益 {trade.pnl:.2f}, 净收益 {trade.pnlcomm:.2f}')
    #回测结束后输出结果(可省略,默认输出结果)
    def stop(self):
        self.log('(MA均线: %2d日) 期末总资金 %.2f' %
                 (self.params.maperiod, self.broker.getvalue()), doprint=True)

下面定义一个主函数,用于对某股票指数(个股)在指定期间进行回测,使用tushare的旧接口获取数据,包含开盘价、最高价、最低价、收盘价和成交量。这里主要以3到30日均线为例进行参数寻优,考察以多少日均线与价格的交叉作为买卖信号能获得最大的收益。

def main(code,start,end='',startcash=10000,qts=500,com=0.001):
    #创建主控制器
    cerebro = bt.Cerebro()      
    #导入策略参数寻优
    cerebro.optstrategy(MyStrategy,maperiod=range(3, 31))    
    #获取数据
    df=ts.get_k_data(code,autype='qfq',start=start,end=end)
    df.index=pd.to_datetime(df.date)
    df=df[['open','high','low','close','volume']]
    #将数据加载至回测系统
    data = bt.feeds.PandasData(dataname=df)    
    cerebro.adddata(data)
    #broker设置资金、手续费
    cerebro.broker.setcash(startcash)           
    cerebro.broker.setcommission(commission=com)    
    #设置买入设置,策略,数量
    cerebro.addsizer(bt.sizers.FixedSize, stake=qts)   
    print('期初总资金: %.2f' %                    
    cerebro.broker.getvalue())    
    cerebro.run(maxcpus=1)    
    print('期末总资金: %.2f' % cerebro.broker.getvalue())

再定义一个画图函数,对相应股票(指数)在某期间的价格走势和累计收益进行可视化。

def plot_stock(code,title,start,end):
    dd=ts.get_k_data(code,autype='qfq',start=start,end=end)
    dd.index=pd.to_datetime(dd.date)
    dd.close.plot(figsize=(14,6),color='r')
    plt.title(title+'价格走势\n'+start+':'+end,size=15)
    plt.annotate(f'期间累计涨幅:{(dd.close[-1]/dd.close[0]-1)*100:.2f}%', xy=(dd.index[-150],dd.close.mean()), 
             xytext=(dd.index[-500],dd.close.min()), bbox = dict(boxstyle = 'round,pad=0.5',
            fc = 'yellow', alpha = 0.5),
             arrowprops=dict(facecolor='green', shrink=0.05),fontsize=12)
    plt.show()

以上证综指为例,回测期间为2010-01-01至2020-03-30,期间累计收益率为-15.31%,惨不忍睹。

面分别对3-30日均线进行回测,这里假设指数可以交易,初始资金为100万元,每次交易100股,注意如果指数收盘价乘以100超过可用资金,会出现交易失败的情况,换句话说在整个交易过程中,是交易固定数量的标的,因此仓位的大小跟股价有直接关系。

main('sh','2010-01-01','',1000000,100)

plot_stock('sh','上证综指','2010-01-01','2020-03-30')

Analyzers模块

Analyzers模块涵盖了评价一个量化策略的完整指标,如常见的夏普比率、年化收益率、最大回撤、Calmar比率等等。Analyzers模块原生代码能获取的评价指标如下图所示,其中TradeAnalyzer和PeriodStats又包含了不少指标。由于采用元编程,Analyzers的扩展性较强,可以根据需要添加自己的分析指标,如获取回测期间每一时刻对应的总资金。

策略模块编写

(1)params-全局参数,可选:更改交易策略中变量/参数的值,可用于参数调优。

(2)log:日志,可选:记录策略的执行日志,可以打印出该函数提供的日期时间和txt变量。

(3) init:用于初始化交易策略的类实例的代码。

(4)notify_order,可选:跟踪交易指令(order)的状态。order具有提交,接受,买入/卖出执行和价格,已取消/拒绝等状态。

(5)notify_trade,可选:跟踪交易的状态,任何已平仓的交易都将报告毛利和净利润。

(6)next,必选:制定交易策略的函数,策略模块最核心的部分。

(7)其他,包括start()、nextsstart()、stop()、prenext()、notify_fund()、notify_store()和notify_cashvalue。

面以技术分析指标RSI(不了解的请自行百度)的择时策略为例,当RSI<30时买入,RSI>70时卖出。为了简便起见,策略模块中只包含最核心的交易信号。

import pandas as pd
import backtrader as bt
from datetime import datetime
class MyStrategy(bt.Strategy):
    params=(('short',30),
            ('long',70),)
    def __init__(self):
        self.rsi = bt.indicators.RSI_SMA(
                   self.data.close, period=21)
    def next(self):
        if not self.position:
            if self.rsi < self.params.short:
                self.buy()
        else:
            if self.rsi > self.params.long:
                self.sell()

回测设置

回测系统设置与之前一样,主要是数据加载、交易本金、手续费、交易数量的设置,此处以tushare的旧接口获取股票002537的交易数据进行量化回测。

from __future__ import (absolute_import, division, print_function,  
                        unicode_literals) 
import tushare as ts
#以股票002537为例
df=ts.get_k_data('002537',start='2010-01-01')
df.index=pd.to_datetime(df.date)
#df['openinterest'] = 0
df=df[['open','high','low','close','volume']]
data = bt.feeds.PandasData(dataname=df,                               
                            fromdate=datetime(2013, 1, 1),                               
                            todate=datetime(2020, 4, 17) )
# 初始化cerebro回测系统设置                           
cerebro = bt.Cerebro()  
# 加载数据
cerebro.adddata(data) 
# 将交易策略加载到回测系统中
cerebro.addstrategy(MyStrategy) 
# 设置初始资本为100,000
cerebro.broker.setcash(100000.0) 
#每次固定交易数量
cerebro.addsizer(bt.sizers.FixedSize, stake=1000) 
#手续费
cerebro.broker.setcommission(commission=0.001) 

运行回测

这里重点是Analyzers模块的调用与结果输出,调用模块是cerebro.addanalyzer(),再从模块中获取分析指标,如夏普比率是bt.analyzers.SharpeRatio,然后是给该指标重命名方便之后调用,即 _name=’SharpeRatio’。要获取分析指标,需要先执行回测系统,cerebro.run(),并将回测结果赋值给变量results,分析指标存储在results[0]里 (strat变量代替),通过strat.analyzers.SharpeRatio.get_analysis()即可获取相应数据,其他指标操作方法类似。

print('初始资金: %.2f' % cerebro.broker.getvalue())
cerebro.addanalyzer(bt.analyzers.SharpeRatio, _name = 'SharpeRatio')
cerebro.addanalyzer(bt.analyzers.DrawDown, _name='DW')
results = cerebro.run()
strat = results[0]
print('最终资金: %.2f' % cerebro.broker.getvalue())
print('夏普比率:', strat.analyzers.SharpeRatio.get_analysis())
print('回撤指标:', strat.analyzers.DW.get_analysis())

输出结果:
初始资金: 100000.00
最终资金: 110215.33
夏普比率: OrderedDict([('sharperatio', 0.094)])
回撤指标: AutoOrderedDict([('len', 280), ('drawdown', 1.01), ('moneydown', 1126.60), ('max', AutoOrderedDict([('len', 280), ('drawdown', 3.61), ('moneydown', 4016.60)]))])

回测结果可视化

下面输出回测图表,一张大图上包含了三张图:

(1)资金变动图:可以看到在实施交易策略的数据期内,资金的盈利/损失。

(2)交易收益/亏损。蓝色(红色)点表示获利(亏损)交易以及获利(亏损)多少。

(3)价格图表。绿色和红色箭头分别表示交易策略的进入点和退出点。黑线是交易标的随时间变化的价格, 条形图表示每个条形图期间资金的交易量。

Analyzers模块指标可视化

其他

init

任何类在生成的时候都是先调用这一初始化构造函数。也就是说,在实例生成的时候,这个函数将被调用。

  1. Birth: start

    start方法在cerebro告诉strategy,是时候开始行动了,也就是说,通知策略激活的时候被调用。

  2. Childhood: prenext

    有些技术指标,比如我们提到的MA,存在一个窗口,也就是说,需要n天的数据才能产生指标,那么在没有产生之前呢?这个prenext方法就会被自动调用。

  3. Adulthood: next
    这个方法是最核心的,就是每次移动到下一的时间点,策略将会调用这个方法,所以,策略的核心往往都是写在这个方法里的。

  4. Death: stop

    策略的生命周期结束,cerebro把这一策略退出。

策略当中的回调函数

Strategy 类就像真实世界的交易员一样,当交易执行的时候,他会得到一些消息,譬如order是否执行,一笔trader赚了多少钱,等等。这些消息都将在Strategy类中通过回调函数被得以知晓。这些回调函数如下:

notify_order(order):下的单子,order的任何状态变化都将引起这一方法的调用

notify_trade(trade):任何一笔交易头寸的改变都将调用这一方法

notify_cashvalue(cash, value):任何现金和资产组合的变化都将调用这一方法
notify_store(msg, *args, **kwargs):可以结合cerebro类进行自定义方法的调用

那么问题接踵而至,这里我们只关注前2种方法中监测对象的可变化方式。

trade指的是一笔头寸,trade是open的状态指当前时刻,这一标的的头寸从0变到某一非零值。trade是closed则刚好相反。

trade大概有如下常用属性
ref: 唯一id
size (int): trade的当前头寸
price (float): trade资产的当前价格
value (float): trade的当前价值
commission (float): trade的累计手续费
pnl (float): trade的当前pnl
pnlcomm (float): trade的当前pnl减去手续费
isclosed (bool): 当前时刻trade头寸是否归零
isopen (bool): 新的交易更新了trade
justopened (bool): 新开头寸
dtopen (float): trade open的datetime
dtclose (float): trade close的datetime

Orders

order是strategy发出的指令,让cerebro去执行。
strategy自身有buy, sell and close方法来生成order,cancel方法来取消一笔order。下单的方式有很多,后续会介绍,这里主要讲回调函数中,咱们可以获得哪些信息。
order.status可以返回order的当前状态

order.isbuy可以获得这笔order是否是buy

order.executed.price
order.executed.value
order.executed.comm

分别可以获得执行order的价格,总价,和手续费

class TestStrategy(bt.Strategy):
    params = (
        ('maperiod', 15),
    )

    def log(self, txt, dt=None):
        ''' Logging function fot this strategy'''
        dt = dt or self.datas[0].datetime.date(0)
        print('%s, %s' % (dt.isoformat(), txt))

    def __init__(self):
        # Keep a reference to the "close" line in the data[0] dataseries
        self.dataclose = self.datas[0].close

        # To keep track of pending orders and buy price/commission
        self.order = None
        self.buyprice = None
        self.buycomm = None

        # Add a MovingAverageSimple indicator
        self.sma = bt.indicators.SimpleMovingAverage(
            self.datas[0], period=self.params.maperiod)
    def start(self):
        print("the world call me!")

    def prenext(self):
        print("not mature")

    def notify_order(self, order):
        if order.status in [order.Submitted, order.Accepted]:
            # Buy/Sell order submitted/accepted to/by broker - Nothing to do
            return

        # Check if an order has been completed
        # Attention: broker could reject order if not enougth cash
        if order.status in [order.Completed]:
            if order.isbuy():
                self.log(
                    'BUY EXECUTED, Price: %.2f, Cost: %.2f, Comm %.2f' %
                    (order.executed.price,
                     order.executed.value,
                     order.executed.comm))

                self.buyprice = order.executed.price
                self.buycomm = order.executed.comm
            else:  # Sell
                self.log('SELL EXECUTED, Price: %.2f, Cost: %.2f, Comm %.2f' %
                         (order.executed.price,
                          order.executed.value,
                          order.executed.comm))

            self.bar_executed = len(self)

        elif order.status in [order.Canceled, order.Margin, order.Rejected]:
            self.log('Order Canceled/Margin/Rejected')

        self.order = None

可以看到打印出来的结果中,有start和prenext,最后当然也有death

Backtrader的indicator

def __init__(self):
    # Keep a reference to the "close" line in the data[0] dataseries
    self.dataclose = self.datas[0].close

    # To keep track of pending orders and buy price/commission
    self.order = None
    self.buyprice = None
    self.buycomm = None

    # Add a MovingAverageSimple indicator
    self.sma = bt.indicators.SimpleMovingAverage(
        self.datas[0], period=self.params.maperiod)

这里的最后,我们使用了一个backtrader内置的indicator,后续我们将尝试自己编写一个indicator。

数据的获取

datafeed,也就是cerebro的本源,数据

dataframe = pd.read_csv('dfqc.csv', index_col=0, parse_dates=True)
dataframe['openinterest'] = 0
data = bt.feeds.PandasData(dataname=dataframe,
                        fromdate = datetime.datetime(2015, 1, 1),
                        todate = datetime.datetime(2016, 12, 31)
                        )
# Add the Data Feed to Cerebro
cerebro.adddata(data)

2014-03-13 00:00:00.005,1.425,1.434,1.449,1.418,457767208.0
2014-03-14 00:00:00.005,1.429,1.422,1.436,1.416,196209439.0
2014-03-17 00:00:00.005,1.433,1.434,1.437,1.422,250946201.0
2014-03-18 00:00:00.005,1.434,1.425,1.437,1.424,245516577.0
2014-03-19 00:00:00.005,1.423,1.419,1.423,1.406,331866195.0
2014-03-20 00:00:00.005,1.412,1.408,1.434,1.407,379443759.0
2014-03-21 00:00:00.005,1.406,1.463,1.468,1.403,825467935.0

dataframe = pd.read_csv('dfqc.csv', index_col=0, parse_dates=True)

把csv读入pandas的参数,index_col=0表示第一列时间数据是作为pandas 的index的,parse_dates=Ture是自动把数据中的符合日期的格式变成datetime类型。为什么要这样呢?其实读入后的pandas长怎么样都是由backtrader规定的

pandas的要求的结构,我们就知道,不仅仅有self.datas[0].close,还会有self.datas[0].open。也确实如此。只是我们通常拿close作为一个价格基准

self.datas[0].close

返回的是一个lines。lines是backtrader一个很重要的概念,可以理解为时间序列流,这类数据,后面可以跟index,也就是说,可以有

self.datas[0].close[0]
self.datas[0].close[-1]

这里的index是有意义的,0代表当前时刻,-1代表前一时刻,1代表后一时刻,以此类推

所以在next中使用self.dataclose[0],self.dataclose[-1]

安装TA-lib

下载TA_Lib-0.4.19-cp37-cp37m-win_amd64

pip install TA_Lib-0.4.19-cp37-cp37m-win_amd64.whl

qa函数

发表于 2020-08-29 | 分类于 投资

数据

下单

QA_Account()

QA_Account() 是quantaxis的核心类, 其作用是一个可以使用规则兼容各种市场的账户类
1.3.0以后, QA_Account需要由组合来进行创建(推荐)

调用方式
import QUANTAXIS as QA
user = QA.QA_User(username ='quantaxis', password = 'quantaxis')
portfolio=user.new_portfolio('x1')
account = *portfolio.new_account*(account_cookie='test')

QA_AccountPRO?
Init signature:
QA_AccountPRO(
    user_cookie:str,
    portfolio_cookie:str,
    account_cookie=None,
    strategy_name=None,
    market_type='stock_cn',
    frequence='day',
    broker='backtest',
    init_hold={},
    init_cash=1000000,
    commission_coeff=0.00025,
    tax_coeff=0.001,
    margin_level={},
    allow_t0=False,
    allow_sellopen=False,
    allow_margin=False,
    running_environment='backtest',
    auto_reload=False,
    generated='direct',
    start=None,
    end=None,
)
Docstring:     
JOB是worker 需要接受QA_EVENT 需要完善RUN方法
👻QA_Broker 继承这个类
👻QA_Account 继承这个类
👻QA_OrderHandler 继承这个类
这些类都要实现run方法,在其它线程🌀中允许自己的业务代码
File:           /usr/local/lib/python3.6/site-packages/QUANTAXIS/QAARP/QAAccountPro.py
Type:           type
Subclasses:     
accpro = *portfolio.new_accountpro*('pro2',market_type=QA.MARKET_TYPE.STOCK_CN)
accpro.positions
{}
*accpro.receive_deal*?
Signature:
accpro.receive_deal(
    code,
    trade_id:str,
    order_id:str,
    realorder_id:str,
    trade_price,
    trade_amount,
    trade_towards,
    trade_time,
    message=None,
)
Docstring: <no docstring>
File:      /usr/local/lib/python3.6/site-packages/QUANTAXIS/QAARP/QAAccountPro.py
Type:      method
`accpro.receive_deal`('000001','001','001','0001',trade_price=12,trade_amount=10000,trade_towards=QA.ORDER_DIRECTION.BUY,trade_time='2020-08-18')
*accpro.positions*
{'000001': < QAPOSITION 000001 amount 10000/0 >}
*accpro.history_table*


*accpro.send_order?*
Signature:
accpro.send_order(
    code=None,
    amount=None,
    time=None,
    towards=None,
    price=None,
    money=None,
    order_model='LIMIT',
    amount_model='by_amount',
    order_id=None,
    position_id=None,
    *args,
    **kwargs,
)
Docstring: <no docstring>
File:      /usr/local/lib/python3.6/site-packages/QUANTAXIS/QAARP/QAAccountPro.py
Type:      method

基于期货市场的账户初始化
future_account = portfolio.new_account(account_cookie ='future',allow_t0=True,allow_margin=True,allow_sellopen=True, running_environment=QA.MARKET_TYPE.FUTURE_CN)

account的其他属性可以.出来,可以自己试着看
*accpro.cash*
[1000000, 879970.0, 779945.0]
*accpro.cash_available*
779945.0
*accpro.get_history*
*accpro.get_position*('000001')

pos2 = accpro.get_position('000002')

*pos2.message*
{'code': '000002',
 'instrument_id': '000002',
 'user_id': 'pro2',
 'portfolio_cookie': 'x1',
 'username': 'quantaxis',
 'position_id': '3e2cd89e-7143-4e0e-b344-40571e84eda5',
 'account_cookie': 'pro2',
 'frozen': {},
 'name': None,
 'spms_id': None,
 'oms_id': None,
 'market_type': 'stock_cn',
 'exchange_id': None,
 'moneypreset': 100000,
 'moneypresetLeft': 0.0,
 'lastupdatetime': '',
 'volume_long_today': 5000,
 'volume_long_his': 0,
 'volume_long': 5000,
 'volume_short_today': 0,
 'volume_short_his': 0,
 'volume_short': 0,
 'volume_long_frozen_today': 0,
 'volume_long_frozen_his': 0,
 'volume_long_frozen': 0,
 'volume_short_frozen_today': 0,
 'volume_short_frozen_his': 0,
 'volume_short_frozen': 0,
 'margin_long': 100000.0,
 'margin_short': 0,
 'margin': 100000.0,
 'position_price_long': 20.0,
 'position_cost_long': 100000.0,
 'position_price_short': 0,
 'position_cost_short': 0.0,
 'open_price_long': 20.0,
 'open_cost_long': 100000.0,
 'open_price_short': 0,
 'open_cost_short': 0.0,
 'trades': [],
 'orders': {},
 'last_price': 20,
 'float_profit_long': 0.0,
 'float_profit_short': 0.0,
 'float_profit': 0.0,
 'position_profit_long': 0.0,
 'position_profit_short': 0.0,
 'position_profit': 0.0}

*pos2.volume_long*
5000
*pos2.volume_long_today*
5000
*pos2.volume_long_his*
0
*pos2.last_price*
20
*pos2.on_price_change*(21)
if pos2.float_profit_long > 2000:
    print('sell')
sell

QIFIAccount

from QIFIAccount import QIFI_Account
aifiacc = QIFI_Account(username='x2',password='x2',)
aifiacc.initial()
Create new Account
aifiacc?
Type:           QIFI_Account
String form:    <QIFIAccount.QAQIFIAccount.QIFI_Account object at 0x7f6e3b2dfc18>
File:           /usr/local/lib/python3.6/site-packages/QIFIAccount/QAQIFIAccount.py
Docstring:      <no docstring>
Init docstring:
Initial
QIFI Account是一个基于 DIFF/ QIFI/ QAAccount后的一个实盘适用的Account基类


1. 兼容多持仓组合
2. 动态计算权益

使用 model = SIM/ REAL来切换


sr = aifiacc.send_order('003',10,12,ORDER_DIRECTION.BUY)
aifiacc.send_order?
Signature:
aifiacc.send_order(
    code:str,
    amount:float,
    price:float,
    towards:int,
    order_id:str='',
)
Docstring: <no docstring>
File:      /usr/local/lib/python3.6/site-packages/QIFIAccount/QAQIFIAccount.py
Type:      method
sr = aifiacc.send_order('004',10.0,12.0,QA.ORDER_DIRECTION.BUY)
{'volume_long': 0, 'volume_short': 0, 'volume_long_frozen': 0, 'volume_short_frozen': 0}
{'volume_long': 0, 'volume_short': 0}
order check success
下单成功 b3f155c7-ab2b-4ac1-94b7-08b6af152738
td = aifiacc.make_deal(sr)
全部成交 b3f155c7-ab2b-4ac1-94b7-08b6af152738
update trade

QUANTAXIS

发表于 2020-08-20 | 分类于 投资

环境准备

安装cmder

  1. 官网下载地址

    http://cmder.net/

    下载好解压包可直接使用

  2. 环境变量配置

    在系统属性里面配置环境变量,将Cmder.exe所在文件路径添加至path里

win+R,输入cmder,确定,即可运行cmder

  1. 配置右键快捷启动

    // 设置任意地方鼠标右键启动Cmder
    Cmder.exe /REGISTER ALL
    

  1. 快捷键

    Tab 自动路径补全
    Ctrl+T 建立新页签
    Ctrl+W 关闭页签
    Ctrl+Tab 切换页签
    Alt+F4 关闭所有页签
    Alt+Shift+1 开启cmd.exe
    Alt+Shift+2 开启powershell.exe
    Alt+Shift+3 开启powershell.exe (系统管理员权限)
    Ctrl+1 快速切换到第1个页签
    Ctrl+n 快速切换到第n个页签( n值无上限)
    Alt + enter 切换到全屏状态
    Ctr+r 历史命令搜索
    Tab 自动路径补全
    Ctrl+T 建立新页签
    Ctrl+W 关闭页签
    Ctrl+Tab 切换页签
    Alt+F4 关闭所有页签
    Alt+Shift+1 开启cmd.exe
    Alt+Shift+2 开启powershell.exe
    Alt+Shift+3 开启powershell.exe (系统管理员权限)
    Ctrl+1 快速切换到第1个页签
    Ctrl+n 快速切换到第n个页签( n值无上限)
    Alt + enter 切换到全屏状态
    Ctr+r 历史命令搜索
    Win+Alt+P 开启工具选项视窗

  2. 中文乱码问题

将下面的4行命令添加到cmder/config/aliases文件末尾。

l=ls --show-control-chars 
la=ls -aF --show-control-chars 
ll=ls -alF --show-control-chars 
ls=ls --show-control-chars -F

安装docker桌面版

下载

https://www.docker.com/

下载Docker Desktop

安装可能遇到的问题

Installation failed:one pre-requisite is not fullfilled

提示我们系统版本低,解决办法,伪装成专业版系统。用管理员权限开启运行[cmd]命令开启命令行,输入如下指令

REG ADD "HKEY_LOCAL_MACHINE\software\Microsoft\Windows NT\CurrentVersion" /v EditionId /T REG_EXPAND_SZ /d Professional /F

再次安装docker可以成功

下载QUANTAXIS的docker-compose.yaml文件

`https://github.com/QUANTAXIS/QUANTAXIS`

如果你是股票方向的 ==> 选择 qa-service 下的docker-compose.yaml

如果你是期货方向的 ==> 选择 qa-service-future 下的docker-compose.yaml

你可以理解 docker的构成类似搭积木的模式, 你需要这个功能的积木, 就选择他放在你的docker-compose.yaml里面

期货方向的yaml 比股票多一个 QACTPBEE的docker-container [这是用于分发期货的tick行情所需的 股票则无需此积木]

可通过git拉取全部代码到本地,从本地拷贝出需要的dockerfile文件

docker部署quantaxis

  1. 选取一个空间较大的盘,最好不放c盘,新建quantaxis文件夹,将docker-compose.yaml拷贝到quantaxis文件夹
  2. cd到quantaxis文件夹,运行如下命令

    docker volume create --name=qamg
    docker volume create --name=qacode
    docker-compose up -d
    

意思在后台启动这个docker环境,如果需要控制台打印输出,则把-d去掉

  1. 在无报错的情况下,打开浏览器输入localhost:81即可看到

在上方随意点击栏目,都可进入登陆界面,默认密码是quantaxis

  1. docker做了什么

帮你直接开启你需要的服务

  • 27017 mongodb
  • 8888 jupyter (密码)quantaxis
  • 8010 quantaxis_webserver
  • 81 quantaxis_community 社区版界面
  • 61208 系统监控
  • 15672 qa-eventmq (密码)admin admin
  1. 日志查看

    docker logs cron容器名
    
  2. 其他命令

    docker ps
    
    docker stats
    
    docker-compose top (必须到dockerfile文件夹目录下)
    
    docker-compose ps (必须到dockerfile文件夹目录下)
    
    docker stop $(docker ps -a -q)停止容器
    
    docker rm $(docker ps -a -q)删除容器
    
    docker-compose pull 更新(必须到dockerfile文件夹目录下)
    docker-compose up -d 重启服务(必须到dockerfile文件夹目录下)
    docker-compose stop 停止服务(必须到dockerfile文件夹目录下)
    
    docker run  --rm -v qamg:/data/db \ -v $(pwd):/backup alpine \tar zcvf /backup/dbbackup.tar /data/db  备份数据库到当前目录下
    docker run  --rm -v qamg:/data/db \
    -v $(pwd):/backup alpine \
    sh -c "cd /data/db \
    && rm -rf diagnostic.data \
    && rm -rf journal \
    && rm -rf configdb \
    && cd / \
    && tar xvf /backup/dbbackup.tar" 还原当前目录下的dbbackup.tar到mongod数据库
    
    当更新了dockerfile后重启服务,之前保存的数据不会被清除
    

保存数据

  1. 先进入到jupyter的登陆页登陆,找到terminal

  1. 在点开的terminal界面中,输入quantaxis 回车, 进入quantaxis cli的命令行界面

  1. 在命令行界面 输入 save 按回车, 你可以看到许多命令行选项

  1. 参考

    save all  (股票/指数 的日线数据 | 权息数据 | 板块数据)  
    save x   (股票/指数的 日线/分钟线数据  | 权息数据| 板块数据)
    
    save future_min_all  (期货的全部合约的分钟线数据)
    save future_min  (q期货主连的分钟线数据)
    
    save future_day_all (期货全部合约的日线数据)
    save future_day (期货主连的日线数据)
    
    save index_day    (指数数据  此处也要存, 因为在做回测的时候, 需要沪深300作为标的对照物)
    
  2. 存完数据后可以打开notebook,做一个回测

    import QUANTAXIS as QA
    import numpy as np
    import pandas as pd
    import datetime
    st1=datetime.datetime.now()
    # define the MACD strategy
    def MACD_JCSC(dataframe, SHORT=12, LONG=26, M=9):
        """
        1.DIF向上突破DEA,买入信号参考。
        2.DIF向下跌破DEA,卖出信号参考。
        """
        CLOSE = dataframe.close
        DIFF = QA.EMA(CLOSE, SHORT) - QA.EMA(CLOSE, LONG)
        DEA = QA.EMA(DIFF, M)
        MACD = 2*(DIFF-DEA)
    
        CROSS_JC = QA.CROSS(DIFF, DEA)
        CROSS_SC = QA.CROSS(DEA, DIFF)
        ZERO = 0
        return pd.DataFrame({'DIFF': DIFF, 'DEA': DEA, 'MACD': MACD, 'CROSS_JC': CROSS_JC, 'CROSS_SC': CROSS_SC, 'ZERO': ZERO})
    
# create account
user = QA.QA_User(username='quantaxis', password='quantaxis')
portfolio = user.new_portfolio('qatestportfolio')


Account = portfolio.new_account(account_cookie='macd_stock', init_cash=1000000)
Broker = QA.QA_BacktestBroker()

QA.QA_SU_save_strategy('MACD_JCSC','Indicator',Account.account_cookie)
# get data from mongodb
QA.QA_SU_save_strategy('MACD_JCSC', 'Indicator',
                       Account.account_cookie, if_save=True)
data = QA.QA_fetch_stock_day_adv(
    ['000001', '000002', '000004', '600000'], '2017-09-01', '2018-05-20')
data = data.to_qfq()

# add indicator
ind = data.add_func(MACD_JCSC)
# ind.xs('000001',level=1)['2018-01'].plot()

data_forbacktest=data.select_time('2018-01-01','2018-05-01')


for items in data_forbacktest.panel_gen:
    for item in items.security_gen:
        ###################
        daily_ind=ind.loc[item.index]

        if daily_ind.CROSS_JC.iloc[0]>0:
            order=Account.send_order(
                code=item.code[0], 
                time=item.date[0], 
                amount=1000, 
                towards=QA.ORDER_DIRECTION.BUY, 
                price=0, 
                order_model=QA.ORDER_MODEL.CLOSE, 
                amount_model=QA.AMOUNT_MODEL.BY_AMOUNT
                )
            #print(item.to_json()[0])
            Broker.receive_order(QA.QA_Event(order=order,market_data=item))
            trade_mes=Broker.query_orders(Account.account_cookie,'filled')
            res=trade_mes.loc[order.account_cookie,order.realorder_id]
            order.trade(res.trade_id,res.trade_price,res.trade_amount,res.trade_time)
        elif daily_ind.CROSS_SC.iloc[0]>0:
            #print(item.code)
            if Account.sell_available.get(item.code[0], 0)>0:
                order=Account.send_order(
                    code=item.code[0], 
                    time=item.date[0], 
                    amount=Account.sell_available.get(item.code[0], 0), 
                    towards=QA.ORDER_DIRECTION.SELL, 
                    price=0, 
                    order_model=QA.ORDER_MODEL.MARKET, 
                    amount_model=QA.AMOUNT_MODEL.BY_AMOUNT
                    )
                #print
                Broker.receive_order(QA.QA_Event(order=order,market_data=item))
                trade_mes=Broker.query_orders(Account.account_cookie,'filled')
                res=trade_mes.loc[order.account_cookie,order.realorder_id]
                order.trade(res.trade_id,res.trade_price,res.trade_amount,res.trade_time)
    Account.settle()

print('TIME -- {}'.format(datetime.datetime.now()-st1))
print(Account.history)
print(Account.history_table)
print(Account.daily_hold)

# create Risk analysis
Risk = QA.QA_Risk(Account)

Account.save()
Risk.save()
  1. 推荐的做法

使用最新的QAStrategy来做回测/模拟

首先 打开terminal (上面有讲), 输入

pip install qastrategy

然后 新建一个notebook, 输入

from QAStrategy import QAStrategyCTABase
import QUANTAXIS as QA
import pprint


class CCI(QAStrategyCTABase):

    def on_bar(self, bar):

        res = self.cci()

        print(res.iloc[-1])

        if res.CCI[-1] < -100:

            print('LONG')

            if self.positions.volume_long == 0:
                self.send_order('BUY', 'OPEN', price=bar['close'], volume=1)

            if self.positions.volume_short > 0:
                self.send_order('SELL', 'CLOSE', price=bar['close'], volume=1)

        elif res.CCI[-1] > 100:
            print('SHORT')
            if self.positions.volume_short == 0:
                self.send_order('SELL', 'OPEN', price=bar['close'], volume=1)
            if self.positions.volume_long > 0:
                self.send_order('BUY', 'CLOSE', price=bar['close'], volume=1)

    def cci(self,):
        return QA.QA_indicator_CCI(self.market_data, 61)

    def risk_check(self):
        pass
        # pprint.pprint(self.qifiacc.message)

然后 你可以自由指定回测/模拟

首先实例化这个类

strategy =CCI(code='RB2005', frequence='1min',strategy_id='a3916de0-bd28-4b9c-bea1-94d91f1744ac', start=‘2020-01-01‘, end=‘2020-02-07’)

如果你需要测试这个策略

strategy.debug()

如果你需要做回测

strategy.run_backtest()

如果你需要让他直接挂模拟

在挂模拟的时候, 你需要注意一些东西

挂模拟的标的需要和真实标的一致
挂模拟的时候, 你的行情必须是有推送的, 并且申请了你所需要的的分钟线级别的数据

(如何申请行情数据? 你可以看这里 )
https://github.com/yutiansut/QUANTAXIS_RealtimeCollector

# 期货订阅请求
  curl -X POST "http://127.0.0.1:8011?action=new_handler&market_type=future_cn&code=au1911"
  
1
2
3
4
5
6
7
8
9
10
# 股票订阅请求
curl -X POST "http://127.0.0.1:8011?action=new_handler&market_type=stock_cn&code=000001"
# 二次采样请求
curl -X POST "http://127.0.0.1:8011?action=new_resampler&market_type=future_cn&code=au1911&frequence=2min"

对于小白可能难以理解curl是个啥, 此处给出一个简单易懂的代码

import requests
requests.post("http://127.0.0.1:8011?action=new_handler&market_type=future_cn&code={}".format("rb2001")
以此类推其他的请求都可以这么做
像 螺纹2001 合约, 你需要改成 rb2001 注意此处是小写 strategy =CCI(code='rb2001', frequence='1min',strategy_id='a3916de0-bd28-4b9c-bea1-94d91f1744ac') strategy.debug_sim()

做完了这些操作以后, 你可以点击 回测 你就可以看到类似这样的结果

  1. 更多参考

    http://www.yutiansut.com:3000/topic/5dc5da7dc466af76e9e3bc5d

    如何修改期货的实盘行情地址 http://www.yutiansut.com:3000/topic/5dfade9efe01257b44740e70

    实时如何申请行情 http://www.yutiansut.com:3000/topic/5dd1be9b0c8e672840f3fea7

    如何接入你的实盘期货账户 http://www.yutiansut.com:3000/topic/5dc865e8c466af76e9e3bdd1

    如何实现模拟盘/实盘的跟单 http://www.yutiansut.com:3000/topic/5ddb5ba8fe01257b4474080a

    docker 如何访问外部数据库 https://github.com/QUANTAXIS/QUANTAXIS/issues/1346 http://www.yutiansut.com:3000/topic/5e4531c96d3b182e88b4ebb4

    docker小白用户的推荐 http://www.yutiansut.com:3000/topic/5e4cb13f6d3b182e88b4ef64

整个环境一览

配置的一些备忘

  1. 安装vscode可以调试docker

修改定时保存数据的时间

使用vscode进入qa-cron的容器中,进入目录 /etc/cron.d 修改daily_update里的时间即可,如果只需要保存期货数据,要改掉脚本里的 update_future.py

部署
crontab daily_update
crontab -l
检查
/etc/init.d/cron start
/etc/init.d/cron status

解决在执行时提示 cron: can’t lock /var/run/crond.pid, otherpid may be 2699: Resource temporarily unavailable

解决方案: 

    rm -rf /var/run/crond.pid

    /etc/init.d/cron reload

    sudo /usr/sbin/service cron restart

如果定时不启用,可以在本地save保存数据,save不会覆盖之前已经下载好的数据

在界面安装包

!ls
!pip -v
!pip install
!pip install qastrategy -U
在terminal界面也可以安装

from QUANTAXIS.QAARP.QAAccountPro import QA_AccountPRO
QA_AccountPRO?

docker-compose常用命令

docker-compose up -d nginx                     构建建启动nignx容器

docker-compose exec nginx bash            登录到nginx容器中

docker-compose down                              删除所有nginx容器,镜像

docker-compose ps                                   显示所有容器

docker-compose restart nginx                   重新启动nginx容器

docker-compose run --no-deps --rm php-fpm php -v  在php-fpm中不启动关联容器,并容器执行php -v 执行完成后删除容器

docker-compose build nginx                     构建镜像 。        

docker-compose build --no-cache nginx   不带缓存的构建。

docker-compose logs  nginx                     查看nginx的日志 

docker-compose logs -f nginx                   查看nginx的实时日志


docker-compose config  -q                        验证(docker-compose.yml)文件配置,当配置正确时,不输出任何内容,当文件配置错误,输出错误信息。 

docker-compose events --json nginx       以json的形式输出nginx的docker日志

docker-compose pause nginx                 暂停nignx容器

docker-compose unpause nginx             恢复ningx容器

docker-compose rm nginx                       删除容器(删除前必须关闭容器)

docker-compose stop nginx                    停止nignx容器

docker-compose start nginx                    启动nignx容器

Git使用详解

发表于 2020-06-17 | 分类于 java

Git的安装和使用

下载安装Git

[https://git-scm.com/download/win](https://git-scm.com/download/win "下载Git")

下载完成后双击安装

检验是否安装完成

鼠标右击如果看到有两个git单词则安装成功

Git基本工作流程

Git的工作区域

向仓库中添加文件流程

Git初始化及仓库创建和操作

Git安装之后需要进行一些基本信息设置

  1. 设置用户名:git config – global user.name ‘你再github上注册的用户名’;
  2. 设置用户邮箱:git config – global user.email ‘注册时候的邮箱’;

注意:该配置会在github主页上显示谁提交了该文件

  1. 配置ok之后,我们用如下命令来看看是否配置成功

  git config –list

注意:git config –global 参数,有了这个参数表示你这台机器上所有的git仓库都会使用这个配置,当然你也可以对某个仓库指定不同的用户名和邮箱

初始化一个新的git仓库

  1. 创建文件夹

    方法一:可以鼠标右击-》点击新建文件夹test1

    方法二:使用git新建:$ mkdir test1

  1. 在文件内初始化git(创建git仓库)

    方法一:直接输入 $ cd test1

    方法一:点击test1文件下进去之后-》鼠标右击选择Git Bash Here->输入$ git int

  1. 向仓库中添加文件  

  方法一:用打开编辑器新建index.html文件

  方法二:使用git命令。$ touch ‘文件名’,然后把文件通过$ git add ‘文件名’添加到暂存区,最后提交操作

  1. 修改仓库文件

  方法一:用编辑器打开index.html进行修改

  方法二:使用git命令。$ vi ‘文件名’,然后在中间写内容,最后提交操作

  1. 删除仓库文件

  方法一:在编辑器中直接把要删除的文件删除掉

  方法二:使用git删除:$ git rm ‘文件名’,然后提交操作

Git管理远程仓库

Git克隆操作

目的:将远程仓库(github上对应的项目)复制到本地

代码:git clone 仓库地址

仓库地址由来如下:

克隆项目

将本地仓库同步到git远程仓库中:git push

注意

解决:这是通过Git GUI进行提交时发生的错误,由 .git 文件夹中的文件被设为“只读”所致,将 .git 文件夹下的所有文件、文件夹及其子文件的只读属性去掉即可。

消息队列5个应用场景

发表于 2020-06-08 | 分类于 java

消息队列中间件是分布式系统中重要的组件,主要解决应用解耦,异步消息,流量削峰等问题,实现高性能、高可用、可伸缩和最终一致性架构,使用较多的消息队列有ActiveMQ、RabbitMQ、ZeroMQ、Kafka、MetaMQ、RocketMQ。

消息队列应用场景

异步处理

场景说明:用户注册后,需要发送注册邮件和注册短信,传统的做法有两种,串行的方式和并行的方式。

串行方式:将注册信息写入数据库成功后,发送注册邮件,在发送注册短信,以上三个任务全部完成后,返回给用户。

并行的方式:将注册信息写入数据库成功后,发送注册邮件的同时,发送注册短信,以上三个任务完成后,返回给客户端。与串行的差别是,并行的方式可以提高处理的时间。

假设三个业务节点每个使用50毫秒,不考虑网络等其他开销,则串行方式时间是150毫秒,并行的时间是100毫秒。

因为CPU在单位时间内处理的请求数是一定的,假设CPU1秒内的吞吐量是100次。则串行方式1秒内CPU可处理的请求量是7次(1000/150)。并行方式处理的请求是10(1000/100)次。

如以上案例描述,传统的方式系统的性能(并发量,吞吐量,响应时间)会有瓶颈,如何解决呢?

引入消息队列,将不是必须的业务逻辑,异步处理,改造后如下

按照以上约定,用户的响应时间想当与是注册信息写入数据库的时间,也就是50毫秒。注册邮件,发送短信写入消息队列后,直接返回,因此写入消息队列的速度很快,基本可以忽略,因此用户的响应时间可能就是50毫秒。因此架构改变后,系统的吞吐量提高到每秒20QPS。比串行提高了3倍,比并行提高了2倍。

应用解耦

场景说明:用户下单后,订单系统需要通知库存系统。传统的做法是,订单系统调用库存系统的接口。如下图:

缺点:假如库存系统无法访问,则订单减库存将失败,从而导致订单失败,订单系统与库存系统存在耦合

解决:引入应用消息队列

订单系统:用户下单后,订单系统完成持久化处理,将消息写入消息队列,返回用户订单下单成功。

库存系统:订阅下单的消息,采用拉/推的方式,获取下单信息,库存系统根据下单信息,进行库存操作。

假如:在下单时库存系统不能正常使用。也不影响正常下单,因为下单后,订单系统写入消息队列就不再关心其他的后续操作了。实现订单系统与库存系统的应用解耦。

流量削峰

流量削峰也是消息队列中常用的场景,一般在秒杀或团抢活动中使用广泛。

应用场景:秒杀活动,一般会因为流量过大,导致流量暴增,应用挂掉。为解决这个问题,一般需要在应用前端假如消息队列。

可以控制活动的人数,可以缓解短时间内高流量压垮应用。

用户的请求,服务器接收到后先写入消息队列。假如消息队列长度超过最大数量,则直接抛弃用户请求或跳转到错误的页面。

秒杀业务根据消息队列中的请求信息,再做后续处理。

日志处理

日志处理是指将消息ui列用在日志处理中,比如Kafka的应用,解决大量日志传输的问题。架构简化如下:

日志采集客户端,负责日志数据采集,定时写入Kafka队列;Kafak消息队列,负责日志数据的接收,存储和转发;日志处理应用:订阅并消费kafaka队列中的日志数据。

以下是新浪kafka日志处理应用案例:

Kafka:接收用户日志的消息队列;

Logstach:做日志解析,统一成JSON传输给Elasticsearch;

Elasticsearch:实时日志分析服务的核心技术,一个schemaless,实时的数据存储服务,通过index组织数据,兼具强大的搜索和统计功能。

Kibaba:基于Elasticsearch的数据可视化组件,超强的数据可视化能力

消息通讯

消息通讯是指,消息队列一般都内置了高效的通信机制,因此也可以用在纯的消息通讯,比如实现点对点消息队列,或者聊天室等。

客户端A,客户端B,客户端N订阅同一主题,进行消息发布和接收。实现类似聊天室效果。

实战用redis实现简单的发布/订阅

场景:两台tomcat做集群,配置文件不同时生效的问题

<bean id="messageContainer"
    class="org.springframework.data.redis.listener.RedisMessageListenerContainer"
    destroy-method="destroy">
    <property name="connectionFactory" ref="jedisConnectionFactory" />
    <property name="messageListeners">
        <map>
            <entry key-ref="subService">
                <ref bean="channelTopic" />
            </entry>
        </map>
    </property>
</bean>
<bean id="channelTopic" class="org.springframework.data.redis.listener.ChannelTopic">
    <constructor-arg value="server:topic" />
</bean>

@Service
public class PubServiceImpl implements PubService {

    private static final Logger logger = Logger.getLogger(PubService.class);

    @Autowired
    private RedisTemplate<String, String> redisTemplate;

    private String channelTopic = "server:topic";

    public void publish(String str) {
        //String str = JsonUtils.toJson(message);
        logger.error("Publish message:" + str + ", topic:" + channelTopic);
        redisTemplate.convertAndSend(channelTopic, str);
    }

    public void publish(Map<String, Object> message) {
        String str = JsonUtils.toJson(message);
        logger.error("Publish message:" + str + ", topic:" + channelTopic);
        redisTemplate.convertAndSend(channelTopic, str);
    }
}

@Service("subService")
public class SubServiceImpl implements MessageListener {

    private static final Logger logger = Logger.getLogger(SubServiceImpl.class);

    @Autowired
    private ChannelTopic channelTopic;

    @Override
    public void onMessage(Message message, byte[] pattern) {
        String str = message.toString();
        logger.error("Subscribe message:" + str + ", topic:" + channelTopic.getTopic());
        try {
            String type =  m.getType();
            if ("config".equals(type)) {
                System.out.println("接收到消息,doSomething========");
            }else if("me".equals(type)){
                System.out.println("接收到消息,doSomething========");
            }else{
                System.out.println("接收到消息,doSomething========");
            }
        } catch (Exception e) {
            e.printStackTrace();
        }
    }
}

JAVA的map

发表于 2020-06-08 | 分类于 java

Map的用法

类型介绍

  • HashMap

    最常用的Map,它根据键的HashCode值存储数据,根据键可以直接获取它的值,具有很快的访问速度。HashMap最多只允许一条记录的键为null(多条会覆盖);允许多条记录的值为null。非同步的。

  • TreeMap

    能够把它保存的记录根据键(key)排序,默认是按升序排序,也可指定排序的比较器,当用Iterator遍历TreeMap时,得到的记录是排过序的。TreeMap不允许key的值为null。非同步的。

  • Hashtable

    与HashMap类似,不同的是:key和value的值均不允许为null;它支持线程同步,即任一时刻只有一个线程能写HashTable,因此也导致了HashTable在写入时会比较慢。

  • LinkedHashMap

    保存了记录的插入顺序,在使用Iterator遍历LinkedHashMap时,先得到的记录肯定是先插入的,在遍历的时候会比HashMap慢。key和value均允许为空。非同步的。

Map用法

用法
Map<String,String> map = new HashMap<String,String>();

插入元素

map.put("key1","value1");

获取元素

map.get("key1");

移除元素

map.remove("key1")

四种常用Map插入与读取性能比较

测试代码

package net.xsoftlab.baike;
import java.util.HashMap;
import java.util.Hashtable;
import java.util.LinkedHashMap;
import java.util.Map;
import java.util.Random;
import java.util.TreeMap;
import java.util.UUID;
public class Test {
    static int hashMapW = 0;
    static int hashMapR = 0;
    static int linkMapW = 0;
    static int linkMapR = 0;
    static int treeMapW = 0;
    static int treeMapR = 0;
    static int hashTableW = 0;
    static int hashTableR = 0;
    public static void main(String[] args) {
        for (int i = 0; i < 10; i++) {
            Test test = new Test();
            test.test(100 * 10000);
            System.out.println();
        }
        System.out.println("hashMapW = " + hashMapW / 10);
        System.out.println("hashMapR = " + hashMapR / 10);
        System.out.println("linkMapW = " + linkMapW / 10);
        System.out.println("linkMapR = " + linkMapR / 10);
        System.out.println("treeMapW = " + treeMapW / 10);
        System.out.println("treeMapR = " + treeMapR / 10);
        System.out.println("hashTableW = " + hashTableW / 10);
        System.out.println("hashTableR = " + hashTableR / 10);
    }
    public void test(int size) {
        int index;
        Random random = new Random();
        String[] key = new String[size];
        // HashMap 插入
        Map<String, String> map = new HashMap<String, String>();
        long start = System.currentTimeMillis();
        for (int i = 0; i < size; i++) {
            key[i] = UUID.randomUUID().toString();
            map.put(key[i], UUID.randomUUID().toString());
        }
        long end = System.currentTimeMillis();
        hashMapW += (end - start);
        System.out.println("HashMap插入耗时 = " + (end - start) + " ms");
        // HashMap 读取
        start = System.currentTimeMillis();
        for (int i = 0; i < size; i++) {
            index = random.nextInt(size);
            map.get(key[index]);
        }
        end = System.currentTimeMillis();
        hashMapR += (end - start);
        System.out.println("HashMap读取耗时 = " + (end - start) + " ms");
        // LinkedHashMap 插入
        map = new LinkedHashMap<String, String>();
        start = System.currentTimeMillis();
        for (int i = 0; i < size; i++) {
            key[i] = UUID.randomUUID().toString();
            map.put(key[i], UUID.randomUUID().toString());
        }
        end = System.currentTimeMillis();
        linkMapW += (end - start);
        System.out.println("LinkedHashMap插入耗时 = " + (end - start) + " ms");
        // LinkedHashMap 读取
        start = System.currentTimeMillis();
        for (int i = 0; i < size; i++) {
            index = random.nextInt(size);
            map.get(key[index]);
        }
        end = System.currentTimeMillis();
        linkMapR += (end - start);
        System.out.println("LinkedHashMap读取耗时 = " + (end - start) + " ms");
        // TreeMap 插入
        key = new String[size];
        map = new TreeMap<String, String>();
        start = System.currentTimeMillis();
        for (int i = 0; i < size; i++) {
            key[i] = UUID.randomUUID().toString();
            map.put(key[i], UUID.randomUUID().toString());
        }
        end = System.currentTimeMillis();
        treeMapW += (end - start);
        System.out.println("TreeMap插入耗时 = " + (end - start) + " ms");
        // TreeMap 读取
        start = System.currentTimeMillis();
        for (int i = 0; i < size; i++) {
            index = random.nextInt(size);
            map.get(key[index]);
        }
        end = System.currentTimeMillis();
        treeMapR += (end - start);
        System.out.println("TreeMap读取耗时 = " + (end - start) + " ms");
        // Hashtable 插入
        key = new String[size];
        map = new Hashtable<String, String>();
        start = System.currentTimeMillis();
        for (int i = 0; i < size; i++) {
            key[i] = UUID.randomUUID().toString();
            map.put(key[i], UUID.randomUUID().toString());
        }
        end = System.currentTimeMillis();
        hashTableW += (end - start);
        System.out.println("Hashtable插入耗时 = " + (end - start) + " ms");
        // Hashtable 读取
        start = System.currentTimeMillis();
        for (int i = 0; i < size; i++) {
            index = random.nextInt(size);
            map.get(key[index]);
        }
        end = System.currentTimeMillis();
        hashTableR += (end - start);
        System.out.println("Hashtable读取耗时 = " + (end - start) + " ms");
    }
}

Map遍历

初始化数据

Map<String,String> map = new HashMap<String,String>();
map.put("key1","value1");
map.put("key2","value2");

增强for循环遍历

使用keySet()遍历

for(String key:map.keySet()){
    System.out.println(key+":"+map.get(key))
}

使用entrySet()遍历

for(Map.Entry<String,String> entry:map.entrySet()){
    System.out.println(entry.getKey()+":"+entry.getValue());
}

迭代器遍历

使用keySet()遍历

Iterator<String> iterator = map.keySet().iterator();
while(iterator.hasNext()){
    String key = iterator.next();
    System.out.println(key+":"+map.get(key));
}

使用entrySet()遍历

Iterator<Map.Entry<String,String>> iterator = map.entrySet().iterator();
while(iterator.hasNext()){
    Map.Entry<String,String> entry = iterator.next();
    System.out.println(entry.getKey()+":"+entry.getValue());
}

HashMap四种遍历方式性能比较

package net.xsoftlab.baike;
import java.util.HashMap;
import java.util.Iterator;
import java.util.Map;
import java.util.Map.Entry;
public class TestMap {
    public static void main(String[] args) {
        // 初始化,10W次赋值
        Map<Integer, Integer> map = new HashMap<Integer, Integer>();
        for (int i = 0; i < 100000; i++)
            map.put(i, i);
        /** 增强for循环,keySet迭代 **/
        long start = System.currentTimeMillis();
        for (Integer key : map.keySet()) {
            map.get(key);
        }
        long end = System.currentTimeMillis();
        System.out.println("增强for循环,keySet迭代 -> " + (end - start) + " ms");
        /** 增强for循环,entrySet迭代 */
        start = System.currentTimeMillis();
        for (Entry<Integer, Integer> entry : map.entrySet()) {
            entry.getKey();
            entry.getValue();
        }
        end = System.currentTimeMillis();
        System.out.println("增强for循环,entrySet迭代 -> " + (end - start) + " ms");
        /** 迭代器,keySet迭代 **/
        start = System.currentTimeMillis();
        Iterator<Integer> iterator = map.keySet().iterator();
        Integer key;
        while (iterator.hasNext()) {
            key = iterator.next();
            map.get(key);
        }
        end = System.currentTimeMillis();
        System.out.println("迭代器,keySet迭代 -> " + (end - start) + " ms");
        /** 迭代器,entrySet迭代 **/
        start = System.currentTimeMillis();
        Iterator<Map.Entry<Integer, Integer>> iterator1 = map.entrySet().iterator();
        Map.Entry<Integer, Integer> entry;
        while (iterator1.hasNext()) {
            entry = iterator1.next();
            entry.getKey();
            entry.getValue();
        }
        end = System.currentTimeMillis();
        System.out.println("迭代器,entrySet迭代 -> " + (end - start) + " ms");
    }
}

运行三次,比较结果 第一次
增强for循环,keySet迭代 -> 37 ms
增强for循环,entrySet迭代 -> 19 ms
迭代器,keySet迭代 -> 14 ms
迭代器,entrySet迭代 -> 9 ms

增强for循环,keySet迭代 -> 29 ms
增强for循环,entrySet迭代 -> 22 ms
迭代器,keySet迭代 -> 19 ms
迭代器,entrySet迭代 -> 12 ms

增强for循环,keySet迭代 -> 27 ms
增强for循环,entrySet迭代 -> 19 ms
迭代器,keySet迭代 -> 18 ms
迭代器,entrySet迭代 -> 10 ms

总结:

  1. 增强for循环使用方便,但性能较差,不适合处理超大量级的数据。
  2. 迭代器的遍历速度要比增强for循环快很多,是增强for循环的2倍左右。
  3. 使用entrySet遍历的速度比keySet快很多,是keySet的1.5倍左右。

Map排序

HashMap、HashTable、LinkedHashMap排序

HashMap

Map<String,String> map = new HashMap<String,String>();
map.put("b","b");
map.put("a","c");
map.put("c","a");
//排序
List<Map.Entry<String,String>> list = new ArrayList<Map.Entry<String, String>>(map.entrySet().size());
Collections.sort(list, new Comparator<Map.Entry<String, String>>() {
    @Override
    public int compare(Map.Entry<String, String> o1, Map.Entry<String, String> o2) {
        return o1.getKey().compareTo(o2.getKey());
    }
});

for (Map.Entry<String,String> mapping:
list) {
    System.out.println(mapping.getKey()+":"+mapping.getValue());
}

TreeMap

Map<String, String> map = new TreeMap<String, String>(new Comparator<String>() {
    @Override
    public int compare(String o1, String o2) {
        // 降序排序
        return o1.compareTo(o2);
    }
});
map.put("b", "b");
map.put("a", "c");
map.put("c", "a");
for (String key : map.keySet()) {
    System.out.println(key + " :" + map.get(key));
}

按value排序(通用)

Map<String, String> map = new TreeMap<String, String>();
map.put("b", "b");
map.put("a", "c");
map.put("c", "a");
// 通过ArrayList构造函数把map.entrySet()转换成list
List<Map.Entry<String, String>> list = new ArrayList<Map.Entry<String, String>>(map.entrySet());
// 通过比较器实现比较排序
Collections.sort(list, new Comparator<Map.Entry<String, String>>() {
    @Override
    public int compare(Map.Entry<String, String> mapping1, Map.Entry<String, String> mapping2) {
        return mapping1.getValue().compareTo(mapping2.getValue());
    }
});
for (String key : map.keySet()) {
    System.out.println(key + " :" + map.get(key));
}

常用API

扩展List如何一边遍历一边删除

public static void main(String[] args) {
    List<String> platformList = new ArrayList<>();
    platformList.add("博客园");
    platformList.add("CSDN");
    platformList.add("掘金");

    for (String platform : platformList) {
        if (platform.equals("博客园")) {
            platformList.remove(platform);
        }
    }

    System.out.println(platformList);
}

java.util.ConcurrentModificationException异常了,翻译成中文就是:并发修改异常

使用Iterator的remove()方法

public static void main(String[] args) {
    List<String> platformList = new ArrayList<>();
    platformList.add("博客园");
    platformList.add("CSDN");
    platformList.add("掘金");

    Iterator<String> iterator = platformList.iterator();
    while (iterator.hasNext()) {
        String platform = iterator.next();
        if (platform.equals("博客园")) {
            iterator.remove();
        }
    }

    System.out.println(platformList);
}

使用for循环正序遍历

public static void main(String[] args) {
    List<String> platformList = new ArrayList<>();
    platformList.add("博客园");
    platformList.add("CSDN");
    platformList.add("掘金");

    for (int i = 0; i < platformList.size(); i++) {
        String item = platformList.get(i);

        if (item.equals("博客园")) {
            platformList.remove(i);
            i = i - 1;
        }
    }

    System.out.println(platformList);
}

使用for循环倒序遍历

public static void main(String[] args) {
    List<String> platformList = new ArrayList<>();
    platformList.add("博客园");
    platformList.add("CSDN");
    platformList.add("掘金");

    for (int i = platformList.size() - 1; i >= 0; i--) {
        String item = platformList.get(i);

        if (item.equals("掘金")) {
            platformList.remove(i);
        }
    }

    System.out.println(platformList);
}

JSON对象和JSON字符串

发表于 2020-06-05 | 分类于 JS

JSON对象

对象的概念

对象的属性是可以用: 对象.属性进行调用的。

var person={"name":"tom","sex":"男"}//json对象
console.log(person.name);//在控制台输出tom
alert(typeof(person));//object

以上就是json对象。是一个可以用person.name这种方式进行属性的调用。
第三行代码就是看person的类型为object类型

JSON字符串

字符串,JS中的字符串是单引号或者双引号引起来的。那么json字符串就是如下

var b = '{"name":"tom","sex":"男"}';//json字符串
console.log(b);//{"name":"tom","sex":"男"};
alert(typeof(b));//string

以上b就是一个字符串,是一个string类型

JSON字符串和JSON对象的转换

JSON字符串转json对象,调用parse方法;

var b = '{"name":"tom","sex":"男"}';//json字符串
console.log(b);//{"name":"tom","sex":"男"};
alert(typeof(b));//string
var objb = JSON.parse(b);
console.log(objb.name);

JSON对象转JSON字符串

var person={"name":"tom","sex":"男"}//json对象
console.log(person.name);//在控制台输出tom
alert(typeof(person));//object
var personStr = JSON.stringify(person);
alert(typeof(personStr));//string
console.log(personStr);//{"name":"tom","sex":"男"}

字符串转json对象

场景:
    后台返回的person对象上有herf属性,是一个字符串
href = {'href':'../juvenile/summerCamp/summerCamp.html','isLogined':'1','param':{'activityId':'2141108450038362510'}}

要解析到herf

var configData = eval('(' + href + ')');//由字符串转换为JSON对象

console.log(configData.href)

SpringSecurity验证流程解析

发表于 2020-05-28 | 分类于 java

SpringSecurity

  1. TokenAuthenticationFilter

    if (httpRequest.getServletPath().equals(loginLink)) {
        //如果是登录或注销的话,设置不沿着过滤器向下
        doNotContinueWithRequestProcessing(httpRequest);
        checkLoginAnDoSomething(httpRequest, httpResponse, token);
    }
    
  2. checkLoginAnDoSomething(httpRequest, httpResponse, token);

    example: Authorization=Basic YWRtaW46MTIzNDU2 (admin:123456)
    
    private boolean checkLoginAnDoSomething(HttpServletRequest httpRequest, HttpServletResponse httpResponse,
        String token) throws IOException {
        String authorization = httpRequest.getHeader(CacheConstant.AUTHORIZATION);
        ReturnStatus result = null;
        if (authorization != null) {
            result = checkBasicAuthorization(authorization, httpRequest, httpResponse, token);
        }
    
        if (null == result) {
            result = new ReturnStatus(false);
            result.getErrors().add(new MError(MErrorCode.e9000));
            result.setMessage(MErrorCode.e9000.desc());
        }
    
        String body;
        try {
            body = JsonUtils.toJson(result);// JsonParserFactory.getParser().toJson(result).toString();
            httpResponse.setContentType("text/html;charset=UTF-8");
            httpResponse.getWriter().write(body);
        } catch (Exception e) {
            throw new IOException(e);
        }
    
        return result.isSuccess();
    

    }

  3. checkBasicAuthorization(authorization, httpRequest, httpResponse, token);

    private ReturnStatus checkBasicAuthorization(String authorization, HttpServletRequest httpRequest,
            HttpServletResponse httpResponse, String token) throws IOException {
        StringTokenizer tokenizer = new StringTokenizer(authorization);
        if (tokenizer.countTokens() < 2) {
            return null;
        }
        if (!tokenizer.nextToken().equalsIgnoreCase(CacheConstant.BASIC_AUTH_PREFIX)) {
            return null;
        }
    
        String base64 = tokenizer.nextToken();
        String loginPassword = new String(Base64.decode(base64.getBytes(StandardCharsets.UTF_8)));
        tokenizer = new StringTokenizer(loginPassword, ":");
        String username = tokenizer.nextToken();
        String pwd = tokenizer.nextToken();
        String password = passwordEncoder.encodePassword(pwd, null);
        ReturnStatus status = checkUsernameAndPassword(username, password, httpRequest, httpResponse, token);
        // 登录成功后返回登录状态
        return status;
    }
    
  4. private ReturnStatus checkUsernameAndPassword(String username, String password, HttpServletRequest httpRequest,HttpServletResponse httpResponse, String oldtoken)

    private ReturnStatus checkUsernameAndPassword(String username, String password, HttpServletRequest httpRequest,
            HttpServletResponse httpResponse, String oldtoken) throws IOException {
        ReturnStatus returnResult = new ReturnStatus(false);
        TokenInfo tokenInfo = authenticationService.authenticate(username, password, httpRequest);
        if (tokenInfo != null && tokenInfo.getUserDetails() != null) {
            VerifyContext verifyContext = (VerifyContext) tokenInfo.getUserDetails();
            Account account = (Account) verifyContext.getUser().getEntity();
            if (account.isLogin()) {
                if (null != oldtoken && !"".equals(oldtoken) && !"null".equals(oldtoken)
                        && !"undefined".equals(oldtoken)) {
                    logger.info("tokenInfo.setToken use the oldtoken Token :{}", tokenInfo.getToken());
                    tokenInfo.setToken(oldtoken);
                }
                logger.info("the new Token :{},entity:{}", tokenInfo.getToken(), tokenInfo);
                this.cacheManager.saveObject(CacheEnum.TOKEN, tokenInfo.getToken(), tokenInfo.getUserDetails(),
                        CacheConstant.USER_SESSION_TIME);
                logger.info("the token:{}, save object:{}", tokenInfo.getToken(),
                        this.cacheManager.getObject(CacheEnum.TOKEN, tokenInfo.getToken()));
                returnResult.setEntity(account);
                returnResult.setSuccess(true);
            } else {
                returnResult.getErrors().add(new MError(MErrorCode.e9001));
                returnResult.setMessage(MErrorCode.e9001.desc());
            }
            httpResponse.setHeader(CacheConstant.HEADER_TOKEN, tokenInfo.getToken());
        } else {
            logger.error("User {} ,Password {} Unauthorized!", username, password);
            returnResult.getErrors().add(new MError(MErrorCode.e9000));
            returnResult.setMessage(MErrorCode.e9000.desc());
        }
        return returnResult;
    }
    

基于用户-角色-权限设计

Account

accountName//账号名
accountPwd//密码
status//状态
accountType//账号类型
entityID//实体id
lastLoginTime//最后一次登录时间
loginTimes//登录次数
roleIds//角色列表
//一个账号可以关联角色,角色呈树状结构,可多选

Function

name//功能点名称
parentId//父级
memo//描述
action//资源url
order//排序
icon//图标
permissionCode//唯一权限标识
permissionName//权限名称

Role

name//角色名称
parentId//父级
memo//描述
functionIds//功能点
order//排序
//角色也是呈树状菜单的,角色里面有权限配置,所有的功能点以树状结构展示,通过角色去关联功能点

递归菜单和角色

// 获取标准JSON数据
public static List<Map<String, Object>> getStandardJSON() {
    // 根据不同框架获取对应的List数据
    List<Map<String, Object>> queryList = query.find();
    List<Map<String, Object>> parentList = Lists.newArrayList();
    for (Map<String, Object> map : queryList) {
        if (map.get("pId").equals("0")) {
            parentList.add(map);
        }
    }    
    recursionChildren(parentList, queryList);
    return parentList;
}

// 递归获取子节点数据
public static void recursionChildren (List<Map<String, Object>> parentList, 
List<Map<String, Object>> allList) {
    for (Map<String, Object> parentMap : parentList) {
        List<Map<String, Object>> childrenList = Lists.newArrayList();
        for (Map<String, Object> allMap : allList) {
            if (allMap.get("pId").equals(parentMap.get("id"))) {
                childrenList.add(allMap);
            }
        }
        if (!ParamValidUtils.isEmpty(childrenList)) {
            parentMap.put("children", childrenList);
            recursionChildren(childrenList, allList);
        }
    }
}

SpringBoot系列

发表于 2020-05-26 | 分类于 java

Spring Boot简介

  1. Spring boot是Spring家族中的一个全新的框架,它用来简化Spring应用程序的创建和开发过程,也可以说Spring boot能简化我们之前采用SpringMVC+Spring+Mybatis框架进行开发的过程。
  2. 在以往我们采用SpringMVC+Spring+Mybatis框架进行开发的时候,搭建和整合三大框架,我们需要做很好工作,比如配置web.xml,配置Spring,配置Mybatis,并将它们整合在一起等,而Spring boot框架对此开发过程进行了革命性的颠覆,抛弃了繁琐的xml配置过程,采用大量的默认配置简化我们的开发过程。
  3. 所以采用Spring boot可以非常容易和快速的创建基于Spring框架的应用程序,它让编码变简单了,配置变简单了,部署变简单了,监控也变简单了。
  4. 正因为Spring boot它化繁为简,让开发变得极其简单和快捷,所以在业界备受关注。Spring boot在国内的关注趋势也日渐超过Spring。
  1. 能够快速创建基于Spring的应用程序。(简化配置)
  2. 能够直接使用java的main方法启动内嵌的Tomcat,Jetty服务器运行Spring boot程序,不需要部署war包文件。
  3. 提供约定的starter POM来简化来简化Maven配置,让Maven配置变得简单。
  4. 根据项目的maven依赖配置,Spring boot自动配置Spring,SpringMVC等其它开源框架。
    .提供程序的健康检查等功能。(检查内部的运行状态等)
    基本可以完全不使用xml配置文件,采用注解配置。(或者默认约定的配置,代码中已经实现)

微服务

微服务:架构风格

一个应用应该是一组小型服务;可以通过HTTP的方式进行互通;

每一个功能元素最终都是一个可独立替换和独立升级的软件单元;

环境准备

环境约束

-jdk1.8

-maven 3.x

-springboot1.5.9RELEASE

MAVEN设置

1
2
3
4
5
6
7
8
9
10
11
12
<profile>
<id>jdk-1.8</id>
<activation>
<activeByDefault>true</activeByDefault>
<jdk>1.8</jdk>
</activation>
<properties>
<maven.compiler.source>1.8</maven.compiler.source>
<maven.compiler.target>1.8</maven.compiler.target>
<maven.compiler.compilerVersion>1.8</maven.compiler.compilerVersion>
</properties>
</profile>

Spring Boot HelloWorld

浏览器发送hello请求,服务器接受请求并处理,响应HelloWorld字符串;

创建一个maven工程(jar)

导入springBoot 依赖

<parent>
<groupId>org.springframework.boot</groupId>
<artifactId>spring-boot-starter-parent</artifactId>
<version>1.5.9.RELEASE</version>
<relativePath/> <!-- lookup parent from repository -->
</parent>
<dependencies>
<dependency>
    <groupId>org.springframework.boot</groupId>
    <artifactId>spring-boot-starter-web</artifactId>
</dependency>
<dependency>
    <groupId>org.springframework.boot</groupId>
    <artifactId>spring-boot-starter-test</artifactId>
    <scope>test</scope>
    <exclusions>
    <exclusion>
    <groupId>org.junit.vintage</groupId>
    <artifactId>junit-vintage-engine</artifactId>
    </exclusion>
    </exclusions>
</dependency>
<dependency>
    <groupId>org.springframework.boot</groupId>
    <artifactId>spring-boot-starter-logging</artifactId>
</dependency>
</dependencies>

编写主程序,启动Spring Boot应用

/**
 * @Date2020/5/23 12:53
 * SpringBootApplication来标注一个主程序
 **/
@SpringBootApplication
public class HelloWorldMainApplication {
    public static void main(String[] args) {
        //spring应用启动起来
        SpringApplication.run(HelloWorldMainApplication.class,args);
    }
}

编写相关的Controller、Service

运行主程序测试

简化部署

<!--可以将应用打包成一个可执行的jar宝-->
<build>
    <plugins>
        <plugin>
        <groupId>org.springframework.boot</groupId>
        <artifactId>spring-boot-maven-plugin</artifactId>
        </plugin>
    </plugins>
</build>
将这个应用打成jar包,直接用java -jar的命令进行执行;
终止运行
netstat -aon|findstr "8080"
taskkill /f /pid 8976  终止jar命令运行的程序

Hello World探究

pom文件

父文件
<parent>
    <groupId>org.springframework.boot</groupId>
    <artifactId>spring-boot-starter-parent</artifactId>
    <version>1.5.9.RELEASE</version>
    <relativePath/> <!-- lookup parent from repository -->
</parent>

Spring Boot的版本仲裁中心

以后我们导入依赖默认是不需要写版本号的(没有在dependencies里面管理的依赖自然需要声明版本号)

导入的依赖
<dependency>
    <groupId>org.springframework.boot</groupId>
    <artifactId>spring-boot-starter-web</artifactId>
</dependency>

spring-boot-starter-web:

spring-boot-starter:spring-boot场景启动器;帮我们导入了web模块正常运行所依赖的组件

Spring Boot将所有功能场景都抽取出来,做成一个个starters(启动器),只需要在项目里引入这些starter相关场景的所有依赖都会导入进来。要用什么功能就导入什么场景的启动器

主程序类
/**
 * @Date2020/5/23 12:53
 * SpringBootApplication来标注一个主程序,说明这是一个Spring Boot应用
 **/
@SpringBootApplication
public class HelloWorldMainApplication {

    private static Logger log= LoggerFactory.getLogger(HelloWorldMainApplication.class);

    public static void main(String[] args) {
        log.info("HelloWorldMainApplication is success!");
        //spring应用启动起来
        SpringApplication.run(HelloWorldMainApplication.class,args);
    }
}

@SpringBootApplication Spring Boot应用标注在某个类上说明这个类是SpringBoot的主配置类,SpringBoot就应该运行这个类的main方法来启动SpringBoot应用。

@Target({ElementType.TYPE})
@Retention(RetentionPolicy.RUNTIME)
@Documented
@Inherited
@SpringBootConfiguration
@EnableAutoConfiguration
@ComponentScan(
    excludeFilters = {@Filter(
    type = FilterType.CUSTOM,
    classes = {TypeExcludeFilter.class}
    ), @Filter(
        type = FilterType.CUSTOM,
        classes = {AutoConfigurationExcludeFilter.class}
    )}
)

@SpringBootConfiguration:SpringBoot的配置类;

​ 标注在某个类上,标识这是一个SpringBoot的配置类;

​ @Configuration:配置类上来标注这个注解:

​ 配置类—配置文件;配置类也是容器中的一个组件;@Componet

@EnableAutoConfiguration:开启自动配置功能

​ 以前需要配置的东西,SpringBoot帮我们自动配置;@EnableAutoConfiguration告诉SpringBoot开启自动配置功能;这样自动配置才能生效。

@AutoConfigurationPackage
@Import({EnableAutoConfigurationImportSelector.class})

@AutoConfigurationPackage:自动配置包

@Import({Registrar.class})

​Spring的底层注解@Import,给容器中导入一个组件;导入的组件由Registrar.class

将主配置类(@SpringBootApplication标注的类)的所在包及下面所有子包里面的所有组件扫描到

Spring容器;

​@Import({EnableAutoConfigurationImportSelector.class})

​给容器中导入组件

​EnableAutoConfigurationImportSelector:导入那些组件的选择器;

​将所有需要导入的组件以全类名的方式返回;

​会给容器中导入非常多的自动配置类(xxxAutoConfiguration);就是给容器中导入这个场景需要的所

有组件,并配置好这些组件;免去了我们手动编写配置注入功能组件的工作。

SpringFactoriesLoader.loadFactoryNames(
  getSpringFactoriesLoaderFactoryClass(), getBeanClassLoader());

Spring Boot在启动的时候从类路径下的”META-INF/spring.factories”中获取EnableAutoConfiguration指定的值,将这些值作为自动配置类导入到容器中,自动配置类就生效,帮我们进行自动配置工作。

J2EE的整体整合解决方案和自动配置都在m2\repository\org\springframework\boot\spring-boot-autoconfigure\1.5.9.RELEASE\spring-boot-autoconfigure-1.5.9.RELEASE.jar

使用Spring Initializer快速创建Spring Boot项目

IDE都支持使用Spring的项目创建向导快速创建一个Spring Boot项目;

选择我们需要的模块,向导会联网进行项目的创建;

默认生成的Spring Boot项目

  1. 主程序已经生成好了,只需要实现我们自己的逻辑

  2. resources文件夹的目录结构

    static:保存所有的js css images

    templates:保存所有的页面模板;(Spring Boot默认jar包使用嵌入式的Tomcat,默认不支持JSP页面);可以使用模板引擎(freemarker、thymeleaf);

    application.properties:Spring Boot 的配置文件,可以修改一些默认设置;

配置文件

SpringBoot使用一个全局的配置文件,配置文件名是固定的;

application.properties

application.yml

配置文件的作用:修改SpringBoot自动配置的默认值

SpringBoot在底层都给我们自动配置好;

YAML是一个标记语言:以前的配置大都使用xxx.xml文件,而yaml以数据为中心,比json,xml更适合作配置文件

YAML语法

k: v :标识一对键值对(空格必须有)

以空格的缩进来控制层级关系,只要左对齐的一列数据,都是一个层级的,属性和值也是大小写敏感;

值的写法

字面量:普通的值(数字、字符串、布尔)

​ 字面量直接来写,字符串默认不用加上单引号或者双引号

​ “”:双引号,不会转义字符串里面的特殊字符,特殊字符会作为本身想表示的意思

​ name: “zhangsan \n lisi” 输出zhangsan 换行 lisi

​ ‘’:单引号,会转义特殊字符,输出zhangsan \n lisi

对象、map(属性和值)(键值对)

​k:v :对象还是k:v的形式

friends:
lastName: zhangsan
    age: 18

行内写法

friends{lastName:zhangsan,age:18}

数组(list、set)

pets:
  - cat
  - dog
 - pig

行内写法

pets:{cat,dog,pig}

配置文件的注入和校验

properities配置文件在idea中默认utf-8可能会乱码

person:
  name: zhangsan
  age: 18
  boss: false
  birth: 2020/12/12
  map: {k1: v1,k2: 12}
  objectList:
    - lisi
    - wangwu
  dog:
    name: mumu
    age: 2

javaBean

/**
 * @ClassNamePerson
 * @Description 将配置文件中的每一个属性的值映射到这个组件中
 * @Author
 * @Date2020/5/23 16:08
 * @ConfigurationProperties告诉SpringBoot将本类中的所有属性和配置文件中相关的配置进行绑定
 * prefix = "person":配置文件中哪个下面的所有属性进行一一映射
 * 只有这个组件是容器中的组件,才能用容器提供的@ConfigurationProperties功能,需要加上@Component
 * @ConfigurationProperties(prefix = "person")默认从全局配置文件中获取值
 **/
@Component
@ConfigurationProperties(prefix = "person")
public class Person {
    private String name;
    private Integer age;
    private boolean boss;
    private Date birth;
    private Map<String,Object> map;
    private List<Object> objectList;
    private Dog dog;

我们可以导入配置文件处理器,以后编写配置就有提示了

<!--导入配置文件处理器,配置文件进行绑定就会有提示-->
 <dependency>
     <groupId>org.springframework.boot</groupId>
     <artifactId>spring-boot-configuration-processor</artifactId>
     <optional>true</optional>
 </dependency>
@ConfigurationProperties @Value
功能 批量注入文件的属性 一个个指定
松散绑定 支持(lastName,last-name) 不支持
SpEL 不支持 支持
JSR303数据校验 支持 不支持
复杂类型封装 支持 不支持

配置文件yml还是properties都可获取到值

如果只需要获取简单属性值可用@Value

@PropertySource&ImportResource

@PropertySource:加载指定的配置文件,需要指定配置文件的路径

/**
 * @Description 将配置文件中的每一个属性的值映射到这个组件中
 * @ConfigurationProperties告诉SpringBoot将本类中的所有属性和配置文件中相关的配置进行绑定
 * prefix = "person":配置文件中哪个下面的所有属性进行一一映射
 * 只有这个组件是容器中的组件,才能用容器提供的@ConfigurationProperties功能,需要加上@Component
 **/
@PropertySource(value = {"classpath:person.properties"})
@Component
@ConfigurationProperties(prefix = "person")
public class Person {
    private String name;
    private Integer age;
    private boolean boss;
    private Date birth;
    private Map<String,Object> map;
    private List<Object> objectList;
    private Dog dog;

@ImportResource:导入Spring的配置文件,让配置文件里面的内容生效;

Spring Boot里面没有Spring的配置文件,我们自己编写的配置文件,也不能自动识别,想让Spring的配置文件生效,加载进来;@ImportResource需要标注在一个配置类上

@ImportResource(locations = {"classpath:beans.xml"})

导入Spring的配置文件,让其生效

<?xml version="1.0" encoding="UTF-8"?>
<beans xmlns="http://www.springframework.org/schema/beans"
       xmlns:xsi="http://www.w3.org/2001/XMLSchema-instance"
       xsi:schemaLocation="http://www.springframework.org/schema/beans http://www.springframework.org/schema/beans/spring-beans.xsd">
<bean id="helloService" class="com.think.hello.service.HelloService"></bean>
</beans>

SpringBoot推荐给容器中添加组件的方式,推荐使用全注解的方式;

1、配置类===Spring配置文件

2、@Bean给容器中添加组件

@Configuration
public class myAppConfig {
    //将方法的返回值添加到容器,容器中这个组件默认的id就是方法名
    @Bean
    public HelloService helloService(){
        return new HelloService();
    }
}

配置文件占位符

占位符后期之前配置的值,如果没有可用:指定默认值

person:
  name: zhangsan${random.uuid}
  boss: false
  age: ${random.int}
  birth: 2020/12/12
  map: {k1: v1,k2: 12}
  objectList:
    - lisi
    - wangwu
    - zhangsan
  dog:
    name: ${person.hello:hello}mumu
    age: 2

Profile

多profile文件

我们在主配置文件编写的时候,文件名可用applicaton-{profile}.properties/yml

默认使用application.properties的配置

yml支持多文档块的方式

server:
  port: 8080
spring:
  profiles:
    active: prod
---
server:
  port: 8081
spring:
  profiles: dev
---
server:
  port: 8082
spring:
  profiles: prod

激活指定profile

在配置文件中指定spring.profiles.active=dev
命令行的方式

​ 在启动配置里 –spring.profiles.active=dev或java -jar xxx.jar –spring.profiles.active=dev

虚拟机参数

​ -Dspring.profiles.active=dev

配置文件的加载默认的优先级由高到低

高优先级的配置会覆盖低优先级的配置生效;

SpringBoot会从这四个位置全部加载主配置文件;互补配置;

-file:./conifg/

-file:./

-classpath:/config/

-classpath:/

我们还可用通过spring.config.location来改变默认的配置文件位置

项目打包后可用命令行参数的形式,启动项目的时候来指定配置文件的新位置,指定配置文件会和默认加载的这些配置文件共同起作用形成配置

-jar xxx.jar –server.port=8080

自动配置原理

配置文件能配置的属性参照

https://docs.spring.io/spring-boot/docs/current/reference/html/appendix-application-properties.html#common-application-properties

@SpringBootApplication
@SpringBootApplication是一个复合注解或派生注解,在@SpringBootApplication中有一个注解@EnableAutoConfiguration,该注解是开启自动配置
@Target(ElementType.TYPE)
@Retention(RetentionPolicy.RUNTIME)
@Documented
@Inherited
@SpringBootConfiguration
@EnableAutoConfiguration
@ComponentScan(excludeFilters = { @Filter(type = FilterType.CUSTOM, classes = TypeExcludeFilter.class),
        @Filter(type = FilterType.CUSTOM, classes = AutoConfigurationExcludeFilter.class) })
public @interface SpringBootApplication {

@EnableAutoConfiguration也是一个派生注解,其中的关键功能是由@Import提供,其导入的AutoConfigurationImportSelector的selectImports()方法通过SpringFactoriesLoader.loadFactoryNames()扫描所有具有META-INF/spring.factories的jar包。 spring-boot-autoconfigure-x.x.x.x.jar里就有一个spring.factories文件。spring.factories文件由一组一组的key=value的形式,其中一个key是EnableAutoConfiguration类的全类名,而它的value是一个xxxxAutoConfiguration的类名的列表, 这些类名以逗号分隔。
spring-boot-autoconfigure-x.x.x.x.jar -> META-INF/spring.factories -> org.springframework.boot.autoconfigure.xxx.xxxAutoConfiguration 类列表将会被实例化到Spring容器。
SpringBoot项目启动时,@SpringBootApplication用在启动类SpringApplication.run()的内部就会置顶selectImports()方法,找到所有JavaConfig自动配置类的全限定名对应的class,然后将所有自动配置类加载到Spring容器中。

以redis自动配置,解析Spring自动配置原理

将redis starter依赖加入

<!--redis jar-->
<dependency>
    <groupId>org.springframework.boot</groupId>
    <artifactId>spring-boot-starter-data-redis</artifactId>
</dependency>

org.springframework.boot.autoconfigure.data.redis.RedisAutoConfiguration会被实例化到容器。该类为什么会被实例化? 因为它在META-INF/spring.factories的Auto Configure列表。
org.springframework.boot.autoconfigure.data.redis.RedisAutoConfiguration被实例化,然而redis也会被实例化即创建RedisTemplate在Spring容器。

然而实例化redis对象是有条件的即@ConditionalOnClass({RedisOperations.class}),意思:当给定的类名在类路径上存在,则实例化当前Bean。

也就是想Spring创建redis实例对象,必须需要将redis starter包:spring-boot-starter-data-redis依赖引入。有了redis starter依赖springboot自动配置就会检测到classpath路径下有相关的类,然后就可以实例化对应的类了,这就是自动配置的原理。

知识点:类上有该注解@Configuration,类被实例化 时@bean会自动执行,生成对应的bean实例,放入Spring容器。

org.springframework.boot.autoconfigure.data.redis.RedisAutoConfiguration会导入JedisConnectionConfiguration.class
@Import({LettuceConnectionConfiguration.class, JedisConnectionConfiguration.class})

JedisConnectionConfiguration.class有注解:@ConditionalOnClass({GenericObjectPool.class, JedisConnection.class, Jedis.class}) 

spring是怎样读取redis配置参数?

关键是org.springframework.boot.autoconfigure.data.redis.RedisAutoConfiguration的注解:@EnableConfigurationProperties({RedisProperties.class})

知识点:@EnableConfigurationProperties会将配置文件的key-value映射成Java对象。
redis配置类,如果没redis配置,使用本地的redis这需要本地安装redis服务,如果有redis配置就设置redis host、port等属性

appliccation.yml redis配置。必须以spring.redis开头

spring-boot-starter

SpringBoot 可以省略众多的繁琐配置,它的众多starter可以说功不可没。 例如集成redis,只需要pom.xml中引入spring-boot-starter-data-redis,配置文件application.yml中加入spring.redis.database等几个关键配置项即可,常用的starter还有spring-boot-starter-web、spring-boot-starter-test等,相比传统的xml配置大大减少了集成的工作量。

原理

利用starter实现自动化配置只需要两个条件–maven依赖、配置文件。引入maven实质就是导入jar包,spring-boot启动的时候会找到starter jar包中的resources/META-INF/spring.factories文件,根据spring.factories文件中的配置,找到需要自动配置的类。

注解 说明
@Configuration 表明是一个配置文件,被注解的类将成为一个bean配置类
@ConditionalOnClass 当classpath下发现该类的情况下进行自动配置
@ConditionalOnBean 当classpath下发现该类的情况下进行自动配置
@EnableConfigurationProperties 使@ConfigurationProperties注解生效
@AutoConfigureAfter 完成自动配置后实例化这个bean

实现

pom.xml

<?xml version="1.0" encoding="UTF-8"?>
<project xmlns="http://maven.apache.org/POM/4.0.0" xmlns:xsi="http://www.w3.org/2001/XMLSchema-instance"
         xsi:schemaLocation="http://maven.apache.org/POM/4.0.0 http://maven.apache.org/xsd/maven-4.0.0.xsd">
    <modelVersion>4.0.0</modelVersion>
    <parent>
        <groupId>org.springframework.boot</groupId>
        <artifactId>spring-boot-starter-parent</artifactId>
        <version>2.1.4.RELEASE</version>
        <relativePath/> <!-- lookup parent from repository -->
    </parent>
    <groupId>com.air</groupId>
    <artifactId>starter-demo</artifactId>
    <version>0.0.1-SNAPSHOT</version>
    <name>starter-demo</name>
    <description>spring-boot-starter demo</description>

    <properties>
        <java.version>1.8</java.version>
    </properties>

    <dependencies>
        <dependency>
            <groupId>org.springframework.boot</groupId>
            <artifactId>spring-boot-starter</artifactId>
        </dependency>

        <dependency>
            <groupId>org.springframework.boot</groupId>
            <artifactId>spring-boot-configuration-processor</artifactId>
            <optional>true</optional>
        </dependency>
        <dependency>
            <groupId>org.projectlombok</groupId>
            <artifactId>lombok</artifactId>
            <optional>true</optional>
        </dependency>
        <dependency>
            <groupId>org.springframework.boot</groupId>
            <artifactId>spring-boot-starter-test</artifactId>
            <scope>test</scope>
        </dependency>
    </dependencies>

    <build>
        <plugins>
            <!-- Source -->
            <plugin>
                <groupId>org.apache.maven.plugins</groupId>
                <artifactId>maven-source-plugin</artifactId>
                <executions>
                    <execution>
                        <phase>package</phase>
                        <goals>
                            <goal>jar-no-fork</goal>
                        </goals>
                    </execution>
                </executions>
            </plugin>
        </plugins>
    </build>

</project>

spring-boot-configuration-processor 的作用是编译时生成 spring-configuration-metadata.json ,在IDE中编辑配置文件时,会出现提示。 打包选择jar-no-fork,因为这里不需要main函数。

EnableDemoConfiguration

@Target({ElementType.TYPE})
@Retention(RetentionPolicy.RUNTIME)
@Documented
@Inherited
public @interface EnableDemoConfiguration {
}

DemoProperties

@Data
@ConfigurationProperties(prefix = "demo")
public class DemoProperties {
    private String name;
    private Integer age;
}

name和age对应application.properties里面的demo.name和demo.age

DemoAutoConfiguration

@Configuration
@ConditionalOnBean(annotation = EnableDemoConfiguration.class)
@EnableConfigurationProperties(DemoProperties.class)
public class DemoAutoConfiguration {

    @Bean
    @ConditionalOnMissingBean
    DemoService demoService (){
        return new DemoService();
    }

}

这里设置自动配置的相关条件,和相关操作,由于这里只想写一个最简单的demo,所以这里只需要简单注入一个bean,没有复杂逻辑,实际开发中,这个类是最关键的。

DemoService

public class DemoService {

    @Autowired
    private DemoProperties demoProperties;

    public void print() {
        System.out.println(demoProperties.getName());
        System.out.println(demoProperties.getAge());
    }
}

这里不需要@Service,因为已经通过DemoAutoConfiguration注入spring容器了。

spring.factories

在resources/META-INF/下创建spring.factories文件:
org.springframework.boot.autoconfigure.EnableAutoConfiguration=\
com.air.starterdemo.config.DemoAutoConfiguration
告诉spring-boot,启动时需要扫描的类。

测试

pom.xml 本地mvn install之后,在新的spring-boot项目里面引入

com.air
starter-demo
0.0.1-SNAPSHOT

配置文件

demo.name = ooo
demo.age = 11

如果使用的是IDEA,在编辑时会出现提示。

测试

@SpringBootApplication
@EnableDemoConfiguration
public class Demo1Application {

    @Autowired
    private DemoService demoService;

    public static void main(String[] args) {
        SpringApplication.run(Demo1Application.class, args);
    }

    @PostConstruct
    public void test() {
        demoService.print();
    }
}

启动main函数,控制台会打印出配置文件中的name和age,一个简单的spring-boot-starter就写好了

spring.factories

# Initializers
org.springframework.context.ApplicationContextInitializer=\
org.springframework.boot.autoconfigure.SharedMetadataReaderFactoryContextInitializer,\
org.springframework.boot.autoconfigure.logging.ConditionEvaluationReportLoggingListener

# Application Listeners
org.springframework.context.ApplicationListener=\
org.springframework.boot.autoconfigure.BackgroundPreinitializer

# Auto Configuration Import Listeners
org.springframework.boot.autoconfigure.AutoConfigurationImportListener=\
org.springframework.boot.autoconfigure.condition.ConditionEvaluationReportAutoConfigurationImportListener

# Auto Configuration Import Filters
org.springframework.boot.autoconfigure.AutoConfigurationImportFilter=\
org.springframework.boot.autoconfigure.condition.OnBeanCondition,\
org.springframework.boot.autoconfigure.condition.OnClassCondition,\
org.springframework.boot.autoconfigure.condition.OnWebApplicationCondition

# Auto Configure
org.springframework.boot.autoconfigure.EnableAutoConfiguration=\
org.springframework.boot.autoconfigure.admin.SpringApplicationAdminJmxAutoConfiguration,\
org.springframework.boot.autoconfigure.aop.AopAutoConfiguration,\
org.springframework.boot.autoconfigure.amqp.RabbitAutoConfiguration,\
org.springframework.boot.autoconfigure.batch.BatchAutoConfiguration,\
org.springframework.boot.autoconfigure.cache.CacheAutoConfiguration,\
org.springframework.boot.autoconfigure.cassandra.CassandraAutoConfiguration,\
org.springframework.boot.autoconfigure.context.ConfigurationPropertiesAutoConfiguration,\
org.springframework.boot.autoconfigure.context.LifecycleAutoConfiguration,\
org.springframework.boot.autoconfigure.context.MessageSourceAutoConfiguration,\
org.springframework.boot.autoconfigure.context.PropertyPlaceholderAutoConfiguration,\
org.springframework.boot.autoconfigure.couchbase.CouchbaseAutoConfiguration,\
org.springframework.boot.autoconfigure.dao.PersistenceExceptionTranslationAutoConfiguration,\
org.springframework.boot.autoconfigure.data.cassandra.CassandraDataAutoConfiguration,\
org.springframework.boot.autoconfigure.data.cassandra.CassandraReactiveDataAutoConfiguration,\
org.springframework.boot.autoconfigure.data.cassandra.CassandraReactiveRepositoriesAutoConfiguration,\
org.springframework.boot.autoconfigure.data.cassandra.CassandraRepositoriesAutoConfiguration,\
org.springframework.boot.autoconfigure.data.couchbase.CouchbaseDataAutoConfiguration,\
org.springframework.boot.autoconfigure.data.couchbase.CouchbaseReactiveDataAutoConfiguration,\
org.springframework.boot.autoconfigure.data.couchbase.CouchbaseReactiveRepositoriesAutoConfiguration,\
org.springframework.boot.autoconfigure.data.couchbase.CouchbaseRepositoriesAutoConfiguration,\
org.springframework.boot.autoconfigure.data.elasticsearch.ElasticsearchDataAutoConfiguration,\
org.springframework.boot.autoconfigure.data.elasticsearch.ElasticsearchRepositoriesAutoConfiguration,\
org.springframework.boot.autoconfigure.data.elasticsearch.ReactiveElasticsearchRepositoriesAutoConfiguration,\
org.springframework.boot.autoconfigure.data.elasticsearch.ReactiveElasticsearchRestClientAutoConfiguration,\
org.springframework.boot.autoconfigure.data.jdbc.JdbcRepositoriesAutoConfiguration,\
org.springframework.boot.autoconfigure.data.jpa.JpaRepositoriesAutoConfiguration,\
org.springframework.boot.autoconfigure.data.ldap.LdapRepositoriesAutoConfiguration,\
org.springframework.boot.autoconfigure.data.mongo.MongoDataAutoConfiguration,\
org.springframework.boot.autoconfigure.data.mongo.MongoReactiveDataAutoConfiguration,\
org.springframework.boot.autoconfigure.data.mongo.MongoReactiveRepositoriesAutoConfiguration,\
org.springframework.boot.autoconfigure.data.mongo.MongoRepositoriesAutoConfiguration,\
org.springframework.boot.autoconfigure.data.neo4j.Neo4jDataAutoConfiguration,\
org.springframework.boot.autoconfigure.data.neo4j.Neo4jRepositoriesAutoConfiguration,\
org.springframework.boot.autoconfigure.data.solr.SolrRepositoriesAutoConfiguration,\
org.springframework.boot.autoconfigure.data.r2dbc.R2dbcDataAutoConfiguration,\
org.springframework.boot.autoconfigure.data.r2dbc.R2dbcRepositoriesAutoConfiguration,\
org.springframework.boot.autoconfigure.data.r2dbc.R2dbcTransactionManagerAutoConfiguration,\
org.springframework.boot.autoconfigure.data.redis.RedisAutoConfiguration,\
org.springframework.boot.autoconfigure.data.redis.RedisReactiveAutoConfiguration,\
org.springframework.boot.autoconfigure.data.redis.RedisRepositoriesAutoConfiguration,\
org.springframework.boot.autoconfigure.data.rest.RepositoryRestMvcAutoConfiguration,\
org.springframework.boot.autoconfigure.data.web.SpringDataWebAutoConfiguration,\
org.springframework.boot.autoconfigure.elasticsearch.ElasticsearchRestClientAutoConfiguration,\
org.springframework.boot.autoconfigure.flyway.FlywayAutoConfiguration,\
org.springframework.boot.autoconfigure.freemarker.FreeMarkerAutoConfiguration,\
org.springframework.boot.autoconfigure.groovy.template.GroovyTemplateAutoConfiguration,\
org.springframework.boot.autoconfigure.gson.GsonAutoConfiguration,\
org.springframework.boot.autoconfigure.h2.H2ConsoleAutoConfiguration,\
org.springframework.boot.autoconfigure.hateoas.HypermediaAutoConfiguration,\
org.springframework.boot.autoconfigure.hazelcast.HazelcastAutoConfiguration,\
org.springframework.boot.autoconfigure.hazelcast.HazelcastJpaDependencyAutoConfiguration,\
org.springframework.boot.autoconfigure.http.HttpMessageConvertersAutoConfiguration,\
org.springframework.boot.autoconfigure.http.codec.CodecsAutoConfiguration,\
org.springframework.boot.autoconfigure.influx.InfluxDbAutoConfiguration,\
org.springframework.boot.autoconfigure.info.ProjectInfoAutoConfiguration,\
org.springframework.boot.autoconfigure.integration.IntegrationAutoConfiguration,\
org.springframework.boot.autoconfigure.jackson.JacksonAutoConfiguration,\
org.springframework.boot.autoconfigure.jdbc.DataSourceAutoConfiguration,\
org.springframework.boot.autoconfigure.jdbc.JdbcTemplateAutoConfiguration,\
org.springframework.boot.autoconfigure.jdbc.JndiDataSourceAutoConfiguration,\
org.springframework.boot.autoconfigure.jdbc.XADataSourceAutoConfiguration,\
org.springframework.boot.autoconfigure.jdbc.DataSourceTransactionManagerAutoConfiguration,\
org.springframework.boot.autoconfigure.jms.JmsAutoConfiguration,\
org.springframework.boot.autoconfigure.jmx.JmxAutoConfiguration,\
org.springframework.boot.autoconfigure.jms.JndiConnectionFactoryAutoConfiguration,\
org.springframework.boot.autoconfigure.jms.activemq.ActiveMQAutoConfiguration,\
org.springframework.boot.autoconfigure.jms.artemis.ArtemisAutoConfiguration,\
org.springframework.boot.autoconfigure.jersey.JerseyAutoConfiguration,\
org.springframework.boot.autoconfigure.jooq.JooqAutoConfiguration,\
org.springframework.boot.autoconfigure.jsonb.JsonbAutoConfiguration,\
org.springframework.boot.autoconfigure.kafka.KafkaAutoConfiguration,\
org.springframework.boot.autoconfigure.availability.ApplicationAvailabilityAutoConfiguration,\
org.springframework.boot.autoconfigure.ldap.embedded.EmbeddedLdapAutoConfiguration,\
org.springframework.boot.autoconfigure.ldap.LdapAutoConfiguration,\
org.springframework.boot.autoconfigure.liquibase.LiquibaseAutoConfiguration,\
org.springframework.boot.autoconfigure.mail.MailSenderAutoConfiguration,\
org.springframework.boot.autoconfigure.mail.MailSenderValidatorAutoConfiguration,\
org.springframework.boot.autoconfigure.mongo.embedded.EmbeddedMongoAutoConfiguration,\
org.springframework.boot.autoconfigure.mongo.MongoAutoConfiguration,\
org.springframework.boot.autoconfigure.mongo.MongoReactiveAutoConfiguration,\
org.springframework.boot.autoconfigure.mustache.MustacheAutoConfiguration,\
org.springframework.boot.autoconfigure.orm.jpa.HibernateJpaAutoConfiguration,\
org.springframework.boot.autoconfigure.quartz.QuartzAutoConfiguration,\
org.springframework.boot.autoconfigure.r2dbc.R2dbcAutoConfiguration,\
org.springframework.boot.autoconfigure.rsocket.RSocketMessagingAutoConfiguration,\
org.springframework.boot.autoconfigure.rsocket.RSocketRequesterAutoConfiguration,\
org.springframework.boot.autoconfigure.rsocket.RSocketServerAutoConfiguration,\
org.springframework.boot.autoconfigure.rsocket.RSocketStrategiesAutoConfiguration,\
org.springframework.boot.autoconfigure.security.servlet.SecurityAutoConfiguration,\
org.springframework.boot.autoconfigure.security.servlet.UserDetailsServiceAutoConfiguration,\
org.springframework.boot.autoconfigure.security.servlet.SecurityFilterAutoConfiguration,\
org.springframework.boot.autoconfigure.security.reactive.ReactiveSecurityAutoConfiguration,\
org.springframework.boot.autoconfigure.security.reactive.ReactiveUserDetailsServiceAutoConfiguration,\
org.springframework.boot.autoconfigure.security.rsocket.RSocketSecurityAutoConfiguration,\
org.springframework.boot.autoconfigure.security.saml2.Saml2RelyingPartyAutoConfiguration,\
org.springframework.boot.autoconfigure.sendgrid.SendGridAutoConfiguration,\
org.springframework.boot.autoconfigure.session.SessionAutoConfiguration,\
org.springframework.boot.autoconfigure.security.oauth2.client.servlet.OAuth2ClientAutoConfiguration,\
org.springframework.boot.autoconfigure.security.oauth2.client.reactive.ReactiveOAuth2ClientAutoConfiguration,\
org.springframework.boot.autoconfigure.security.oauth2.resource.servlet.OAuth2ResourceServerAutoConfiguration,\
org.springframework.boot.autoconfigure.security.oauth2.resource.reactive.ReactiveOAuth2ResourceServerAutoConfiguration,\
org.springframework.boot.autoconfigure.solr.SolrAutoConfiguration,\
org.springframework.boot.autoconfigure.task.TaskExecutionAutoConfiguration,\
org.springframework.boot.autoconfigure.task.TaskSchedulingAutoConfiguration,\
org.springframework.boot.autoconfigure.thymeleaf.ThymeleafAutoConfiguration,\
org.springframework.boot.autoconfigure.transaction.TransactionAutoConfiguration,\
org.springframework.boot.autoconfigure.transaction.jta.JtaAutoConfiguration,\
org.springframework.boot.autoconfigure.validation.ValidationAutoConfiguration,\
org.springframework.boot.autoconfigure.web.client.RestTemplateAutoConfiguration,\
org.springframework.boot.autoconfigure.web.embedded.EmbeddedWebServerFactoryCustomizerAutoConfiguration,\
org.springframework.boot.autoconfigure.web.reactive.HttpHandlerAutoConfiguration,\
org.springframework.boot.autoconfigure.web.reactive.ReactiveWebServerFactoryAutoConfiguration,\
org.springframework.boot.autoconfigure.web.reactive.WebFluxAutoConfiguration,\
org.springframework.boot.autoconfigure.web.reactive.error.ErrorWebFluxAutoConfiguration,\
org.springframework.boot.autoconfigure.web.reactive.function.client.ClientHttpConnectorAutoConfiguration,\
org.springframework.boot.autoconfigure.web.reactive.function.client.WebClientAutoConfiguration,\
org.springframework.boot.autoconfigure.web.servlet.DispatcherServletAutoConfiguration,\
org.springframework.boot.autoconfigure.web.servlet.ServletWebServerFactoryAutoConfiguration,\
org.springframework.boot.autoconfigure.web.servlet.error.ErrorMvcAutoConfiguration,\
org.springframework.boot.autoconfigure.web.servlet.HttpEncodingAutoConfiguration,\
org.springframework.boot.autoconfigure.web.servlet.MultipartAutoConfiguration,\
org.springframework.boot.autoconfigure.web.servlet.WebMvcAutoConfiguration,\
org.springframework.boot.autoconfigure.websocket.reactive.WebSocketReactiveAutoConfiguration,\
org.springframework.boot.autoconfigure.websocket.servlet.WebSocketServletAutoConfiguration,\
org.springframework.boot.autoconfigure.websocket.servlet.WebSocketMessagingAutoConfiguration,\
org.springframework.boot.autoconfigure.webservices.WebServicesAutoConfiguration,\
org.springframework.boot.autoconfigure.webservices.client.WebServiceTemplateAutoConfiguration

# Failure analyzers
org.springframework.boot.diagnostics.FailureAnalyzer=\
org.springframework.boot.autoconfigure.diagnostics.analyzer.NoSuchBeanDefinitionFailureAnalyzer,\
org.springframework.boot.autoconfigure.flyway.FlywayMigrationScriptMissingFailureAnalyzer,\
org.springframework.boot.autoconfigure.jdbc.DataSourceBeanCreationFailureAnalyzer,\
org.springframework.boot.autoconfigure.jdbc.HikariDriverConfigurationFailureAnalyzer,\
org.springframework.boot.autoconfigure.r2dbc.ConnectionFactoryBeanCreationFailureAnalyzer,\
org.springframework.boot.autoconfigure.session.NonUniqueSessionRepositoryFailureAnalyzer

# Template availability providers
org.springframework.boot.autoconfigure.template.TemplateAvailabilityProvider=\
org.springframework.boot.autoconfigure.freemarker.FreeMarkerTemplateAvailabilityProvider,\
org.springframework.boot.autoconfigure.mustache.MustacheTemplateAvailabilityProvider,\
org.springframework.boot.autoconfigure.groovy.template.GroovyTemplateAvailabilityProvider,\
org.springframework.boot.autoconfigure.thymeleaf.ThymeleafTemplateAvailabilityProvider,\
org.springframework.boot.autoconfigure.web.servlet.JspTemplateAvailabilityProvider

每一个autoconfigure类都是容器中的一个组件,都加入到容器中,用他们来做自动配置

每一个自动配置类进行自动配置功能;

以HttpEncodingAutoConfiguration为例解释自动配置原理

@Configuration(//表示这是一个自动配置类
proxyBeanMethods = false
)
@EnableConfigurationProperties({ServerProperties.class})//启用configurationProperties功能,将配置文件中对应的值和xxxProperties绑定起来
@ConditionalOnWebApplication(//Spring底层@Conditional注解,根据不同条件,如果满足指定条件,整个配置里里面的配置就会生效,判断当前应用是否是web应用,是就生效不是就不生效
    type = Type.SERVLET
)
@ConditionalOnClass({CharacterEncodingFilter.class})//判断当前项目有没有这个类
CharacterEncodingFilter:SpringMVC中进行乱码解决的过滤器
@ConditionalOnProperty(//判断配置文件中是否存在某个配置server.servlet.encoding.enabled如果不存在判断也是成立的,即使我们的配置文件中不配置server.servlet.encoding.enabled=true,也是默认生效的  
    prefix = "server.servlet.encoding",//从配置文件中获取指定的值和bean的属性进行绑定
    value = {"enabled"},
    matchIfMissing = true
)
public class HttpEncodingAutoConfiguration {

根据当前不同的条件判断,决定这个配置类是否生效

如果生效,这个配置类就会给容器中添加各种组件,这些组件的属性是从对应的properties类中获取的,这些类里面的每一个又是和配置文件绑定的

@Bean//给容器中添加一个组件,这个组件的某些值需要从properties中获取
@ConditionalOnMissingBean
public CharacterEncodingFilter characterEncodingFilter() {
    CharacterEncodingFilter filter = new OrderedCharacterEncodingFilter();
    filter.setEncoding(this.properties.getCharset().name());
    filter.setForceRequestEncoding(this.properties.shouldForce(org.springframework.boot.web.servlet.server.Encoding.Type.REQUEST));
    filter.setForceResponseEncoding(this.properties.shouldForce(org.springframework.boot.web.servlet.server.Encoding.Type.RESPONSE));
    return filter;
}

所有在配置文件中能配置的属性都是xxxProperties类中封装着,配置文件能配置什么就可以参照某个功能对应的这个属性类

总结 1、SpringBoot启动会加载大量的自动配置类;

​ 2、我们看需要的功能有没有SpringBoot默认写好的自动配置类

​ 3、我们再来看这个自动配置类中配置了哪些组件,只要我们要用的组件有,就不需要再来配置了,

​ 4、给容器中自动配置类添加组件的时候,会从properties类中获取某些属性,我们就可以再配置文件总指定这些属性的值。

xxxAutoConfiguration:自动配置类

给容器中添加组件

xxxProperties:封装配置文件中相关属性

自动配置类哪个生效了

我们可以通过debug=true来让控制台打印自动配置报告,这样就可以很方便知道哪些自动配置生效了

============================
CONDITIONS EVALUATION REPORT
============================


Positive matches:(自动配置类启用的)
-----------------

AopAutoConfiguration matched:
- @ConditionalOnProperty (spring.aop.auto=true) matched (OnPropertyCondition)

AopAutoConfiguration.ClassProxyingConfiguration matched:
- @ConditionalOnMissingClass did not find unwanted class 'org.aspectj.weaver.Advice' (OnClassCondition)
- @ConditionalOnProperty (spring.aop.proxy-target-class=true) matched (OnPropertyCondition)

DispatcherServletAutoConfiguration matched:
- @ConditionalOnClass found required class 'org.springframework.web.servlet.DispatcherServlet' (OnClassCondition)
- found 'session' scope (OnWebApplicationCondition)

DispatcherServletAutoConfiguration.DispatcherServletConfiguration matched:
- @ConditionalOnClass found required class 'javax.servlet.ServletRegistration' (OnClassCondition)
- Default DispatcherServlet did not find dispatcher servlet beans (DispatcherServletAutoConfiguration.DefaultDispatcherServletCondition)


Negative matches:(没有启用的,没匹配成功的)
-----------------

ActiveMQAutoConfiguration:
Did not match:
- @ConditionalOnClass did not find required class 'javax.jms.ConnectionFactory' (OnClassCondition)

AopAutoConfiguration.AspectJAutoProxyingConfiguration:
Did not match:
- @ConditionalOnClass did not find required class 'org.aspectj.weaver.Advice' (OnClassCondition)

ArtemisAutoConfiguration:
Did not match:
- @ConditionalOnClass did not find required class 'javax.jms.ConnectionFactory' (OnClassCondition)

SpringBoot与日志

日志门面SLF4J日志实现Logback;

SpringBoot:底层是Spring框架,Spring框架默认用JCL;

SpringBoot选用SLF4J(日志的抽象层)和logback;

以后开发的时候,日志记录方法的调用,不应该来直接调用日志的实现类,而是调用日志抽象曾里面的方法。

应该给系统导入slf4j的jar和logback的实现jar

import org.slf4j.Logger;
import org.slf4j.LoggerFactory;

public class HelloWorld {
  public static void main(String[] args) {
    Logger logger = LoggerFactory.getLogger(HelloWorld.class);
    logger.info("Hello World");
  }
}

每一个日志的实现框架都有自己的配置文件。使用slf4j后,配置文件还是做成日志实现框架自己本身的配置文件;

遗留问题

不同系统有不同的日志框架,需要做到统一日志记录,即使别的框架和我一起使用slf4j进行输出

如何让系统中所有日志都统一到slf4j

将系统中其他日志框架排除,用中间包替换原有的日志框架,再导入slf4d其他的实现

<dependency>
    <groupId>org.springframework.boot</groupId>
    <artifactId>spring-boot-starter</artifactId>
    <version>2.3.0.RELEASE</version>
    <scope>compile</scope>
</dependency>

SpringBoot 使用它来做日志

<dependency>
    <groupId>org.springframework.boot</groupId>
    <artifactId>spring-boot-starter-logging</artifactId>
    <version>2.3.0.RELEASE</version>
    <scope>compile</scope>
</dependency>

<dependencies>
    <dependency>
      <groupId>ch.qos.logback</groupId>
      <artifactId>logback-classic</artifactId>
      <scope>compile</scope>
    </dependency>
    <dependency>
      <groupId>org.apache.logging.log4j</groupId>
      <artifactId>log4j-to-slf4j</artifactId>
      <scope>compile</scope>
    </dependency>
    <dependency>
      <groupId>org.slf4j</groupId>
      <artifactId>jul-to-slf4j</artifactId>
      <scope>compile</scope>
    </dependency>
</dependencies>

总结:1、SpringBoot底层也是使用slf4j+logback的方式进行日志记录

​ 2、SpringBoot也把其他的日志都替换成了slf4j

​ 3、中间替换包

​ 4、如果要引入其他框架,一定要把这个框架的默认日志移除掉

​ Spring框架用的commons-logging;

<dependency>
    <groupId>org.apache.activemq</groupId>
    <artifactId>activemq-console</artifactId>
    <version>${activemq.version}</version>
        <exclusions>
            <exclusion>
            <groupId>commons-logging</groupId>
            <artifactId>commons-logging</artifactId>
            </exclusion>
        </exclusions>
</dependency>

SpringBoot能自动适配所有的日志,而且底层使用slf4j+logback的方式记录日志,引入其他框架的时候,只需要把这个框架依赖的日志框架排除掉。

private static Logger logger = LoggerFactory.getLogger(HelloApplication.class);
public static void main(String[] args) {
    SpringApplication.run(HelloApplication.class, args);
    //日志级别由低到高
    //可以调整输出的日志级别
    logger.trace("trace");
    logger.debug("debug");
    logger.info("HelloApplication is Success");
    logger.warn("warn");
    logger.error("error");
}

logging.pattern.console=%d{yyyy-MM-dd} [%thread] %-5level %logger{50} - %msg%n

%d表示日期时间
%thread表示线程名
%-5level:级别从左显示5个字符的宽度
%logger{50}表示logger名字最长50个字符,否则按照句点分割
%msg:日志消息
%n换行符

SpringBoot修改默认日志配置

logging.level.com.think=trace
#当前项目下生成springboot.log日志,可以指定完整的路径D:/springboot.log
#logging.file.name=springboot.log
#在当前磁盘的根路径下创建spring文件夹和里面的log文件夹;使用spring.log做为默认文件
logging.file.path=/spring/log
#在控制台输出的日志的格式
logging.pattern.console=%d{yyyy-MM-dd} [%thread] %-5level %logger{50} - %msg%n
#指定文件中日志的输出格式
logging.pattern.file=%d{yyyy-MM-dd} [%thread] %-5level %logger{50} - %msg%n

<!-- 日志记录器,日期滚动记录 -->
<appender name="FILE_ERROR" class="ch.qos.logback.core.rolling.RollingFileAppender">

<!-- 正在记录的日志文件的路径及文件名 -->
<file>${LOG_PATH}/log_error.log</file>

<!-- 日志记录器的滚动策略,按日期,按大小记录 -->
<rollingPolicy class="ch.qos.logback.core.rolling.TimeBasedRollingPolicy">

<!-- 归档的日志文件的路径,%d{yyyy-MM-dd}指定日期格式,%i指定索引 -->
<fileNamePattern>${LOG_PATH}/error/log-error-%d{yyyy-MM-dd}.%i.log</fileNamePattern>

<!-- 除按日志记录之外,还配置了日志文件不能超过2M,若超过2M,日志文件会以索引0开始,
命名日志文件,例如log-error-2013-12-21.0.log -->
<timeBasedFileNamingAndTriggeringPolicy class="ch.qos.logback.core.rolling.SizeAndTimeBasedFNATP">
<maxFileSize>10MB</maxFileSize>
</timeBasedFileNamingAndTriggeringPolicy>
</rollingPolicy>

<!-- 追加方式记录日志 -->
<append>true</append>

<!-- 日志文件的格式 -->
<encoder class="ch.qos.logback.classic.encoder.PatternLayoutEncoder">
<pattern>${FILE_LOG_PATTERN}</pattern>
<charset>utf-8</charset>
</encoder>

<!-- 此日志文件只记录error级别的 -->
<filter class="ch.qos.logback.classic.filter.LevelFilter">
<level>error</level>
<onMatch>ACCEPT</onMatch>
<onMismatch>DENY</onMismatch>
</filter>
</appender>

可以按照slfj的日志适配图,进行相关的切换

idea依赖分析-pom.xml-右键-Diagrams-Show Dependencies

SpringBoot与Web开发

使用SpringBoot

创建SpringBoot应用,选中我们需要的模块;

SpringBoot已经默认将这些场景配置好了,只需要在配置文件中指定少量配置就可以运行起来;

自己编写业务逻辑代码;

自动配置原理

这个场景SpringBoot帮我们配置了什么,能不能修改,能修改哪些配置,能不能扩展

xxxAutoConfiguration:帮我们给容器中自动配置组件

xxxProperties:配置类来封装配置文件中的内容

SpringBoot对静态资源的映射规则

ResourceProperties可以设置静态资源有关的参数,缓存时间等

@ConfigurationProperties(prefix = "spring.resources", ignoreUnknownFields = false)
public class ResourceProperties {

    private static final String[] CLASSPATH_RESOURCE_LOCATIONS = { "classpath:/META-INF/resources/",
            "classpath:/resources/", "classpath:/static/", "classpath:/public/" };

    /**
     * Locations of static resources. Defaults to classpath:[/META-INF/resources/,
     * /resources/, /static/, /public/].

@Override
public void addResourceHandlers(ResourceHandlerRegistry registry) {
    if (!this.resourceProperties.isAddMappings()) {
        logger.debug("Default resource handling disabled");
        return;
    }
    Duration cachePeriod = this.resourceProperties.getCache().getPeriod();
    CacheControl cacheControl = this.resourceProperties.getCache().getCachecontrol().toHttpCacheControl();
    if (!registry.hasMappingForPattern("/webjars/**")) {
        customizeResourceHandlerRegistration(registry.addResourceHandler("/webjars/**")
        .addResourceLocations("classpath:/META-INF/resources/webjars/")
        .setCachePeriod(getSeconds(cachePeriod)).setCacheControl(cacheControl));
    }
    String staticPathPattern = this.mvcProperties.getStaticPathPattern();
    if (!registry.hasMappingForPattern(staticPathPattern)) {
    customizeResourceHandlerRegistration(registry.addResourceHandler(staticPathPattern)
    .addResourceLocations(getResourceLocations(this.resourceProperties.getStaticLocations()))
    .setCachePeriod(getSeconds(cachePeriod)).setCacheControl(cacheControl));
    }
}

所有/webjars/**都去classpath:/META-INF/resources/webjars/找资源

webjars:以jar包的方式引入静态资源;

https://www.webjars.org/

http://localhost:8080/webjars/jquery/3.5.1/jquery.js

<!--引入jquery-webjar-->
<dependency>
    <groupId>org.webjars</groupId>
    <artifactId>jquery</artifactId>
    <version>3.5.1</version>
</dependency>

/**访问当前项目的任何资源(静态资源文件夹)

"/":当前项目的根路径
"classpath:/META-INF/resources/",
"classpath:/resources/", 
"classpath:/static/", 
"classpath:/public/

以什么样的路径访问静态资源

spring.mvc.static-path-pattern=/static/**
Spring Boot 2.3要在配置文件配置静态资源访问路径

欢迎页,静态资源文件夹下所有的index.html页面;被”/**“映射

所有的**/favicon.ico都是在静态资源文件下找

模板引擎

Thymeleaf

语法更简单,功能更强大

引入Thymeleaf

<!--模板引擎-->
<dependency>
    <groupId>org.springframework.boot</groupId>
    <artifactId>spring-boot-starter-thymeleaf</artifactId>
</dependency>

@ConfigurationProperties(prefix = "spring.thymeleaf")
public class ThymeleafProperties {

    private static final Charset DEFAULT_ENCODING = StandardCharsets.UTF_8;
    //只要我们把html页面放在classpath:/templates/,thymeleaf就能自动渲染
    public static final String DEFAULT_PREFIX = "classpath:/templates/";

    public static final String DEFAULT_SUFFIX = ".html";

    /**
     * Whether to check that the template exists before rendering it.
     */
    private boolean checkTemplate = true;

导入thymeleaf的名称空间
<html xmlns:th="http://www.thymeleaf.org">

语法

参考thymeleaf手册

SpringMVC自动配置

Spring Boot自动配置好了SpringMVC

以下是SpringBoot对SpringMVC的默认

The auto-configuration adds the following features on top of Spring’s defaults:

  • Inclusion of ContentNegotiatingViewResolver and BeanNameViewResolver beans.

    • 自动配置了ViewResolver(视图解析器:根据方法的返回值得到视图对象(View)视图对象决定如何渲染,是转发还是重定向)
    • ContentNegotiatingViewResolver符合所有的视图解析器的
    • 如何定制:我们可以给容器中添加一个视图解析器@Bean;自动将其组合进来
    • 如何验证是否添加进来了-搜索DispatcherServlet-doDispatch-在这打断点,用debug方式运行
    • 随便请求一个页面可以看到DispatcherServlet的viewResolvers里面已经包含了我们自定义的视图解析器
  • Support for serving static resources, including support for WebJars (covered later in this document)).静态资源文件夹路径,webjars

  • Automatic registration of Converter, GenericConverter, and Formatter beans.

    • Converter:转换器 类型转换使用
    • Formatter:格式化器日期的转换
  • Support for HttpMessageConverters (covered later in this document).

    • HttpMessageConverters:SpringMVC用来转换Http请求和响应的;User–Json
  • Automatic registration of MessageCodesResolver (covered later in this document).

    • 定义错误代码生成规则的
  • Static index.html support.(静态首页访问)

  • Custom Favicon support (covered later in this document).(favicon.ico)

  • Automatic use of a ConfigurableWebBindingInitializer bean (covered later in this document).

    • 我们可以配置一个ConfigurableWebBindingInitializer来替换默认的

      初始化WebDataBinder;
      请求数据===JavaBean

If you want to keep those Spring Boot MVC customizations and make more MVC customizations (interceptors, formatters, view controllers, and other features), you can add your own @Configuration class of type WebMvcConfigurer but without @EnableWebMvc.

使用WebMvcConfigurerAdapter扩展SpringMVC的功能

编写一个配置类(@Configuration),是WebMvcConfigurerAdapter类型;不能标注@EnableWebMvc。

既保留了所有的自动配置,也能用我们扩展的配置

//作用:请求me的时候会到success页面
@Configuration
public class MyConfig extends WebMvcConfigurerAdapter{

    @Override
    public void addViewControllers(ViewControllerRegistry registry) {
        registry.addViewController("/me").setViewName("success");
    }
}

原理:

  1. WebMvcAutoConfiguration 是SpringMVC的自动配置类

  2. 在做其他自动配置时会导入@Import(EnableWebMvcConfiguration.class)

    @Configuration(proxyBeanMethods = false)
    public static class EnableWebMvcConfiguration extends DelegatingWebMvcConfiguration implements ResourceLoaderAware {
    
    private final WebMvcConfigurerComposite configurers = new WebMvcConfigurerComposite();
    
    //从容器中获取所有WebMvcConfigurer的配置
    @Autowired(required = false)
    public void setConfigurers(List<WebMvcConfigurer> configurers) {
        if (!CollectionUtils.isEmpty(configurers)) {
        this.configurers.addWebMvcConfigurers(configurers);
            //一个参考实现,将所有的WebMvcConfigurer相关配置都来一起调用
            @Override
            public void addViewControllers(ViewControllerRegistry registry) {
                for (WebMvcConfigurer delegate : this.delegates) {
                    delegate.addViewControllers(registry);
                }
            }
        }
    }
    
  3. 容器中所有的WebMvcConfigurer都会一起起作用,包括自己写的配置类

全面接管SpringMVC

SpringBoot对SpringMVC的自动配置不需要,所有都是我们自己配,只需要在配置类中添加@EnableWebMvc

原理:

@Retention(RetentionPolicy.RUNTIME)
@Target(ElementType.TYPE)
@Documented
@Import(DelegatingWebMvcConfiguration.class)
public @interface EnableWebMvc {//这个注解上导入了DelegatingWebMvcConfiguration
}

@Configuration(proxyBeanMethods = false)
public class DelegatingWebMvcConfiguration extends WebMvcConfigurationSupport {//DelegatingWebMvcConfiguration.class又继承了WebMvcConfigurationSupport

@Configuration(proxyBeanMethods = false)
@ConditionalOnWebApplication(type = Type.SERVLET)
@ConditionalOnClass({ Servlet.class, DispatcherServlet.class, WebMvcConfigurer.class })
//容器种没有(WebMvcConfigurationSupport)这个组件的时候,这个自动配置类才生效
@ConditionalOnMissingBean(WebMvcConfigurationSupport.class)
@AutoConfigureOrder(Ordered.HIGHEST_PRECEDENCE + 10)
@AutoConfigureAfter({ DispatcherServletAutoConfiguration.class, TaskExecutionAutoConfiguration.class,
        ValidationAutoConfiguration.class })
public class WebMvcAutoConfiguration {

@EnableWebMvc将WebMvcConfigurationSupport组件导入进来;
导入的WebMvcConfigurationSupport只是SpringMVC最基本的功能;

如何修改SpringBoot的默认配置

  1. SpringBoot在自动配置很多组件的时候,先看容器中有没有用户自己配置的(@Bean,@Component)如果有就用用户配置的,如果没有才自动配置;如果有些组件可以有多个,他是将用户配置的和自己默认的组合起来
  2. 在SpringBoot种会有非常多的xxxConfigurer帮助我们进行扩展配置

登陆页面

 //所有的WebMvcConfigurerAdapter组件都会一起起作用
@Bean//将组件注册到容器中
public WebMvcConfigurerAdapter webMvcConfigurerAdapter(){
    WebMvcConfigurerAdapter adapter = new WebMvcConfigurerAdapter() {
        @Override
        public void addViewControllers(ViewControllerRegistry registry) {
            registry.addViewController("/").setViewName("login");
            registry.addViewController("/login.html").setViewName("login");
        }
    };
    return adapter;
}

国际化

  1. 编写国际化文件,抽取页面需要显示的国际化消息

  1. SpringBoot自动配置好了管理国际化资源文件的组件

    @Configuration(proxyBeanMethods = false)
    @ConditionalOnMissingBean(name = AbstractApplicationContext.MESSAGE_SOURCE_BEAN_NAME, search = SearchStrategy.CURRENT)
    @AutoConfigureOrder(Ordered.HIGHEST_PRECEDENCE)
    @Conditional(ResourceBundleCondition.class)
    @EnableConfigurationProperties
    public class MessageSourceAutoConfiguration {

    private static final Resource[] NO_RESOURCES = {};

    @Bean
    @ConfigurationProperties(prefix = “spring.messages”)
    public MessageSourceProperties messageSourceProperties() {

    return new MessageSourceProperties();
    

    }

    @Bean
    public MessageSource messageSource(MessageSourceProperties properties) {

    ResourceBundleMessageSource messageSource = new ResourceBundleMessageSource();
    if (StringUtils.hasText(properties.getBasename())) {
        //设置国际化资源文件的基础名
        messageSource.setBasenames(StringUtils
                .commaDelimitedListToStringArray(StringUtils.trimAllWhitespace(properties.getBasename())));
    }
    if (properties.getEncoding() != null) {
        messageSource.setDefaultEncoding(properties.getEncoding().name());
    }
    messageSource.setFallbackToSystemLocale(properties.isFallbackToSystemLocale());
    Duration cacheDuration = properties.getCacheDuration();
    if (cacheDuration != null) {
        messageSource.setCacheMillis(cacheDuration.toMillis());
    }
    messageSource.setAlwaysUseMessageFormat(properties.isAlwaysUseMessageFormat());
    messageSource.setUseCodeAsDefaultMessage(properties.isUseCodeAsDefaultMessage());
    return messageSource;
    

    }

  2. 去页面获取国际化的值

idea file-setting-FileEncodings-fileEncodeing将properties编码改成UTF-8,让他自动转成ascii码(只对当前项目生效)
要改默认的在file-Other Setting-DefaultSetting来修改全局默认设置

1234…6
Airthink

Airthink

The Pursuit of Happyness

58 日志
20 分类
24 标签
GitHub
© 2018 - 2022 Airthink